Creating USB installation media
One way to install new Operating Systems onto your computer is by using a USB storage device, also known as a flash drive. There is already great software available to users on different operating systems for rewriting USB drives to serve as operating system installers.
Recommended software for Windows 10 – Rufus
If you are creating USB installation media on Windows 10, especially if you are creating a Windows 10 installer, I recommend using Rufus.
Midway through the rufus homepage are download links. The portable version is a single executable file that can be stored anywhere on your device.
Once you have downloaded Rufus, launch the software by opening the start menu (Windows key) and searching for “rufus”.
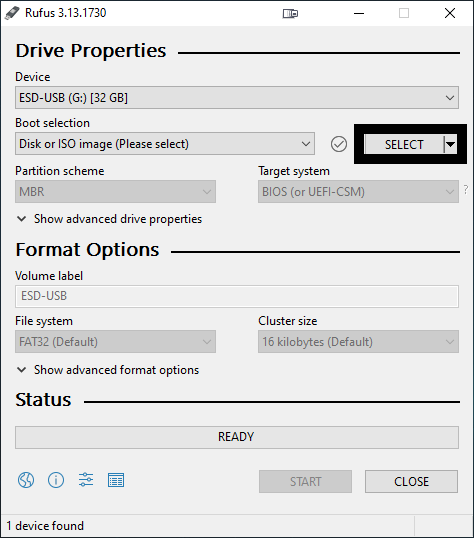
Once you launch Rufus, select your USB drive under “Device” and then click “Select” and choose a disk image file.
Rufus has some built in functionality for creating Windows 10 installation images. If you select a Windows 10 installation .iso image, you should see the following options:
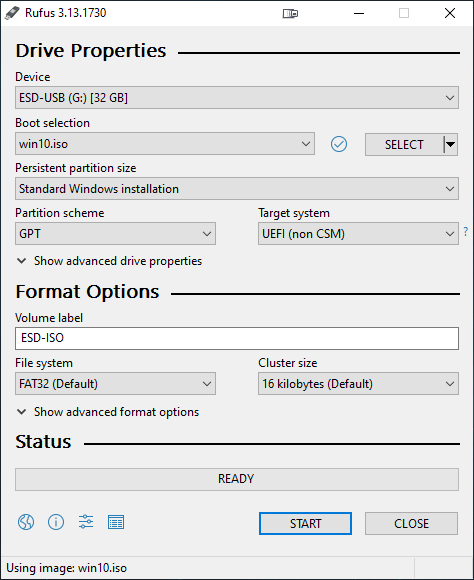
I recommend letting Rufus pick the default settings as shown here, then click “Start” at the bottom to begin rewriting the USB drive with the installation image.
Recommended Software for Linux, macOS or Windows 10 users – Etcher
I recommend etcher which will run on Linux, Windows 10 and macOS as well. You cannot use etcher to create Windows 10 installation media but it works great for creating bootable Linux installers. You could download the latest version of the standalone executable from the etcher github repository.
Installing etcher on Debian and Ubuntu based distributions
If you have a Debian based distro i.e. Debian, Ubuntu, Mint, Pop_OS, MX Linux or similar, you can install etcher by adding the Package repository to your system:
echo "deb https://deb.etcher.io stable etcher" | sudo tee /etc/apt/sources.list.d/balena-etcher.listBefore installing, add Bintray.com’s GPG key to your system:
sudo apt-key adv --keyserver hkps://keyserver.ubuntu.com:443 --recv-keys 379CE192D401AB61This key will verify that the software you download comes from the maintainer.
Update your apt cache and install:
sudo apt-get update && sudo apt-get install balena-etcher-electronNow etcher can stay up to date along with the rest of your system through apt updates.
Installing etcher on Red Hat and Fedora systems:
If on RHEL 8 or Fedora 22 or a newer version, add the DNF repository and install the rpm package:
sudo dnf config-manager --add-repo https://balena.io/etcher/static/etcher-rpm.repo && sudo dnf install balena-etcher-electronInstalling etcher on macOS:
I recommend using homebrew to install etcher. Once you have homebrew available, install with one command:
brew install balenaetcherRecent versions of macOS will block execution of all third-party software by default. To circumvent this issue, enable ‘App Store and identified developers’ in the ‘Security & Privacy’ pane of System Preferences.
System preferences can be opened from the desktop and then pressing [ Command ] + [ , ] keys. If you are still warned against running the application:
“Etcher” was blocked from opening because it is not from an identified developer.
Click ‘Open Anyway’ in the same pane of System Preferences.
Installing etcher on Windows 10:
For windows and for the other platforms, you can also download a precompiled executable for etcher from the official site. Similar to Rufus it can come in a single executable file.

Running etcher
Once you have installed etcher, launch it by pressing the Windows/Super key and searching for “etcher” in your desktop environment. If on macOS, open spotlight search instead of pressing the Command key.
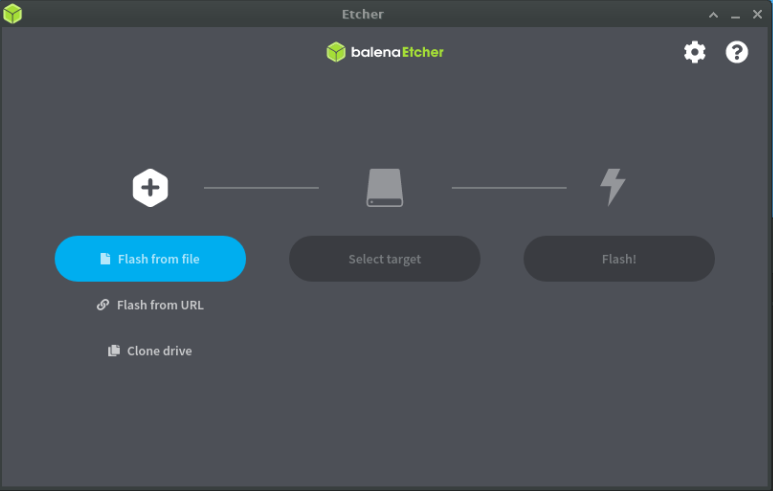
- Once you have launched etcher, similar to Rufus you can select a disk image that has a bootable installer.
- Click “Flash from file” and find the location of the disk image you downloaded.
- Alternatively, you can paste in the URL of a installation image.
- Once you have selected your image file or URL, click “Select target” and choose the USB device that is connected to your computer.
- Once you have selected your USB device, press “Flash!” and etcher will rewrite the USB device.
I can recommend etcher because of how easy it is to create installation USB drives and it can also be used to copy images onto SD cards. There are also ways to do it from the command line but personally, I wouldn’t script something like this because USB drives can change device labels and this process can be destructive to data on those devices.
Creating a bootable USB drive – macOS & Linux Shell
Linux and macOS have a command shell program known as dd that can take installation .iso images and rewrite your usb drive with these files.
Format USB drive – macOS
diskutil listIdentify your USB device from the list of disks and unmount it, replacing “N” with the disk number from the last step:
diskutil unmountDisk /dev/diskNCopy installation image with dd
sudo dd bs=4M if=location_of_image.iso of=/dev/rdiskN; syncThis will take quite a bit of time and progress can be checked with [ Ctrl ] + [ t ] . If you get an error about the block size, try bs=1M
Once this command completes, eject the disk:
sudo diskutil eject /dev/diskNFormat USB drive – Linux and Cygwin
First, determine the USB device name and unmount the partition (if there is a partition).
# Linux
lsblk
# Find the correct /dev/sdN device
sudo unmount /dev/sdN

# Cygwin
cat /proc/partitions
# Find the correct /dev/sdN device
Navigate to the directory where the image file is located. If on Cygwin, run as an admin (this is required to access USB devices). On Linux, run the command with sudo.
dd bs=4M if=image_filename.iso of=/dev/sdNThis will take quite a bit of time and progress can be checked with [ Ctrl ] + [ t ] . If you get an error about the block size, try bs=1M
Formating a USB Drive – Command Line Windows
Open an administrative shell i. e. [ Win key ] + [ x ] + [ a ]
Open the diskpart program, and identify your usb device disk number and replace with X below
diskpart
DISKPART> list disk
Disk ###  Status         Size     Free     Dyn  Gpt
DISKPART> select disk X
Disk X is now the selected disk.
DISKPART> clean
DiskPart succeeded in cleaning the disk.
DISKPART> create partition primary
DiskPart succeeded in creating the specified partition.
DISKPART> select partition 1
Partition 1 is now the selected partition.
DISKPART> format fs=fat32 quick
100 percent completed
 DiskPart successfully formatted the volume.
DISKPART> active
DiskPart marked the current partition as active.
DISKPART> exit
After this you can move files to the root of the drive.