Home Assistant
Home Assistant is an open source tool for managing IoT/smart home devices on your network and also cloud based home services. You can create automated workflows using this software such as turning on lights when something happens or turning off all lights when you leave home.
I have used Home Assistant on and off for over 5 years. It supports all of my smart home gadgets ranging from light bulbs to bluetooth sensors. I have chosen not to integrate any of my locks, doors, or security system even though it supports them. I just do not like the idea of a compromised software that can unlock my house and open my garage.
Requirements
Home Assistant offers two different installation types. Home Assistant Operating System is the recommended installation type from the maintainers.
- Home Assistant Operating System: a custom operating system designed to run the Home Assistant ecosystem on single board computers (like the Raspberry Pi) or Virtual Machines. I have multiple Raspberry Pi systems and am using this on one of them. This method will replace the Operating System where you install so make sure you have a dedicated system before taking this approach. Check the official site for their recommended install method.
- Home Assistant Container: Container-based installation of Home Assistant. You need to have a system with container orchestration like Docker. If you are not familiar with containers, check out a previous post for getting started with Docker. This method allows you to still use the resources on your server for other containers.
Home Assistant Container
This is the fastest way to get Home Assistant running but you may lose out on some things such as bluetooth and usb devices without extra configuration for the container. For more details always check the official documentation.
Ensure you have Docker ready to run a container:
docker run -d \
  --name homeassistant \
  --privileged \
  --restart=unless-stopped \
  -e TZ=America/Chicago \
  -v ./config:/config \
  -v /run/dbus:/run/dbus:ro \
  --network=host \
ghcr.io/home-assistant/home-assistant:stable- D-Bus is optional but required if you plan to use the Bluetooth integration.
- Replace
TZwith your timezone.
Once the container is running, you can configure using a browser and port 8123 on the system where the container is.
http://ip.of.server:8123
The first time the server launches, it will be in setup mode and ask you to configure a password.
Run a “development” server
The Home Assistant application itself is a Python package. While not a supported method to install, you can run home assistant if you are familiar with Python and how to run a Python environment.
Now the command to run the server is simply hass. I also specify a custom log file but this is not required, it will log to the default home Assistant directory.
pip install homeassistant

hass —log-file logs/hass.log
Note for that path to work you want to be one level above that logs directory which in this case is my working directory.
This will start a server on port 8123.
To upgrade, kill the running process for homeassistant and upgrade via pip within the virtual environment.
pip install —upgrade homeassistantConfig
The default config file will be ~/.homeassistant/configuration.yaml
On the Home Assistant Operating system, there is an addon to edit the config file in the browser. You can also edit the file using the terminal for HAOS.
Configure proxy
A reverse proxy will not work out of the box and you will likely get errors without the following config added to the Home Assistant Config.
http:
  use_x_forwarded_for: true
  trusted_proxies:
    - 1.1.1.1 # replace with your proxy server
Replace trusted_proxies with a valid proxy server that will be connecting to the hass server.
Configure prometheus metrics
To enable prometheus metrics, simply add this to the config file.
prometheus:Now to scrape the metrics you need a long lived token. Generate this in the user profile in Home Assistant UI or API. Check their docs cause this process has changed over the years.
The prometheus endpoint will be /api/prometheus and you must be authenticated.
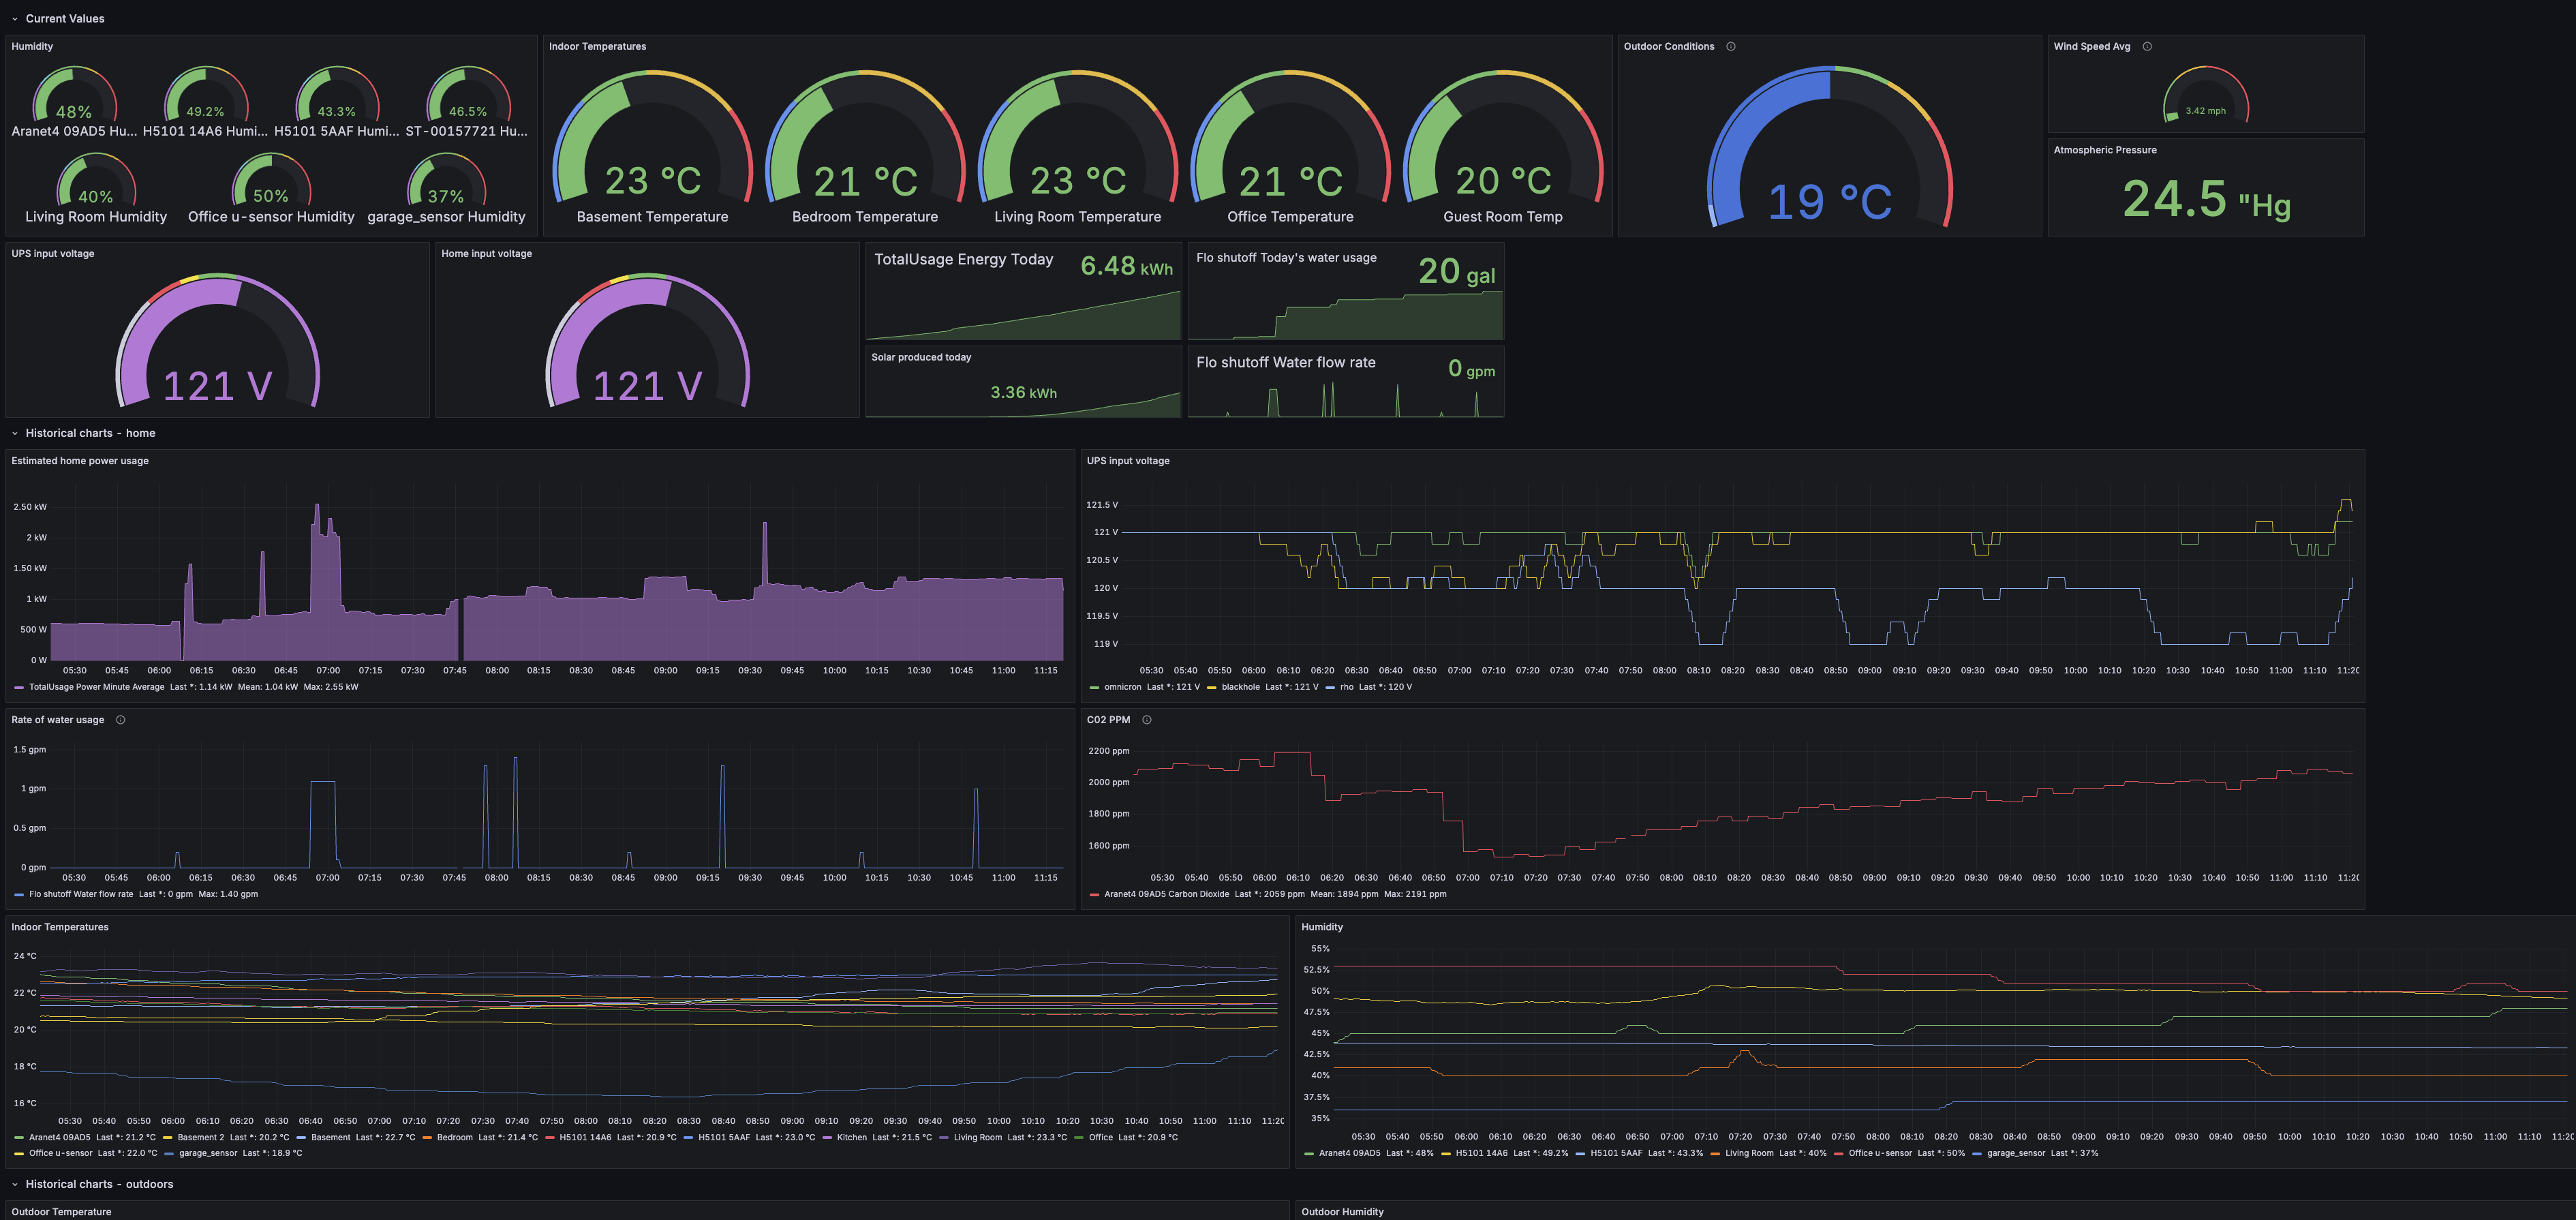
I am working on a Grafana dashboard but some of my panels are specific to the sensors and integrations in my home. Link on Github.
Closing thoughts
As I mentioned before, I do not integrate doors or locks with Home Assistant so you may wonder how I use those as I do have them in my home. For now I have decided to trust Apple HomeKit along with the Homepod ecosystem. It is so easy to add family members to an Apple home so they can control doors, locks, arm/disarm security system and they don’t need to install any apps to do this.
I do not think one method is inherently more secure over the other but Apple has shareholders that hold them accountable while Home assistant is entirely community/volunteer driven.
Also I have local generative AI in my homelab and I do not want to give it access to doors, locks, etc. Previously I setup Ollama and Home Assistant supports this as an integration (basically any HASS integration is typically easy to setup and maintain.)