Auditing Unix-based systems with Lynis
Linux systems power everything from personal workstations to enterprise servers, IoT devices to cloud infrastructure. Regardless of where your Linux machine lives or what it does, security vulnerabilities can turn a trusted system into a liability. Whether your system is exposed to the internet or tucked away on your local network, regular security audits are essential. You can also run it on a macOS system.
What is Lynis and Why Should You Care?
Lynis is an open-source security auditing tool that performs in-depth security scans on Unix-based systems like Linux, helping with system hardening, compliance testing, and vulnerability detection. It examines file permissions, service configurations, kernel settings, and hundreds of other security parameters. The tool runs on almost all Unix-based systems, including Raspberry Pi and IoT devices. It only tests the components it can find on your system, requiring no additional tool installations.
Lynis has been around since 2007 and is used by thousands daily, from system administrators and auditors to penetration testers. It remains completely free under the GPL license. I can’t believe I have not heard of this tool before, I think it could have helped at my first job years ago. As I am working on new Linux VM (virtual machine) templates, I thought I would look at this tool I had listed in my notes to take a deeper look at the configuration of my systems.
Today I will be installing and Running it on one of my Raspberry Pis. You can follow along with any Linux system.
Prerequisites
Before diving into the installation, make sure you have:
- A Linux system (Debian, Ubuntu, CentOS, Fedora, Arch, or any major distribution)
- Terminal access via SSH or direct console
- Sudo privileges (the ability to run commands as root)
- About 10-15 minutes of your time
Method 1: Installing Lynis from the Official Repository (Recommended)
The most reliable way to get Lynis on your Linux system is through the official CISOfy repository. This ensures you’ll always have access to the latest version with all the newest security checks.
To ensure you are getting the correct software, check the official documentation for instructions to install via Linux package repo for your distribution of Linux: https://packages.cisofy.com/
Verify the Installation
Check that Lynis installed correctly and see which version you have:
lynis show versionYou should see version information displayed, confirming your installation was successful:
3.1.6Method 2: Installing from GitHub (Alternative)
If you want the absolute latest version directly from the source, you can clone the GitHub repository. This method is perfect if you want to stay on the cutting edge or if the repository method doesn’t work for your setup.
Install Git (if needed)
First, ensure Git is installed.
For Debian/Ubuntu:
sudo apt install git -yFor CentOS/RHEL/Fedora:
sudo dnf install git -yClone the Lynis Repository
Navigate to where you want to store Lynis and clone the repository:
cd ~
git clone https://github.com/CISOfy/lynis.git
cd lynis
With this method, you’ll run Lynis using ./lynis instead of just lynis.
Running Your First Security Audit
Now for the exciting part. Let’s scan your Linux system and see what security issues might be lurking beneath the surface.
The Basic Audit Command
To run a security audit, use the following command:
sudo lynis audit system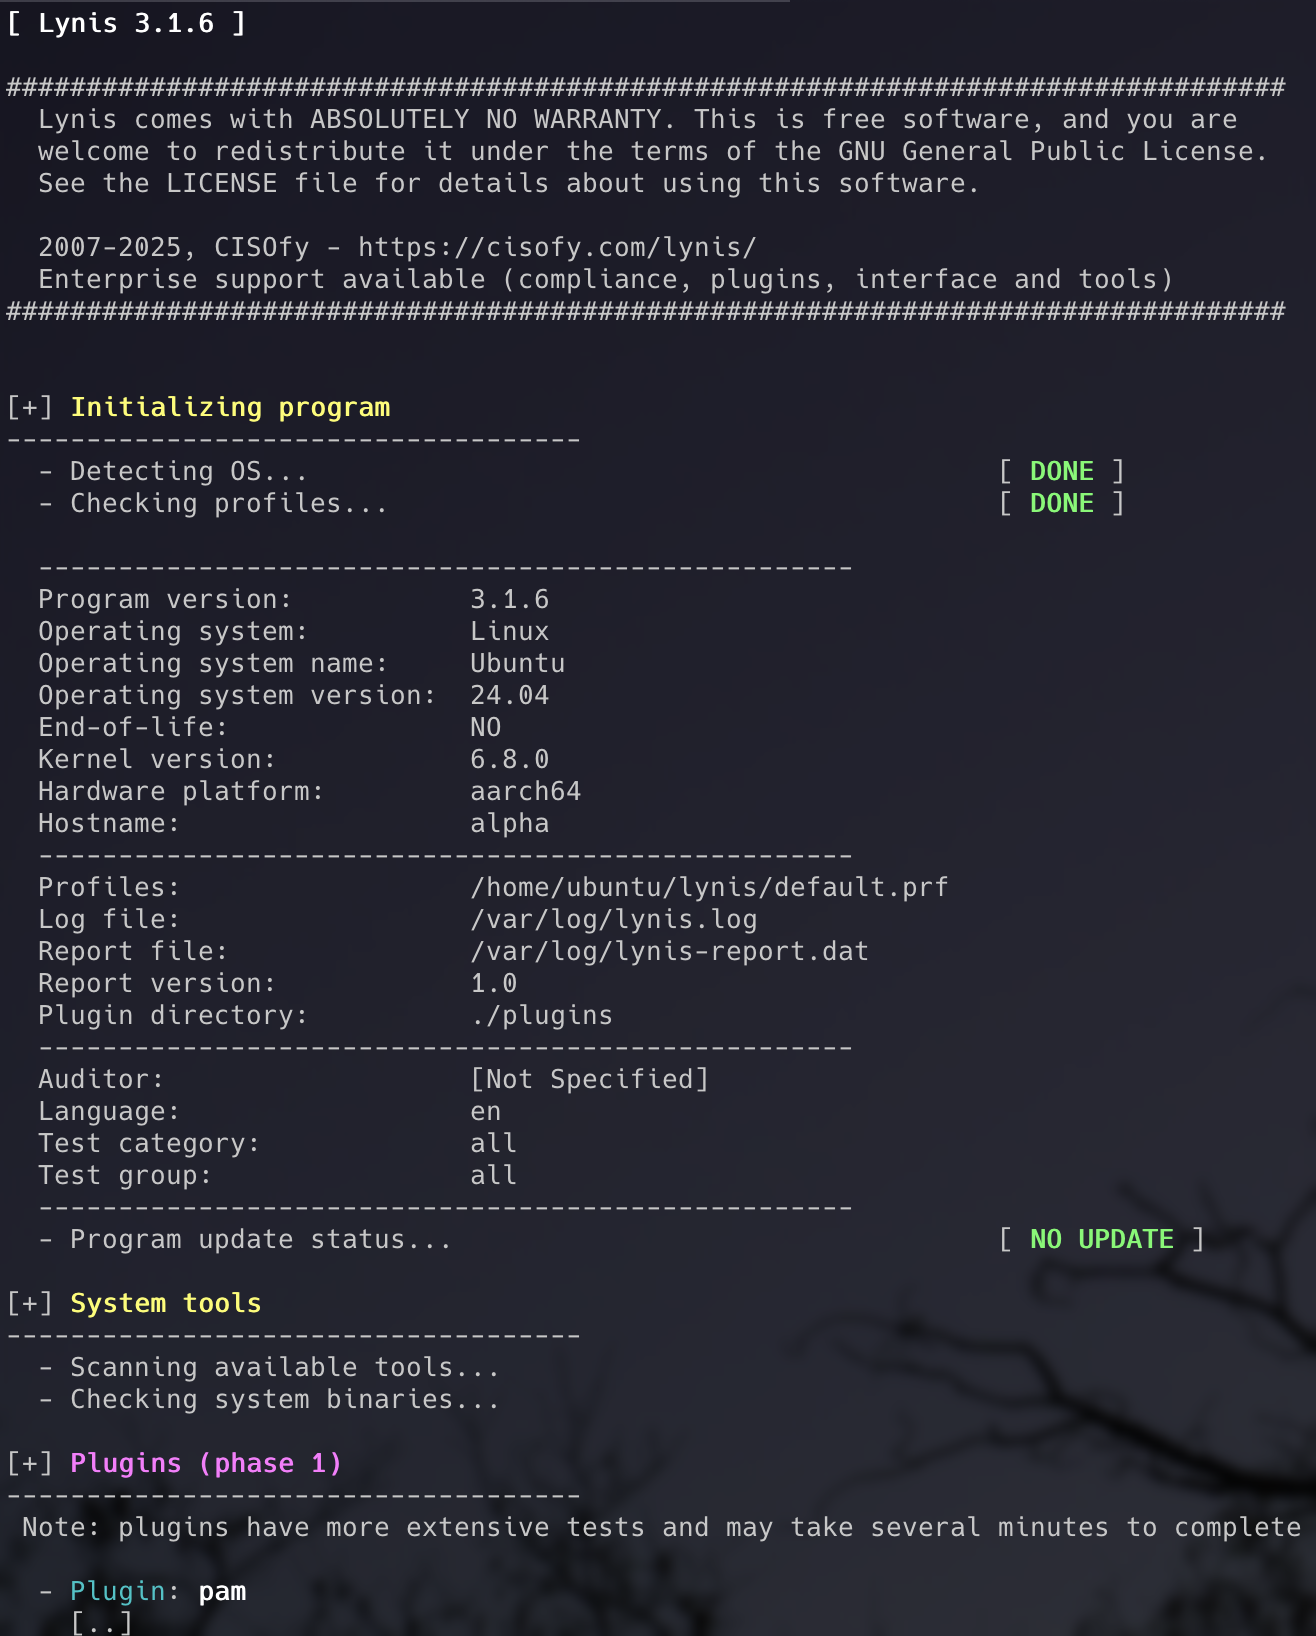
Important: You need to run Lynis with sudo privileges. Otherwise, you’ll miss many important security checks.
By default, Lynis pauses after each section, allowing you to review the results. To run a continuous scan without pauses (perfect for when you’re multitasking), add the --quick flag:
sudo lynis audit system --quickWhat Happens During a Scan?
Lynis performs hundreds of individual tests organized into categories, checking everything from kernel settings to file permissions. You’ll see it progress through various sections:
- System Tools - Identifying available binaries and utilities
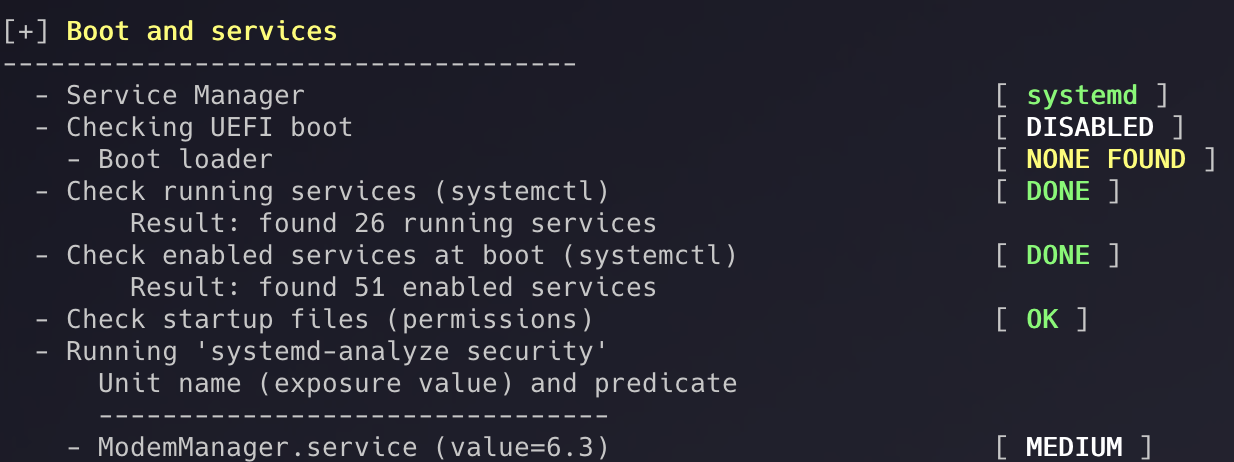
- Boot and Services - Checking service managers and startup configurations
- Kernel - Examining kernel version, modules, and security parameters
- Memory and Processes - Analyzing running processes and memory usage
- Users, Groups, and Authentication - Reviewing user accounts and authentication mechanisms
- Shells - Checking shell configurations and histories
- File Systems - Inspecting mount points and file system security
- File Permissions - Verifying critical file and directory permissions
- Insecure Services - Looking for outdated or dangerous services
- SSH Support - Auditing SSH daemon configuration
- Firewalls - Checking firewall status and rules
- Networking - Examining network configuration and open ports
Understanding Your Audit Results
Once the scan completes, Lynis presents a wealth of information. Let’s break down what you’re seeing.
Color Coding: Your Visual Guide
Lynis uses color coding to help you quickly identify issues:
- Green - Tests passed, configuration looks good
- Yellow - Suggestions for improvement (not critical)
- Red - Warnings that require attention or unsafe configurations
- White - Informational output or neutral results
The Hardening Index: Your Security Score
At the end of every scan, Lynis assigns a Hardening Index. This is a score out of 100 that indicates how well your system is secured. A score in the 80s indicates a solid security baseline, while higher scores demonstrate excellent security posture.
Don’t panic if your first scan shows a score in the 60s or 70s. That’s actually quite common for default installations. The goal isn’t perfection, but continuous improvement.

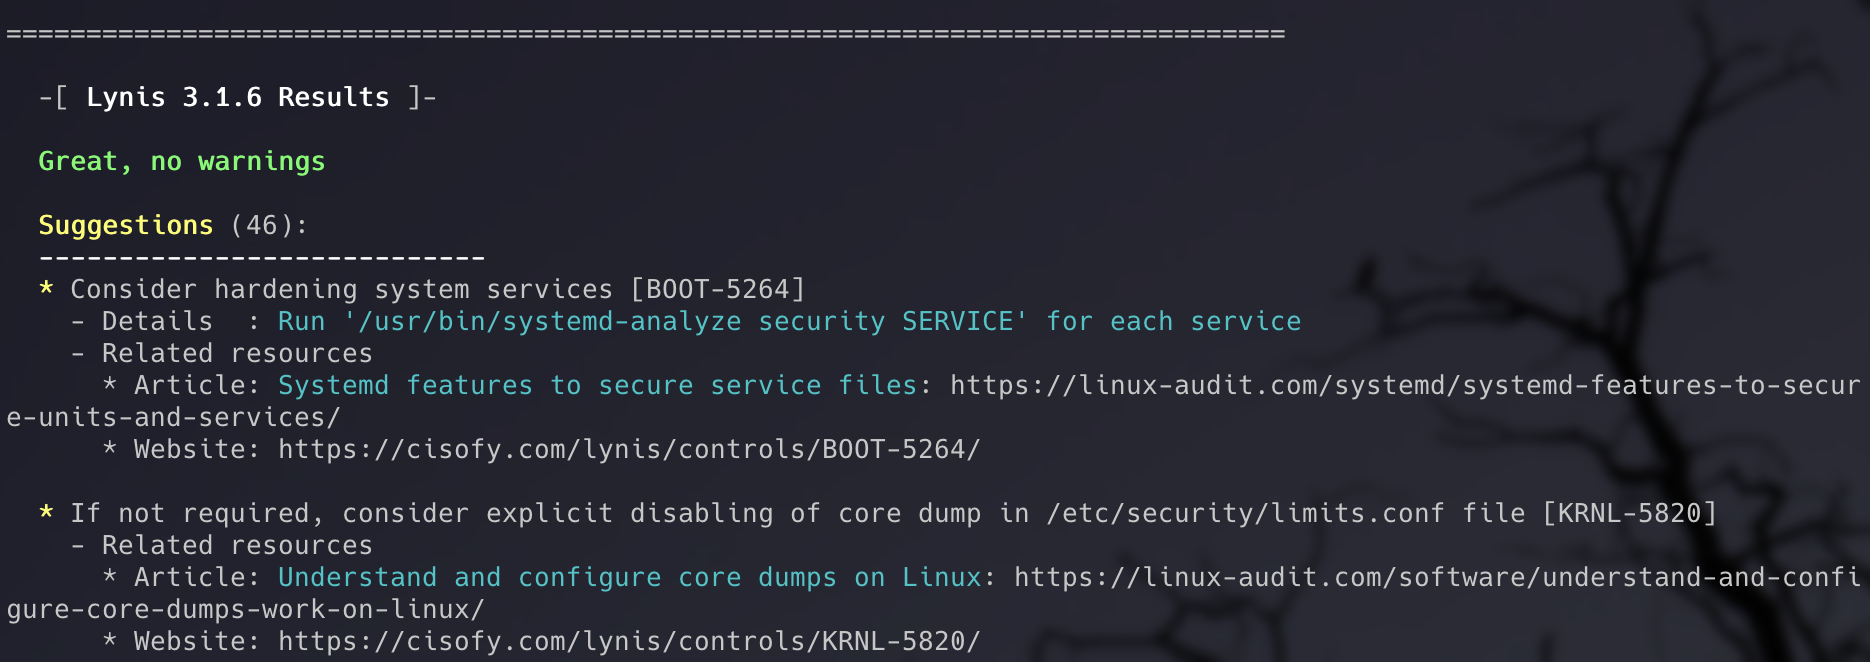
Warnings vs. Suggestions
Warnings are issues that need immediate consideration for remediation, while suggestions are healthy security practices for improved hardening.
Warnings typically include:
- Outdated software packages with known vulnerabilities
- Weak SSH configurations
- Missing security tools
- Improper file permissions on critical files
Suggestions might include:
- Installing additional security tools
- Enabling process accounting
- Configuring more restrictive firewall rules
- Implementing file integrity monitoring
Where to Find Detailed Information
Lynis doesn’t just show results on screen. It creates detailed logs for later review.
The Log File
All technical details about the scan are stored in /var/log/lynis.log. This file contains:
- Timestamps for each action
- Why specific tests were skipped or failed
- Internal test outputs
- Configuration suggestions
- Threat impact scores
View it with:
less /var/log/lynis.logThe Report File
Findings like warnings and suggestions are stored in /var/log/lynis-report.dat. This structured data file can be used for tracking progress over time or integrating with other security tools.
Getting Details on Specific Suggestions
Lynis provides detailed information about each suggestion using test ID numbers. Each recommendation links back to the official documentation explaining what it does and why it matters:
lynis show details TEST-IDReplace TEST-ID with the actual identifier from your scan (like SSH-7408 or FILE-6310).

Taking Action: Hardening Your Linux System
Now that you understand what Lynis found, it’s time to improve your security posture. Let’s walk through some common recommendations.
Example 1: Strengthening SSH Configuration
Many findings often relate to SSH daemon configuration, especially since SSH is commonly enabled on Linux servers and remote systems.
Common SSH hardening steps include:
- Disable root login:
sudo nano /etc/ssh/sshd_configFind the line PermitRootLogin and set it to no.
- Use SSH keys instead of passwords: Generate an SSH key pair and disable password authentication.
- Change the default SSH port: While security through obscurity isn’t sufficient alone, it reduces automated attacks.
After making changes, restart SSH:
For systems with systemd:
sudo systemctl restart sshExample 2: Installing a Firewall
If Lynis reports no firewall installed, you can easily set one up using UFW (Uncomplicated Firewall) on Debian/Ubuntu systems:
sudo apt install ufw -y
sudo ufw default deny incoming
sudo ufw default allow outgoing
sudo ufw allow ssh
sudo ufw enable
For RHEL/CentOS systems, use firewalld:
sudo dnf install firewalld -y
sudo systemctl start firewalld
sudo systemctl enable firewalld
sudo firewall-cmd --permanent --add-service=ssh
sudo firewall-cmd --reload
Example 3: Installing Additional Security Tools
Lynis might suggest installing tools like:
- fail2ban - Protects against brute-force attacks
- rkhunter - Rootkit detection
- aide - File integrity monitoring
Note that these tools are free to use and install but will consume additional resources of the system. This should only be a problem for edge devices like Raspberry Pi or a small cloud VPS.
For Debian/Ubuntu:
sudo apt install fail2ban rkhunter aide -yFor CentOS/RHEL:
sudo dnf install fail2ban rkhunter aide -yAutomating Regular Audits
Security isn’t a one-time event. You should perform regular audits to catch new vulnerabilities and configuration drift.
Setting Up a Cron Job
You can automate Lynis audits using cron jobs. This runs the audit automatically at scheduled intervals.
Edit your crontab:
sudo crontab -eAdd a line to run Lynis daily at 2 AM:
0 2 * * * /usr/bin/lynis audit system --cronjob --quiet > /var/log/lynis_daily.log 2>&1The --cronjob and --quiet options are specifically designed for automated runs, producing minimal output and focusing on warnings.
Advanced Tips and Tricks
Skipping Specific Tests
If certain tests are too strict for your system’s role, you can disable them using a custom profile. Create /etc/lynis/custom.prf:
sudo nano /etc/lynis/custom.prfAdd lines to skip specific tests:
# Skip Apache check (not running web server)
skip-test=HTTP-6702

# Skip nginx check
skip-test=HTTP-6622
Running Specific Test Categories
You can run tests for specific categories instead of a full system audit:
sudo lynis audit system --tests-category firewallAvailable categories include: kernel, authentication, networking, storage, filesystems, and more.
Viewing All Available Tests
To see what tests Lynis can perform:
lynis show tests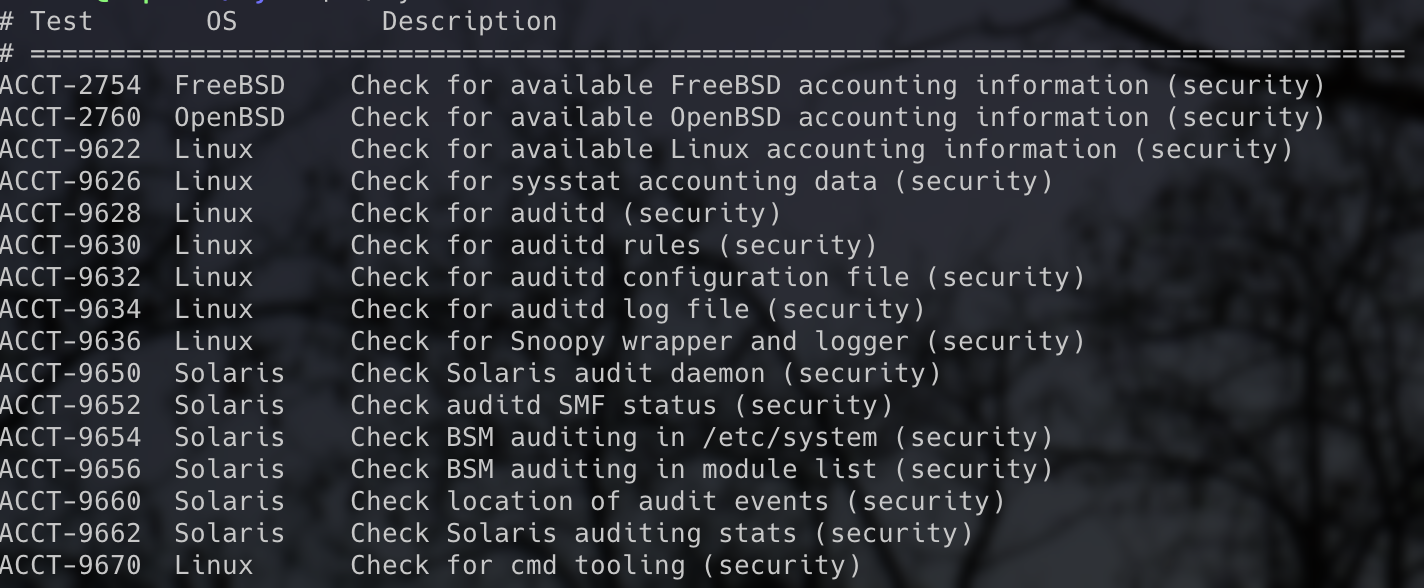
Generating Reports in Different Formats
Lynis can output reports in various formats for integration with other tools:
sudo lynis audit system --report-file /tmp/lynis-report.txtImportant Considerations for Different Use Cases
Home Systems vs. Production Servers
Many Lynis warnings are more applicable to public-facing servers than home systems on private networks. If your Linux machine only operates on your local network and isn’t accessible from the internet, some recommendations may be overly cautious for your use case.
Use your judgment: if a suggestion doesn’t make sense for your specific setup, it’s okay to skip it. The goal is reasonable security, not paranoia.
Performance Impact
The Lynis scan itself is lightweight and shouldn’t significantly impact system performance. However, implementing all recommendations can consume CPU and memory, particularly resource-intensive tools like file integrity monitors. Prioritize the most important security measures for your use case.
Keeping Lynis Updated
The Lynis project receives frequent updates to detect the most recently uncovered exploits and attack vectors. Keep it current.
For repository installations:
sudo apt update && sudo apt upgrade lynisOr on RPM systems:
sudo dnf update lynisFor GitHub installations:
cd ~/lynis
git pull
What Lynis Doesn’t Do
It’s important to understand Lynis’s limitations:
- Lynis doesn’t fix issues automatically - It reports problems but leaves remediation to you
- It’s not a vulnerability scanner - software like OpenVAS or Nessus are better for that
- It won’t protect against zero-day exploits - No tool can do that
- It doesn’t replace proper security practices - Strong passwords, regular updates, and good judgment remain essential
Lynis simply lets you know what needs to be addressed. The actual fixing is up to you.
Troubleshooting Common Issues
Permission Denied Errors
Always run Lynis with sudo. Without elevated privileges, many security checks will be skipped.
“Lynis: command not found”
If you installed from GitHub, make sure you’re in the correct directory and use an absolute path instead of just lynis.
Old Version in Repository
The version available in default distribution repositories may be outdated. Use the official CISOfy repository (Method 1) or GitHub (Method 2) for the latest version.
Tests Being Skipped
Some tests require specific software to be installed. If a test is skipped, check the log file to see why. Often it’s because the relevant software (like a web server or database) isn’t present on your system.
Wrapping Up: Your Path to a More Secure Linux System
You’ve now equipped your Linux system with one of the most respected security auditing tools in the open-source world. Lynis offers comprehensive auditing and improvement suggestions, with detailed reports that make it easier to understand system health and prioritize what needs attention.
Start by addressing the most critical warnings, gradually implement suggested improvements, and run regular audits to ensure your system stays secure over time.
Potential Next Steps
- Run your first audit and review the results
- Address any critical warnings immediately
- Tackle high-priority suggestions
- Set up automated monthly or weekly audits
- Re-scan after making changes to see your improved Hardening Index
- Document your security baseline and track improvements over time
- Join the Lynis community to stay updated on best practices
Additional Resources
- Official Lynis documentation: https://cisofy.com/lynis/
- GitHub repository: https://github.com/CISOfy/lynis
- Community forums and support channels
- CISOfy blog for security best practices
- Linux hardening guides for your specific distribution
New disclaimer I am adding: I used an LLM to help create this post but afterwards I spent more than an hour editing it to the final form.