Netbox
If you’re like me, your home network probably started simple. Maybe it was just a router and a few devices. Fast forward a few years, and suddenly you’re managing VLANs, static IP assignments, multiple Raspberry Pis, and trying to remember which port on which switch connects to what. Sound familiar?
Enter NetBox: an open-source infrastructure resource modeling (IRM) application that’s like having a living blueprint of your entire network. Originally developed by the network engineering team at DigitalOcean, NetBox was designed to solve a problem we can all relate to: keeping track of everything in your infrastructure before the chaos takes over.
What Exactly Is NetBox?
Think of NetBox as a single source of truth for your network. It’s part inventory system, part documentation tool, and part IP address manager (IPAM). Instead of maintaining scattered spreadsheets or trying to remember which device has which IP address, NetBox gives you a centralized, web-based interface to document everything.
NetBox helps you track:
- Devices and their connections: Every router, switch, server, and Raspberry Pi in your network
- IP Address Management (IPAM): A system for organizing and tracking IP addresses. Instead of guessing which static IPs you’ve assigned or checking spreadsheets, NetBox knows exactly which addresses are allocated and to what.
- VLANs and network segmentation: Document your IoT VLAN, guest network, and everything in between
- Cables and physical connections: Know exactly which port connects to what
- Power circuits and rack layouts: Perfect if you’re running a home lab
Like many tools I self-host, it is free and open-source.
Why Use NetBox for a Home Network?
NetBox offers substantial benefits for home networks once they reach a certain complexity. You might initially wonder if NetBox is overkill for a home setup. The answer becomes clear once you have multiple VLANs and dozens of devices.
Here’s why NetBox is worth it for home networks:
It saves time during troubleshooting. When something breaks at 11 PM, you don’t want to SSH into multiple devices to figure out your network topology. NetBox gives you instant visibility. (Unless netbox is also down).
It prevents IP conflicts. As your network grows, manually tracking IP assignments becomes impossible. NetBox’s IPAM features ensure you never accidentally assign the same static IP twice.
It documents your “why”. Six months from now, will you remember why you set up that specific VLAN or firewall rule? NetBox lets you add context and notes to everything. You can use it as a source of truth instead of consulting scattered notes or trying to remember everything you have set up.
It’s a safety net. If you need to rebuild your network or if you actually have more than 0 users, having comprehensive documentation is invaluable.
If you are in a tech career
If you are in the tech industry and your team does not already use an IPAM or if you work in a Data Center, this tool could be useful in your career. If you put this project on your resume you can set yourself apart from a lot of peers and demonstrate you know how to stay organized and able to implement a complicated self-hosted system.
My Network: A Real-World Example
Before we dive into setup, let me go over what I will be documenting in NetBox.
Core Network Infrastructure:
- UniFi Dream Machine
- UniFi switches (managing multiple VLANs)
- UniFi access points
Servers and Storage:
- Synology NAS (primary storage)
- Ubuntu backup NAS
- Multiple Raspberry Pis spread across VLANs
- Linux micro desktops acting as Proxmox hosts
- Linux servers with GPUs
- Mac Mini m4
Network Segmentation:
- Main VLAN: Raspberry Pis including two acting as DNS servers (running Adguard Home)
- IoT/Personal VLAN: Smartphones, laptops, and smart home IoT devices
- Guest/Untrusted VLAN: Guest access and cloud-only IoT devices (WiFi only, isolated from the main network)
This is exactly the kind of setup that benefits from proper documentation. Let’s get NetBox running and start documenting it.
Installing NetBox with Docker
The easiest way to get NetBox running is with Docker. This approach works on any system that can run Docker. You can use your NAS, a Raspberry Pi, or a dedicated server.
Prerequisites
You’ll need:
- A system with Docker and Docker Compose installed. If you are not familiar with Docker or containers, check out a previous post
- At least 2GB of RAM available
- Several GB of disk space available
Quick Installation
Download the official Docker Compose configuration using Git:
git clone -b release https://github.com/netbox-community/netbox-docker.gitReview your environment configuration in the env/ directory. There are some default passwords that you can use for testing but for an actual deployment you should set unique passwords.
For example: edit env/netbox.env and reset the secure secret key. You can generate one with a python one liner:
python3 -c "import secrets; print(secrets.token_hex(50))"Update the SECRET_KEY line in env/netbox.env.
Before starting the containers, copy the included example override file to set a port for accessing the Netbox interface.
cp docker-compose.override.yml.example docker-compose.override.ymlThis file will define that NetBox container will be forwarded on port 8000 of the host system when it starts up. You can change that port if needed.
Start NetBox:
docker compose up -dAfter a minute or two, NetBox will be accessible at http://your-server-ip:8000.
Use a command to create a new superuser to administrate the system:
docker compose exec netbox python manage.py createsuperuserFollow the prompts to set your username and password. Use these credentials to log into Netbox in a browser.
Alternative Installation Methods
If Docker isn’t your preference, NetBox can also be installed directly on Linux or via other methods. Check the official NetBox documentation for detailed instructions on bare-metal installations, Kubernetes deployments, and other options.
First Steps: Configuring Your NetBox Instance
After logging in, the first thing you’ll see is NetBox’s dashboard. Before we start adding devices, let’s set up the foundational elements.
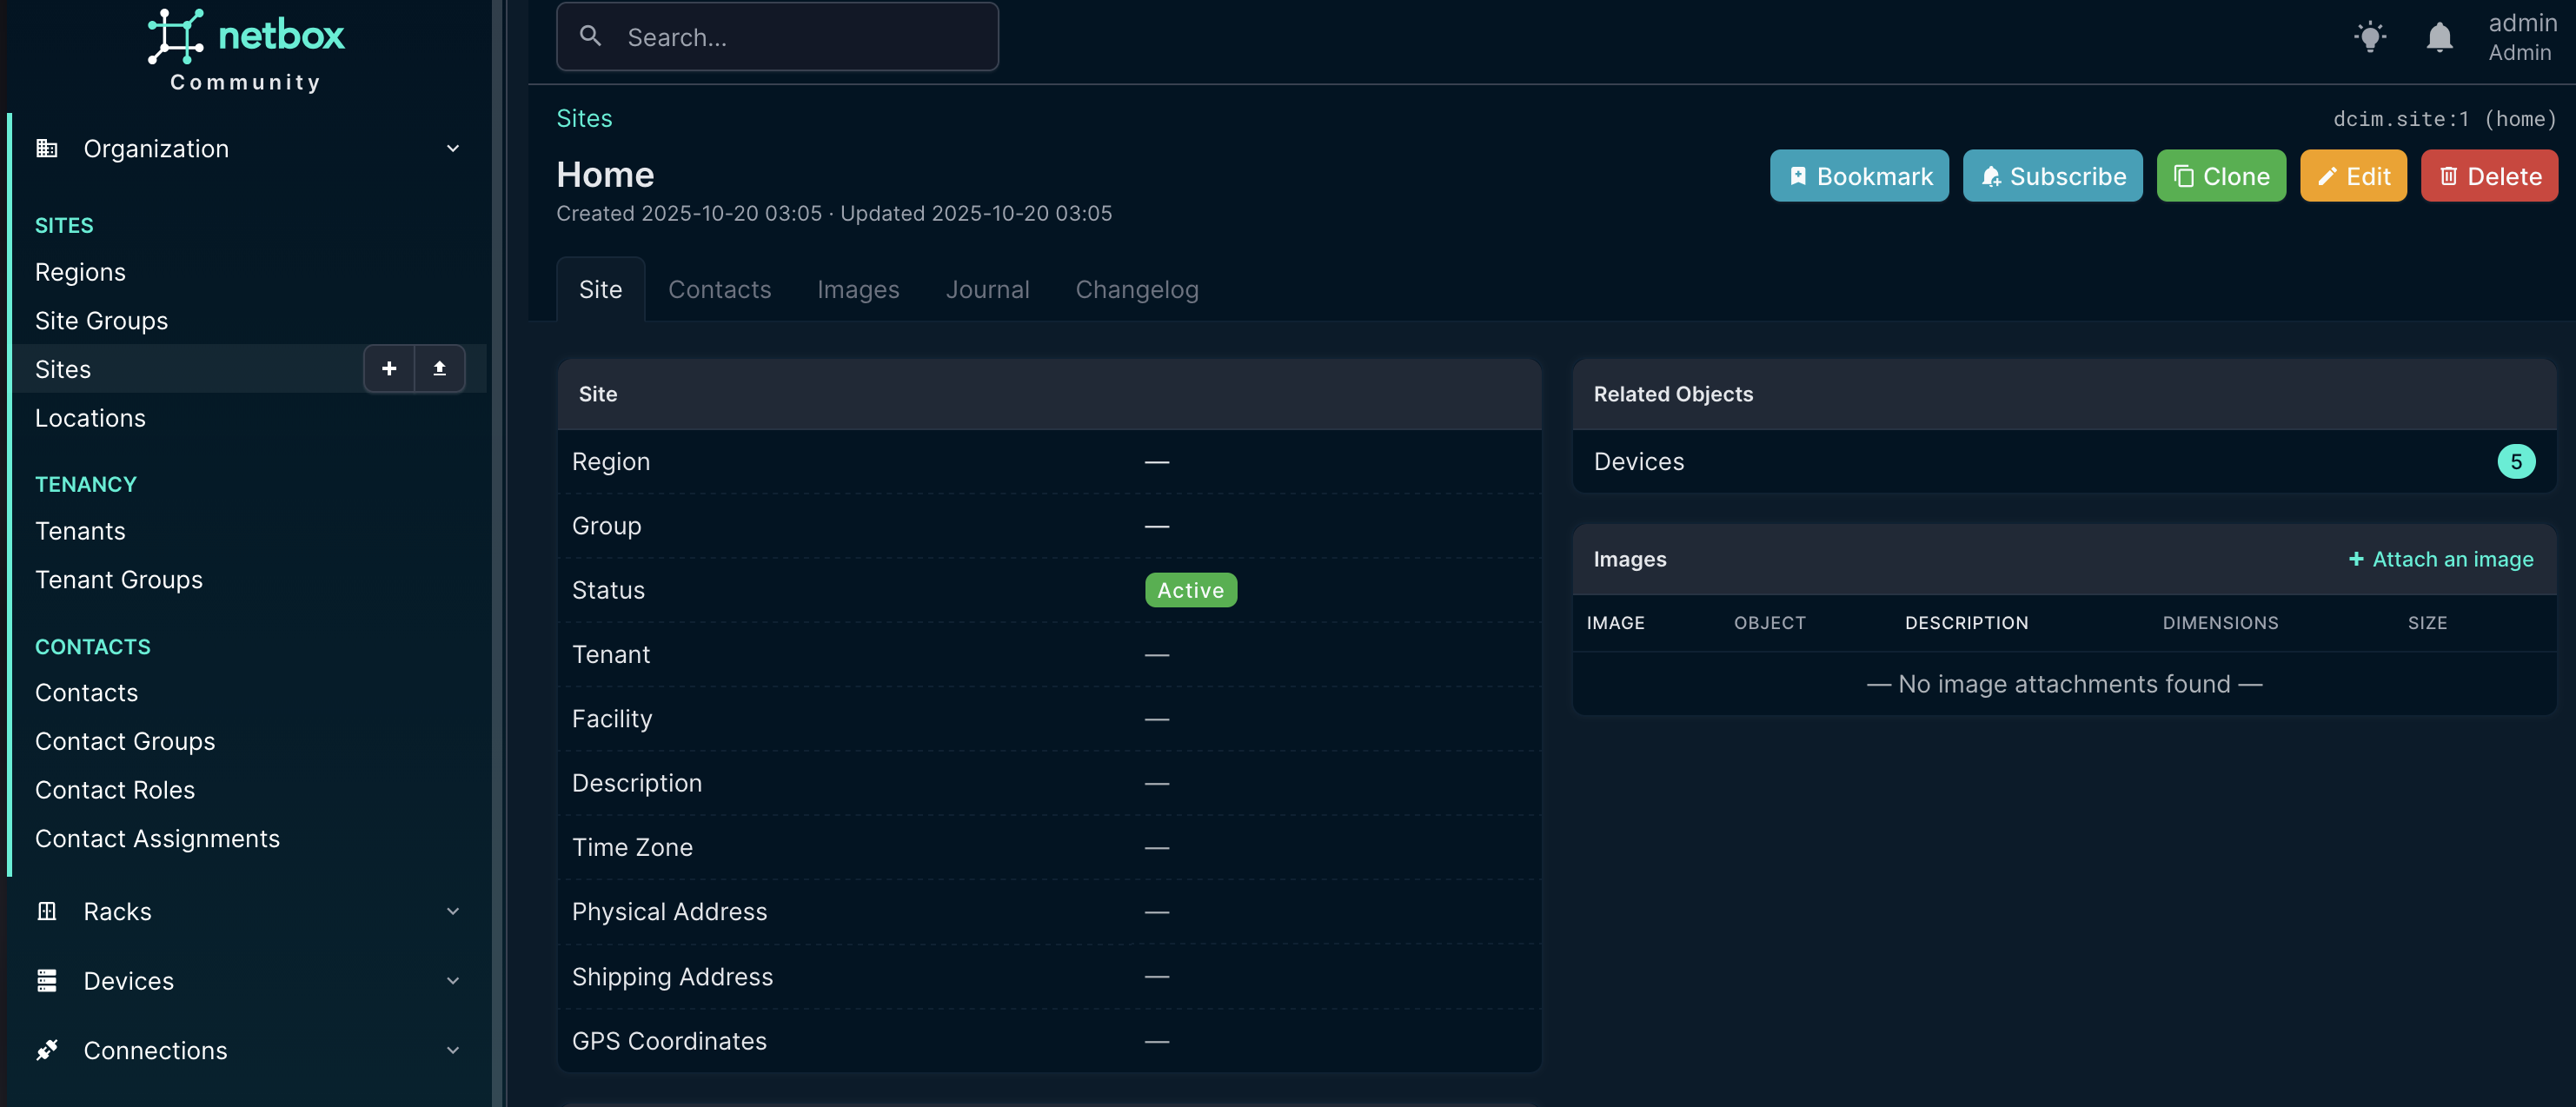
Creating a Site
Navigate to Organization in the top menu and click Sites. Think of sites as physical locations. Even for a home network, this is useful. You might have “Home,” “Garage,” or “Detached Office” as separate sites.
Click Add and create your first site:
- Name: Home
- Status: Active
Setting Up Device Roles
Device roles help categorize what each device does. Go to Devices > Device Roles and create roles for your network:
- Router (for your UniFi gateway)
- Switch (for UniFi switches)
- Access Point (for WiFi APs)
- Server (for your NAS devices)
- Compute (for Raspberry Pis)
For each role, you can assign a color that will appear throughout NetBox. This makes devices easy to identify at a glance.

Adding Manufacturers and Device Types
Before you can add specific devices, you need to define manufacturers and device types. This might seem like extra work, but it pays off with accurate documentation.
Go to Devices > Device Types > Manufacturers and add:
- Ubiquiti
- Synology
- Raspberry Pi Foundation
Or add appropriate values for your environment.
Then under Devices > Device Types, create types for your specific hardware. For example:
Pi-5:
- Manufacturer: Raspberry Pi Foundation
- Model: Pi-5
- U Height: 1 (use for rack-mounted)
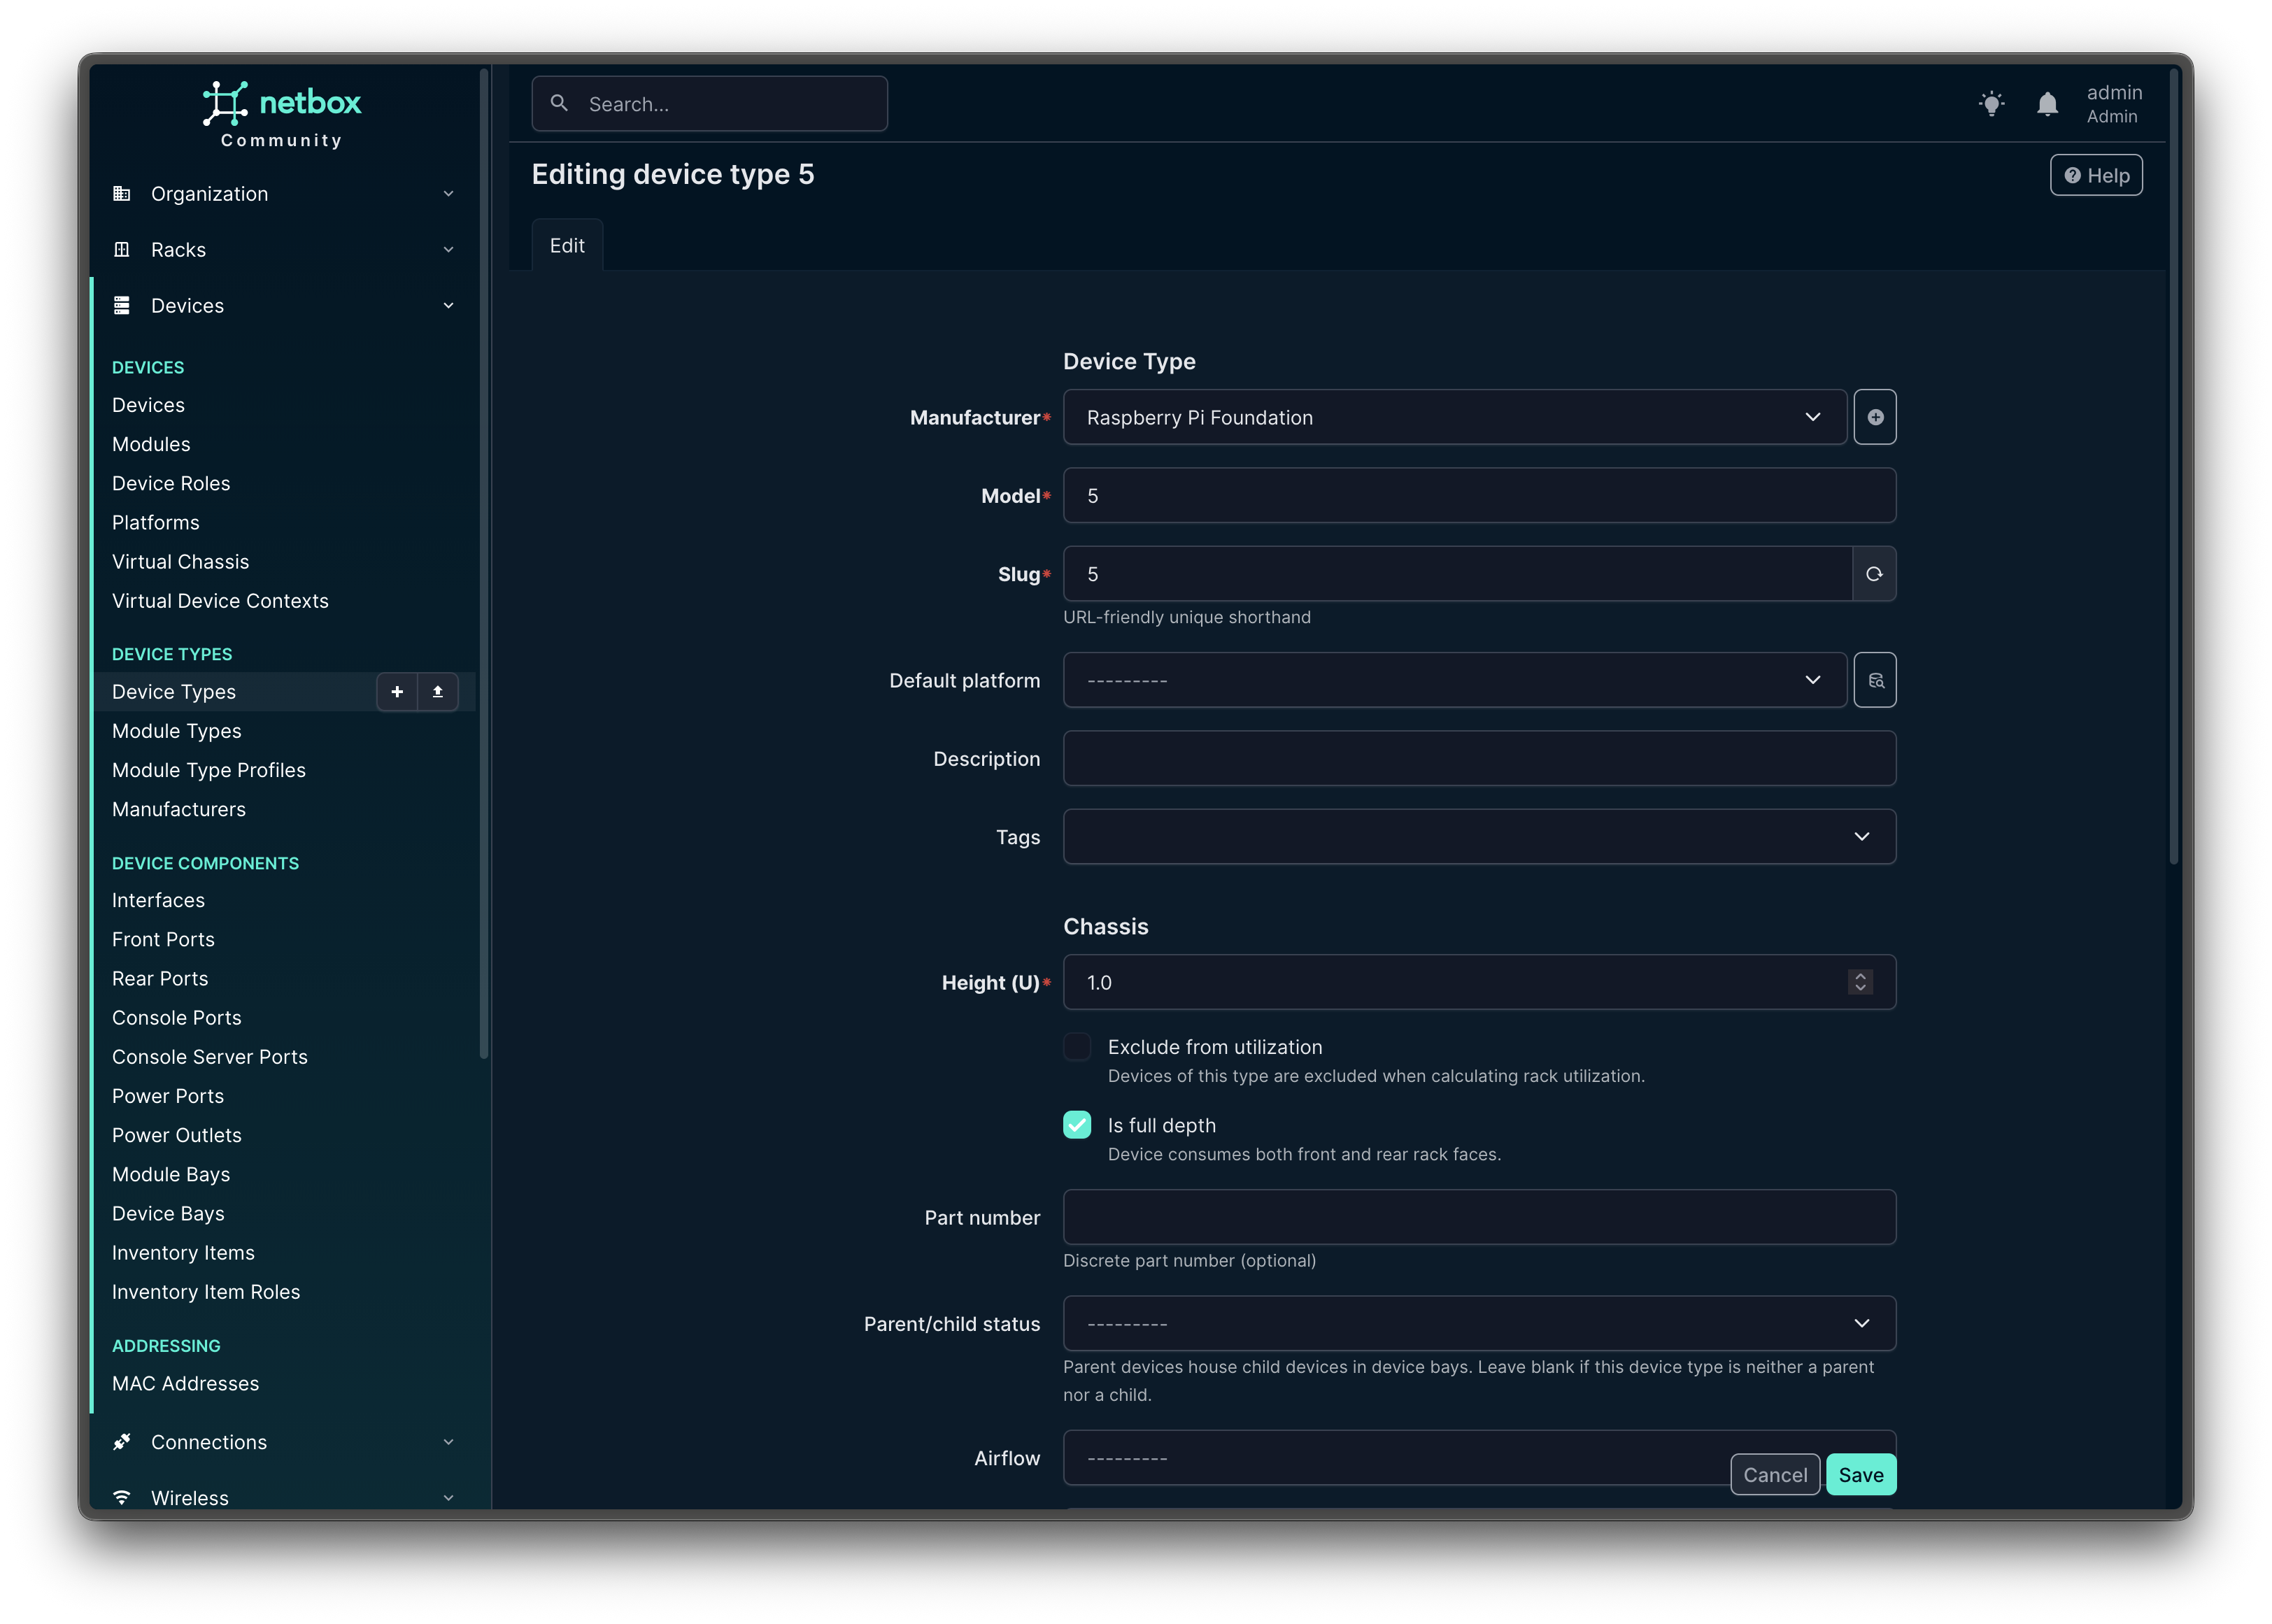
For home networks with common equipment, check if your device types already exist in NetBox’s community library before creating them manually. I started creating a bunch then realized there are detailed device specs for Ubiquiti devices. Check the Community GitHub repo: https://github.com/netbox-community/devicetype-library
Building Your Network Inventory
Now comes the satisfying but arduous part: adding all your devices to NetBox.
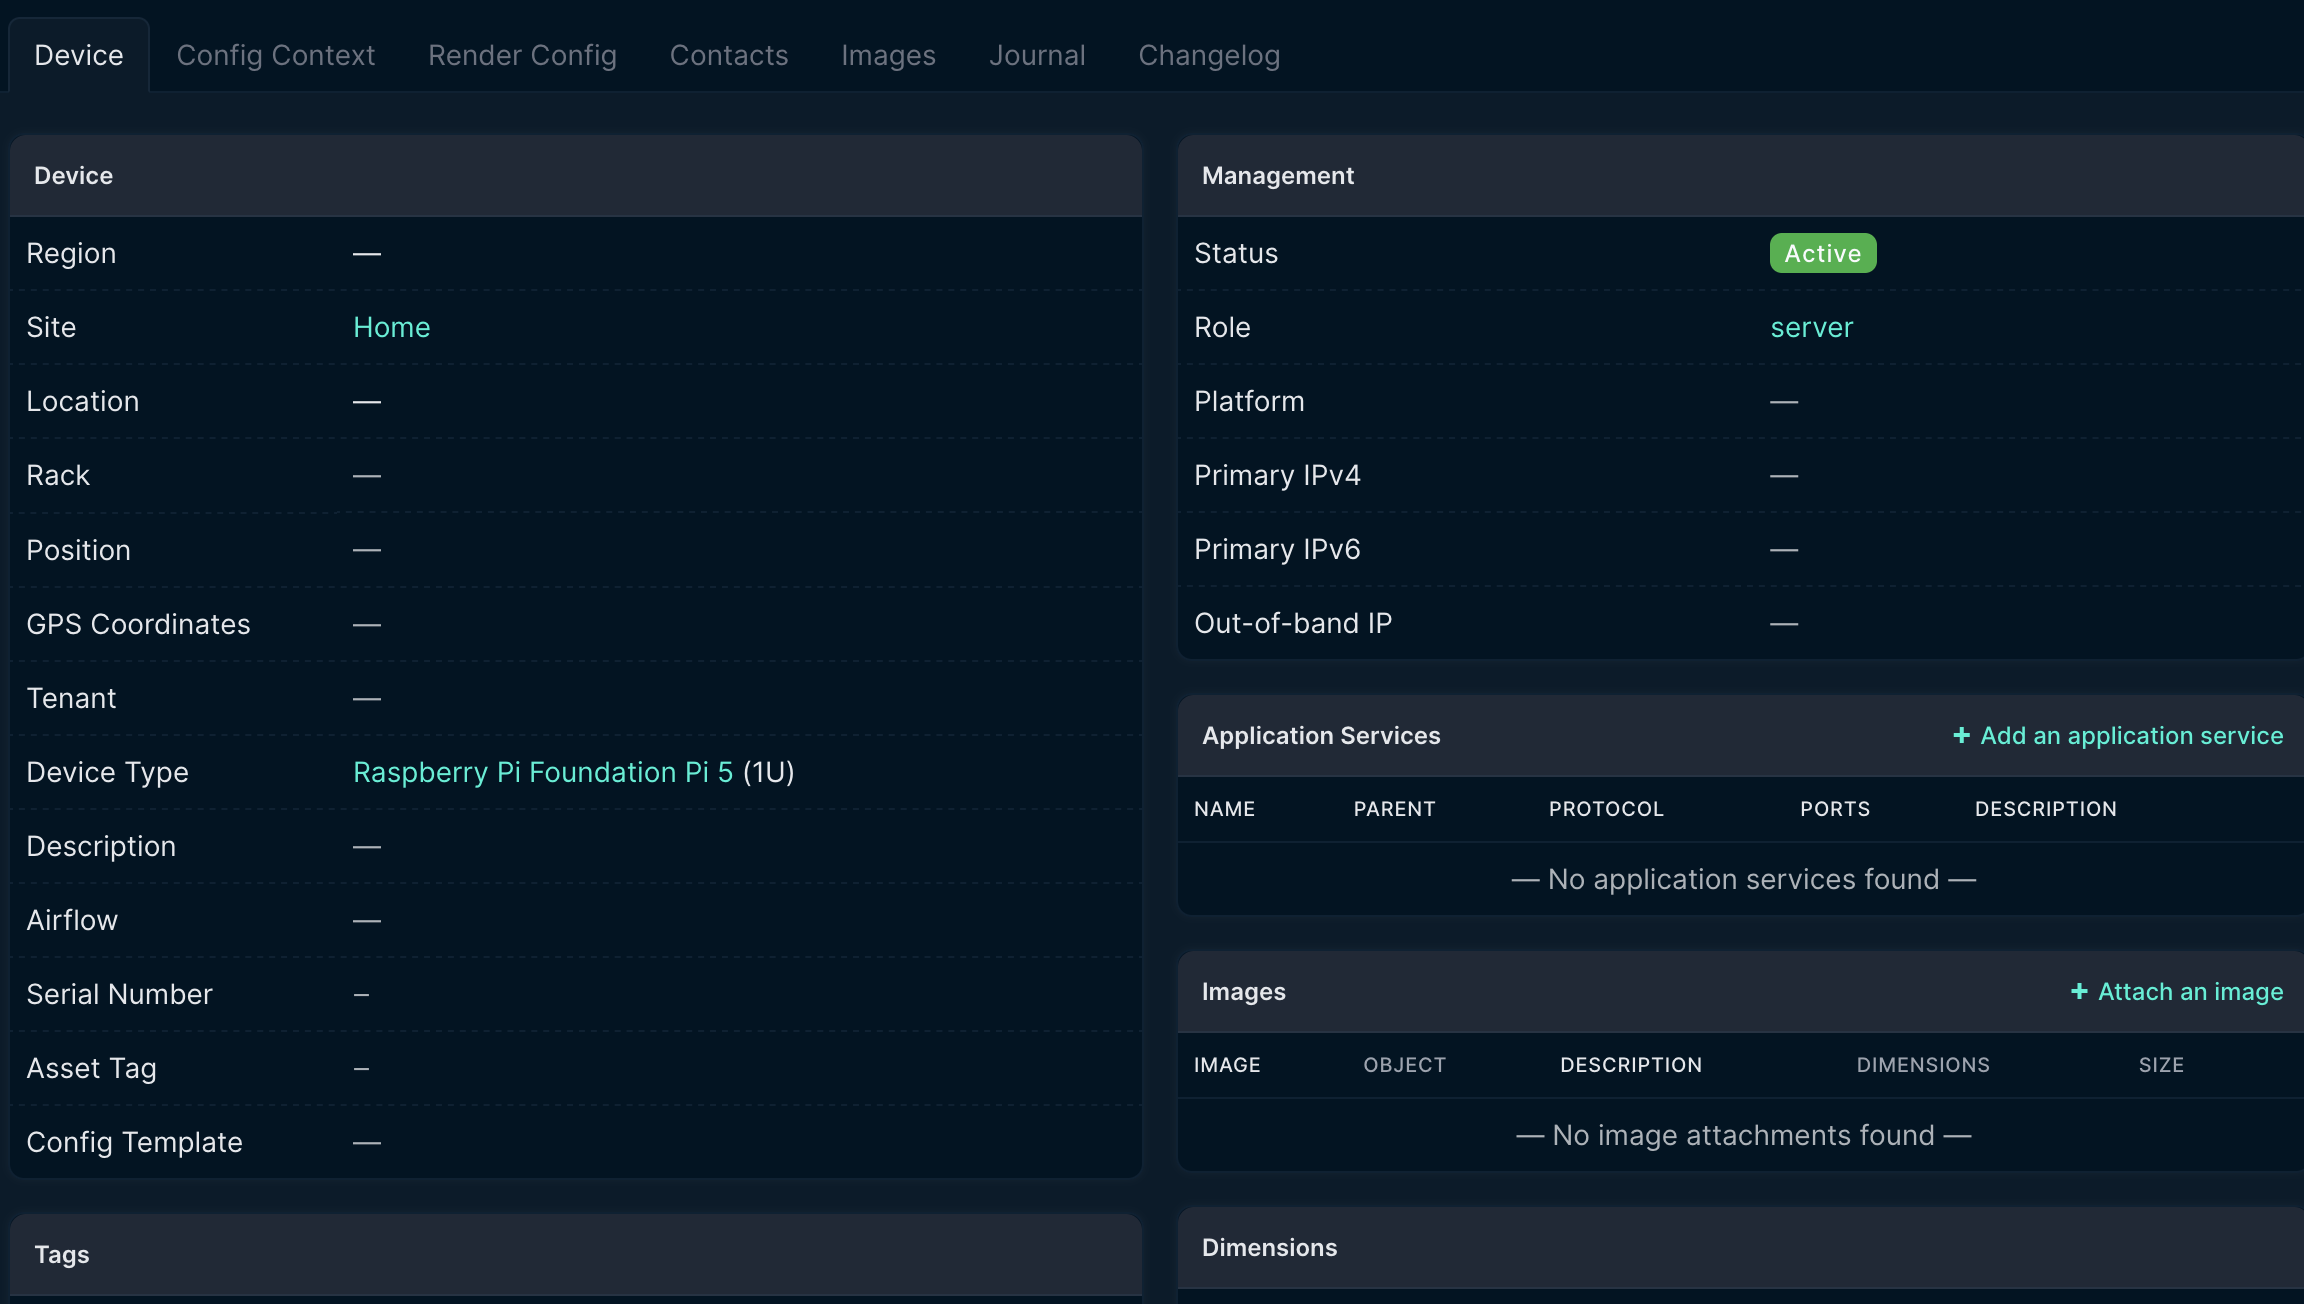
Adding a Device
Navigate to Devices > Devices and click Add.
Fill in the details:
- Name: pi5 (or whatever you call your Pi)
- Device role: server
- Device type: Pi 5
- Site: Home
- Status: Active
These are the required fields at the time of writing. This may change in future versions.
There is a lot of optional fields that you can fill out over time to provide more details about the devices that you use.
In the description or comments field, add useful details like:
- What the purpose of the device
- When it was installed
- Any special configuration notes
Add notes about what each one does. Trust me, you’ll forget what server runs your Home Assistant instance once you have more than one.
Setting Up IP Address Management (IPAM)
This is where NetBox really shines. Let’s organize an IP addressing scheme.
Regional Internet Registries (RIRs)
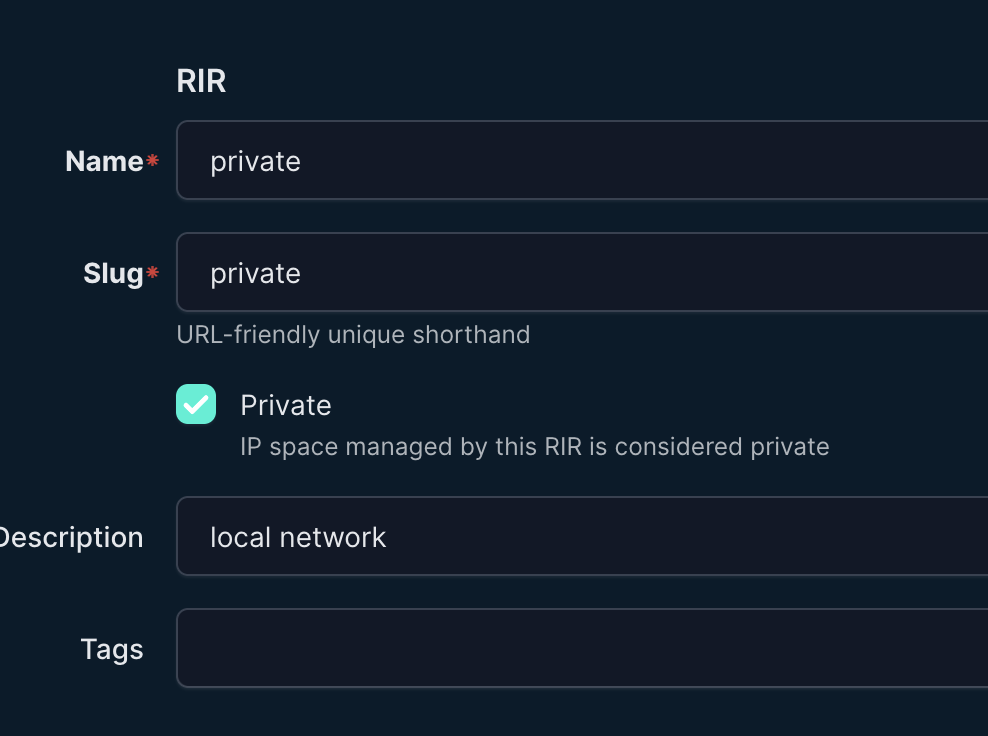
First, define an RIR as each aggregate must be assigned to one RIR. These orgs are responsible for the allocation of globally-routable address space. The five RIRs are ARIN, RIPE, APNIC, LACNIC, and AFRINIC.
This is useful for Commercial users of Netbox but for home users, just create a new RIR named “private” or something like that and mark it as private.
Go to IPAM > Aggregates > RIRs and select Add.
Tracking RIRs is useful for Commercial users of Netbox but for home users, just create a new RIR named “private” or something like that and mark it as private.
Creating Your Aggregates and Prefixes
First, define your overall IP space. Go to IPAM > Aggregates and add your home network’s private IP range. Most home networks use:
- 192.168.0.0/16
- 10.0.0.0/8
- 172.16.0.0/12
I’m using 192.168.0.0/16 for this example.
Now create prefixes for each VLAN under IPAM > Prefixes:
Note: If you do not use VLANs just define one ore more Prefixes that match your router configuration. Honestly a lot of routers are just set to DHCP and use
192.168.1.0/24
Main VLAN (VLAN 10):
- Prefix: 192.168.10.0/24
- RIR: private
- Description: Main network with servers and Raspberry Pis
IoT/Personal VLAN (VLAN 20):
- Prefix: 192.168.20.0/24
- RIR: private
- Description: IoT devices, smartphones, and laptops
Guest VLAN (VLAN 22):
- Prefix: 192.168.2.0/24
- RIR: private
- Description: Guest network and untrusted IoT devices (isolated)
Creating VLANs (Optional)
This step is optional if you leverage VLANS.
Under IPAM > VLANs, add each VLAN:
VLAN 10 (Main):
- VLAN ID: 10
- Name: Main
- Status: Active
VLAN 20 (IoT/Personal):
- VLAN ID: 20
- Name: IoT-Personal
VLAN 30 (Guest):
- VLAN ID: 30
- Name: Guest-Isolated
Documenting Device Connections
One of NetBox’s most powerful features is tracking how devices physically connect to each other.
Adding Interfaces
Each device needs interfaces defined before you can connect them. This is where you may have to spend a lot of time. Do not try to do it all at once is my advice.
Go to your router device and click on it, then select the Interfaces tab.
Add interfaces for:
- WAN port
- LAN ports
- Each configured network connection
For your UniFi switches, add all the physical ports. Yes, this is tedious for a 24-port switch. But you only do it once, and it’s worth it.
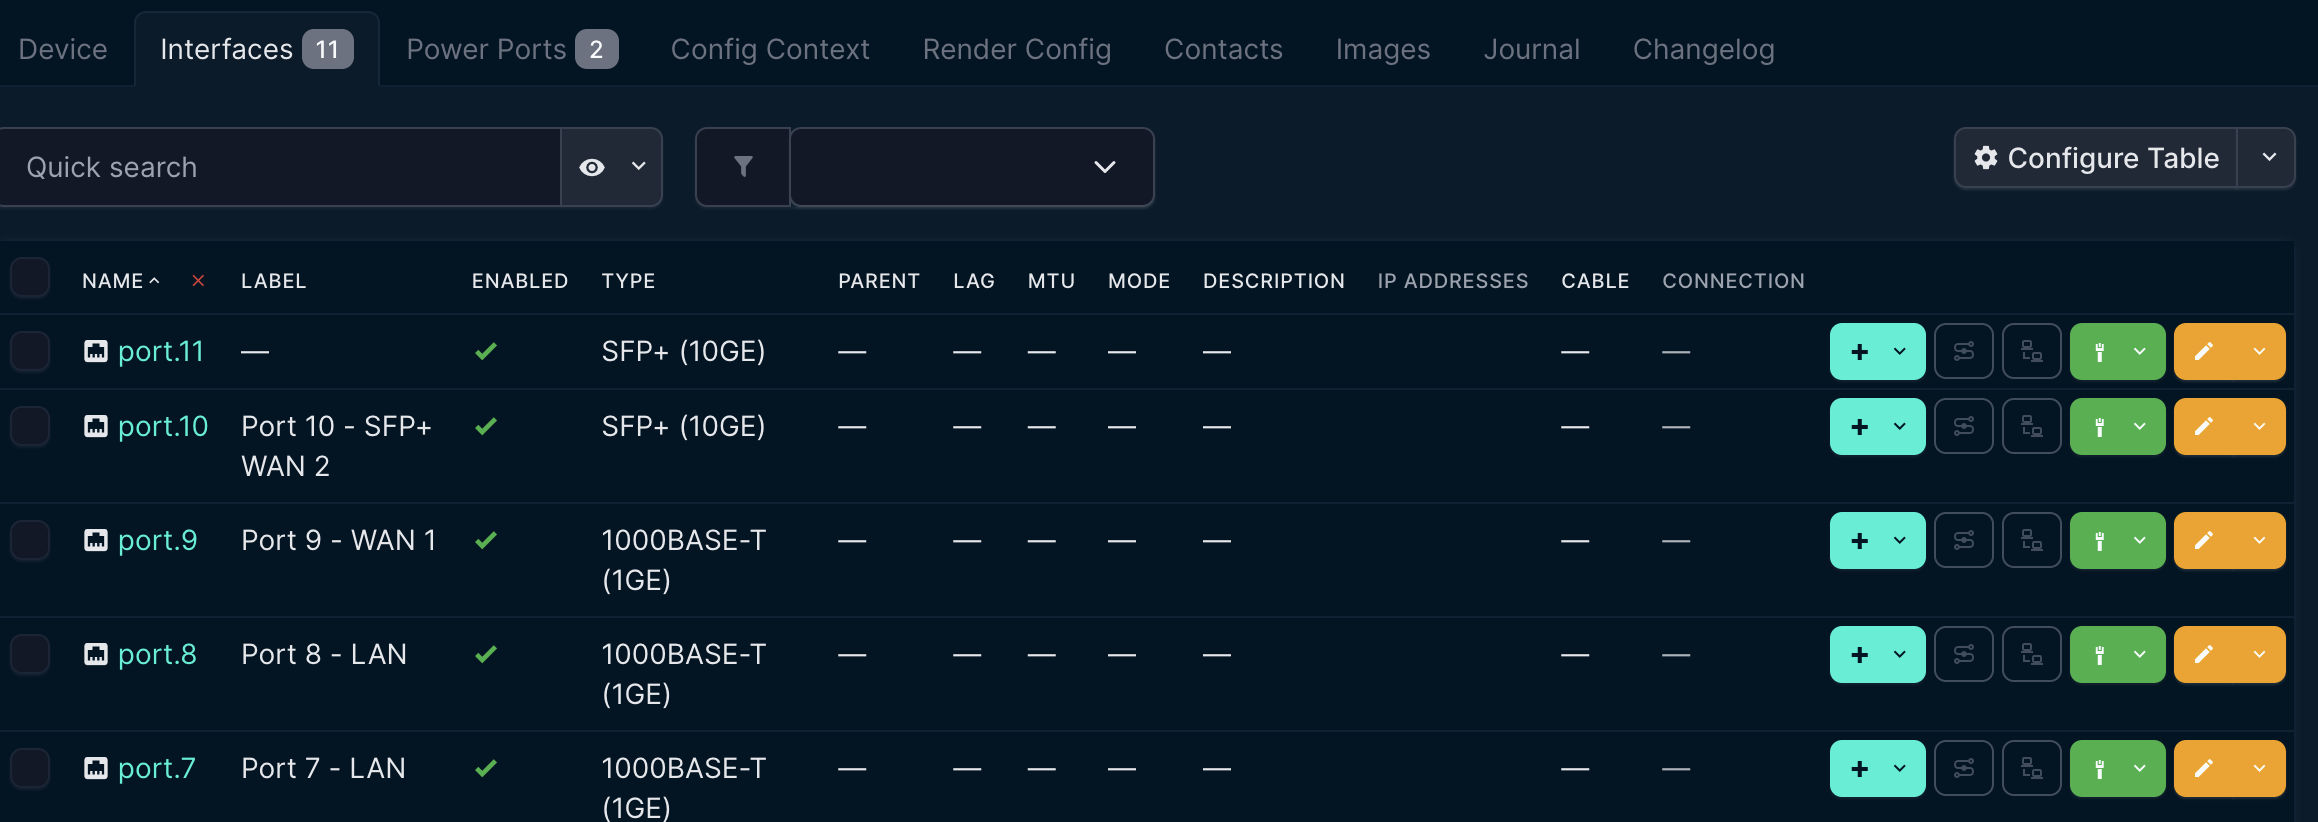
Here is an example device with several interfaces configured.
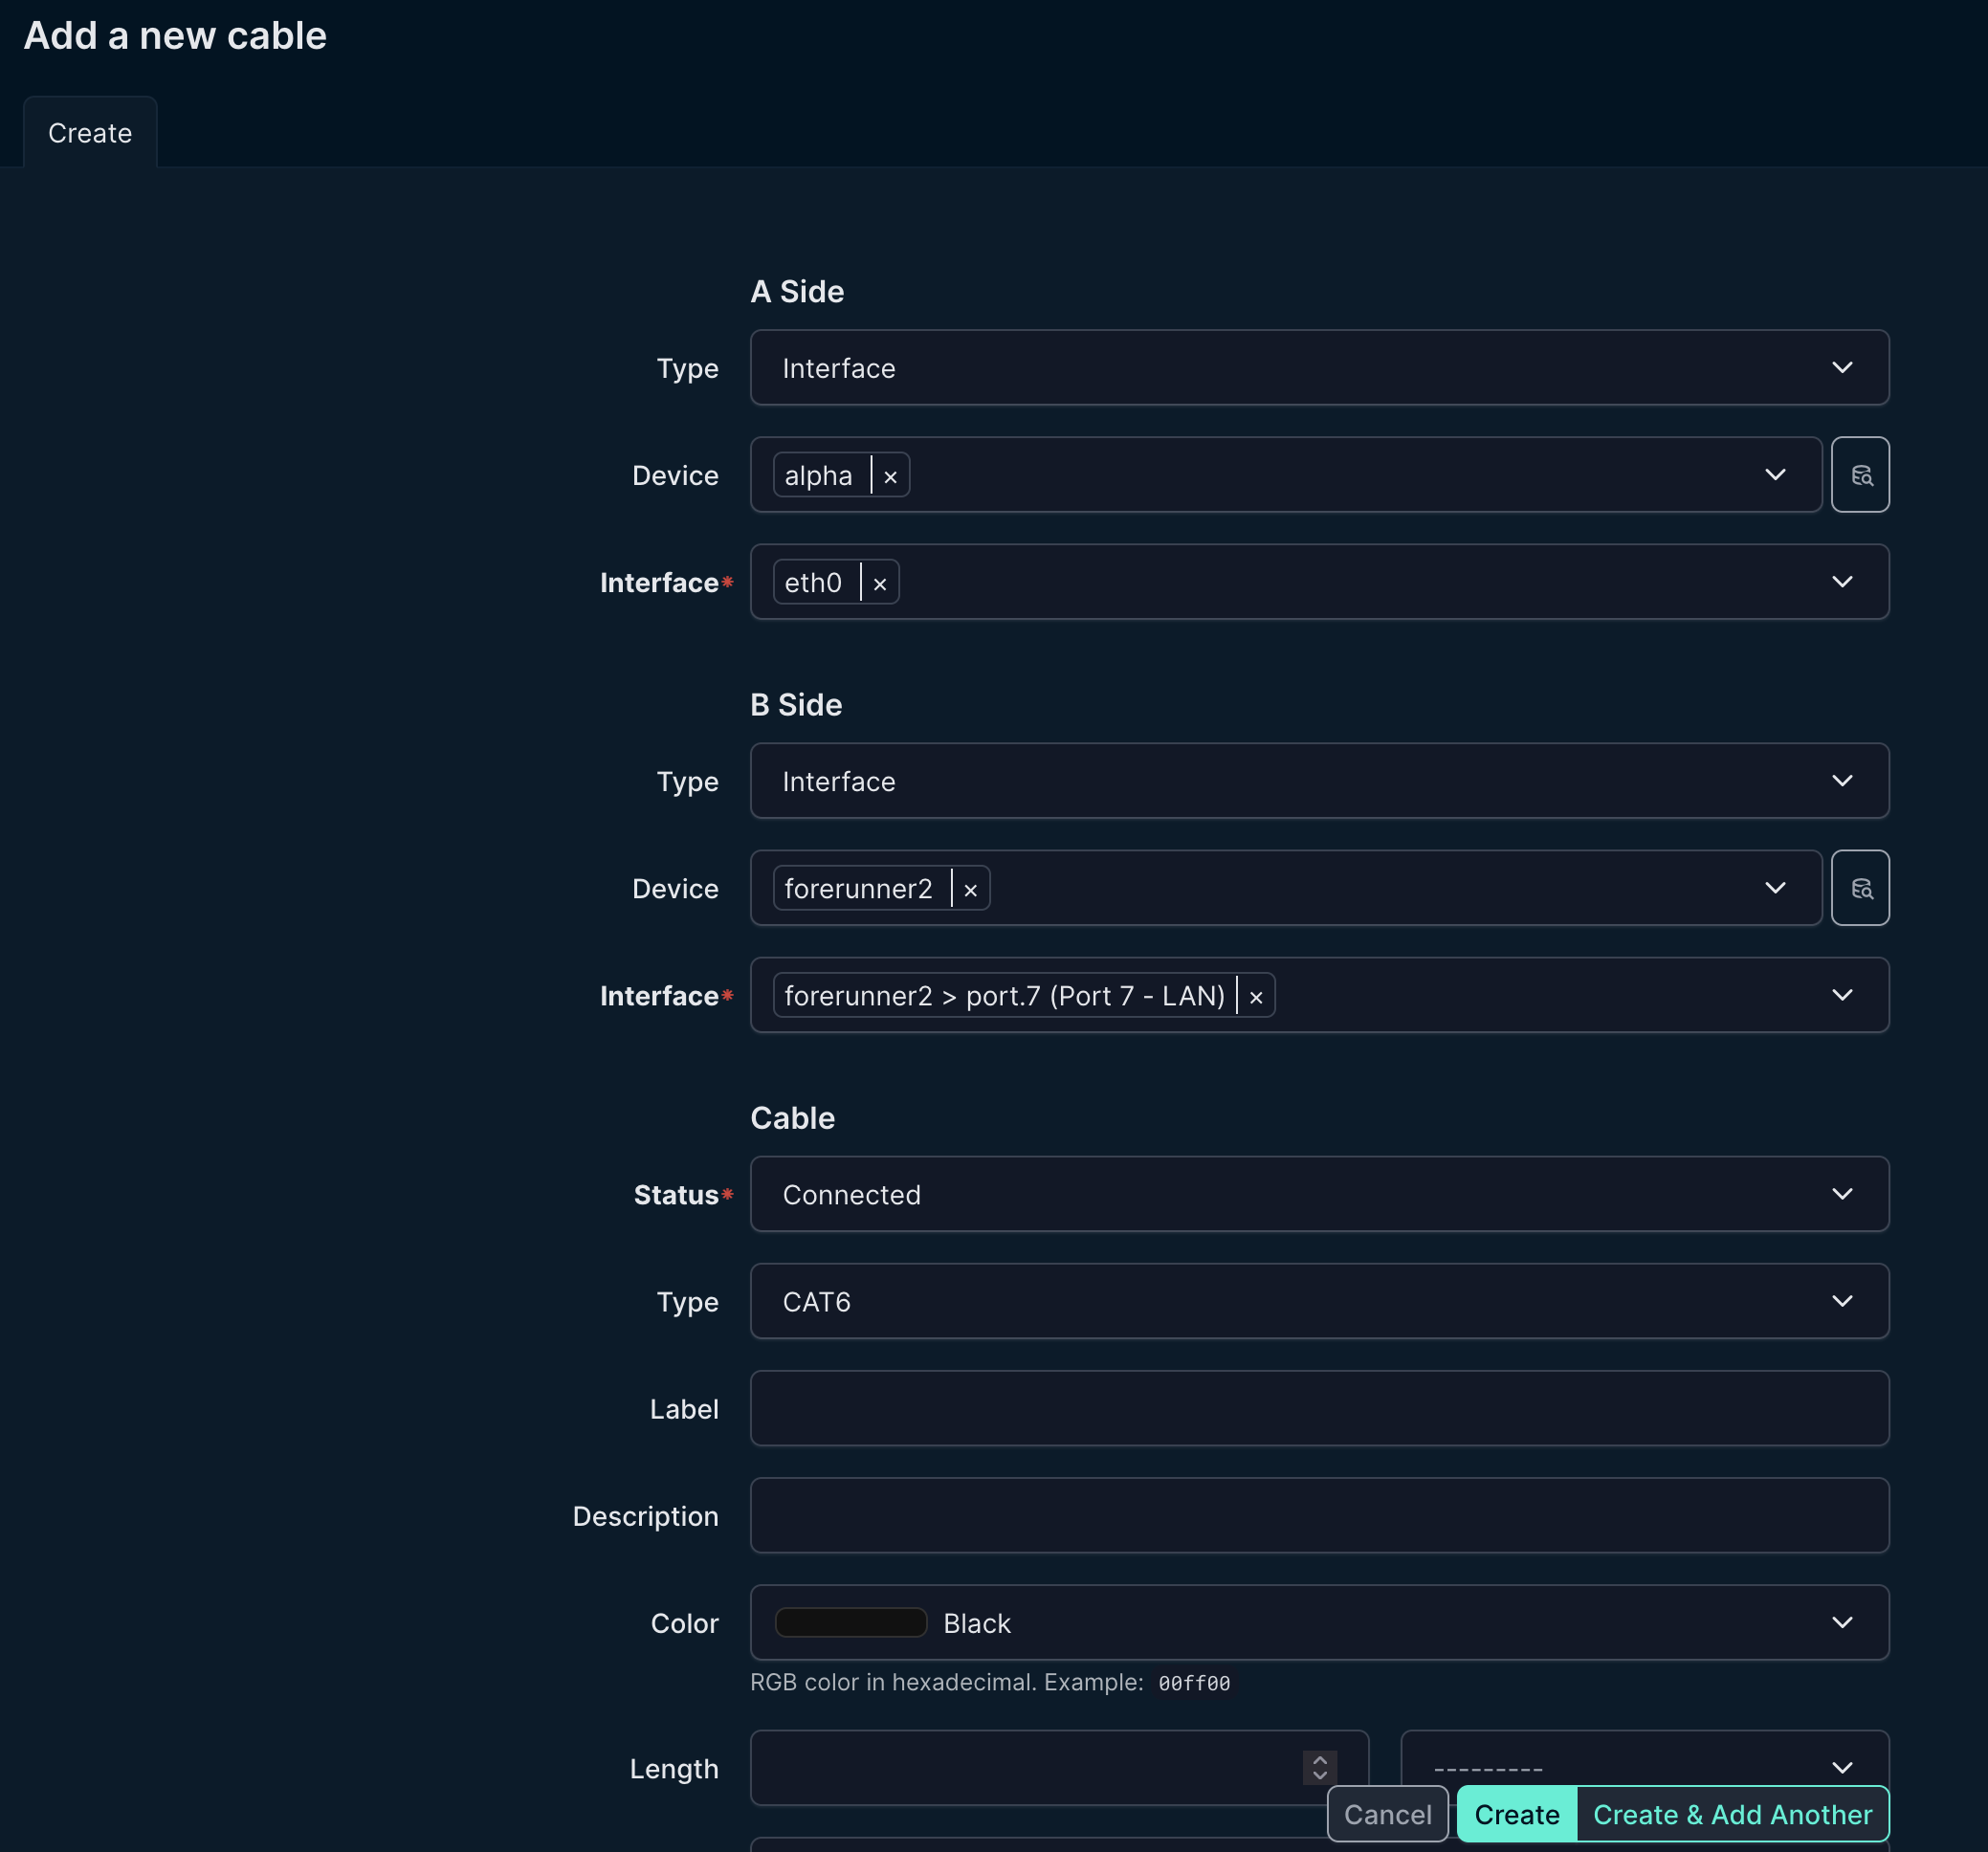
Creating Connections
Now document how everything connects. You can create connections through a device. Click on an interface and select Connect > Interface.
This will create new new Cable with sides A and B.
For example, connecting your main switch to your router:
- Side A: alpha, interface
eth0 - Side B: forerunner2, interface
port.7 - Type: CAT6
- Color: Blue (optional, but fun)
Continue documenting:
- Which switch ports your Raspberry Pis connect to
- How your NAS or other devices connect
- Where access points uplink to switches
This creates a complete map of your physical network. When troubleshooting, you can instantly see the entire path from a device to your router.
Viewing the Network Topology
While NetBox doesn’t have a built-in visual topology map in the base install, you can see all connections by clicking on the main menu Connections and navigating to Cables or Interface Connections.
For visual topology maps, consider NetBox plugins like netbox-topology-views. This plugin can generate interactive network diagrams from your NetBox data.
Assigning IP Addresses to Devices
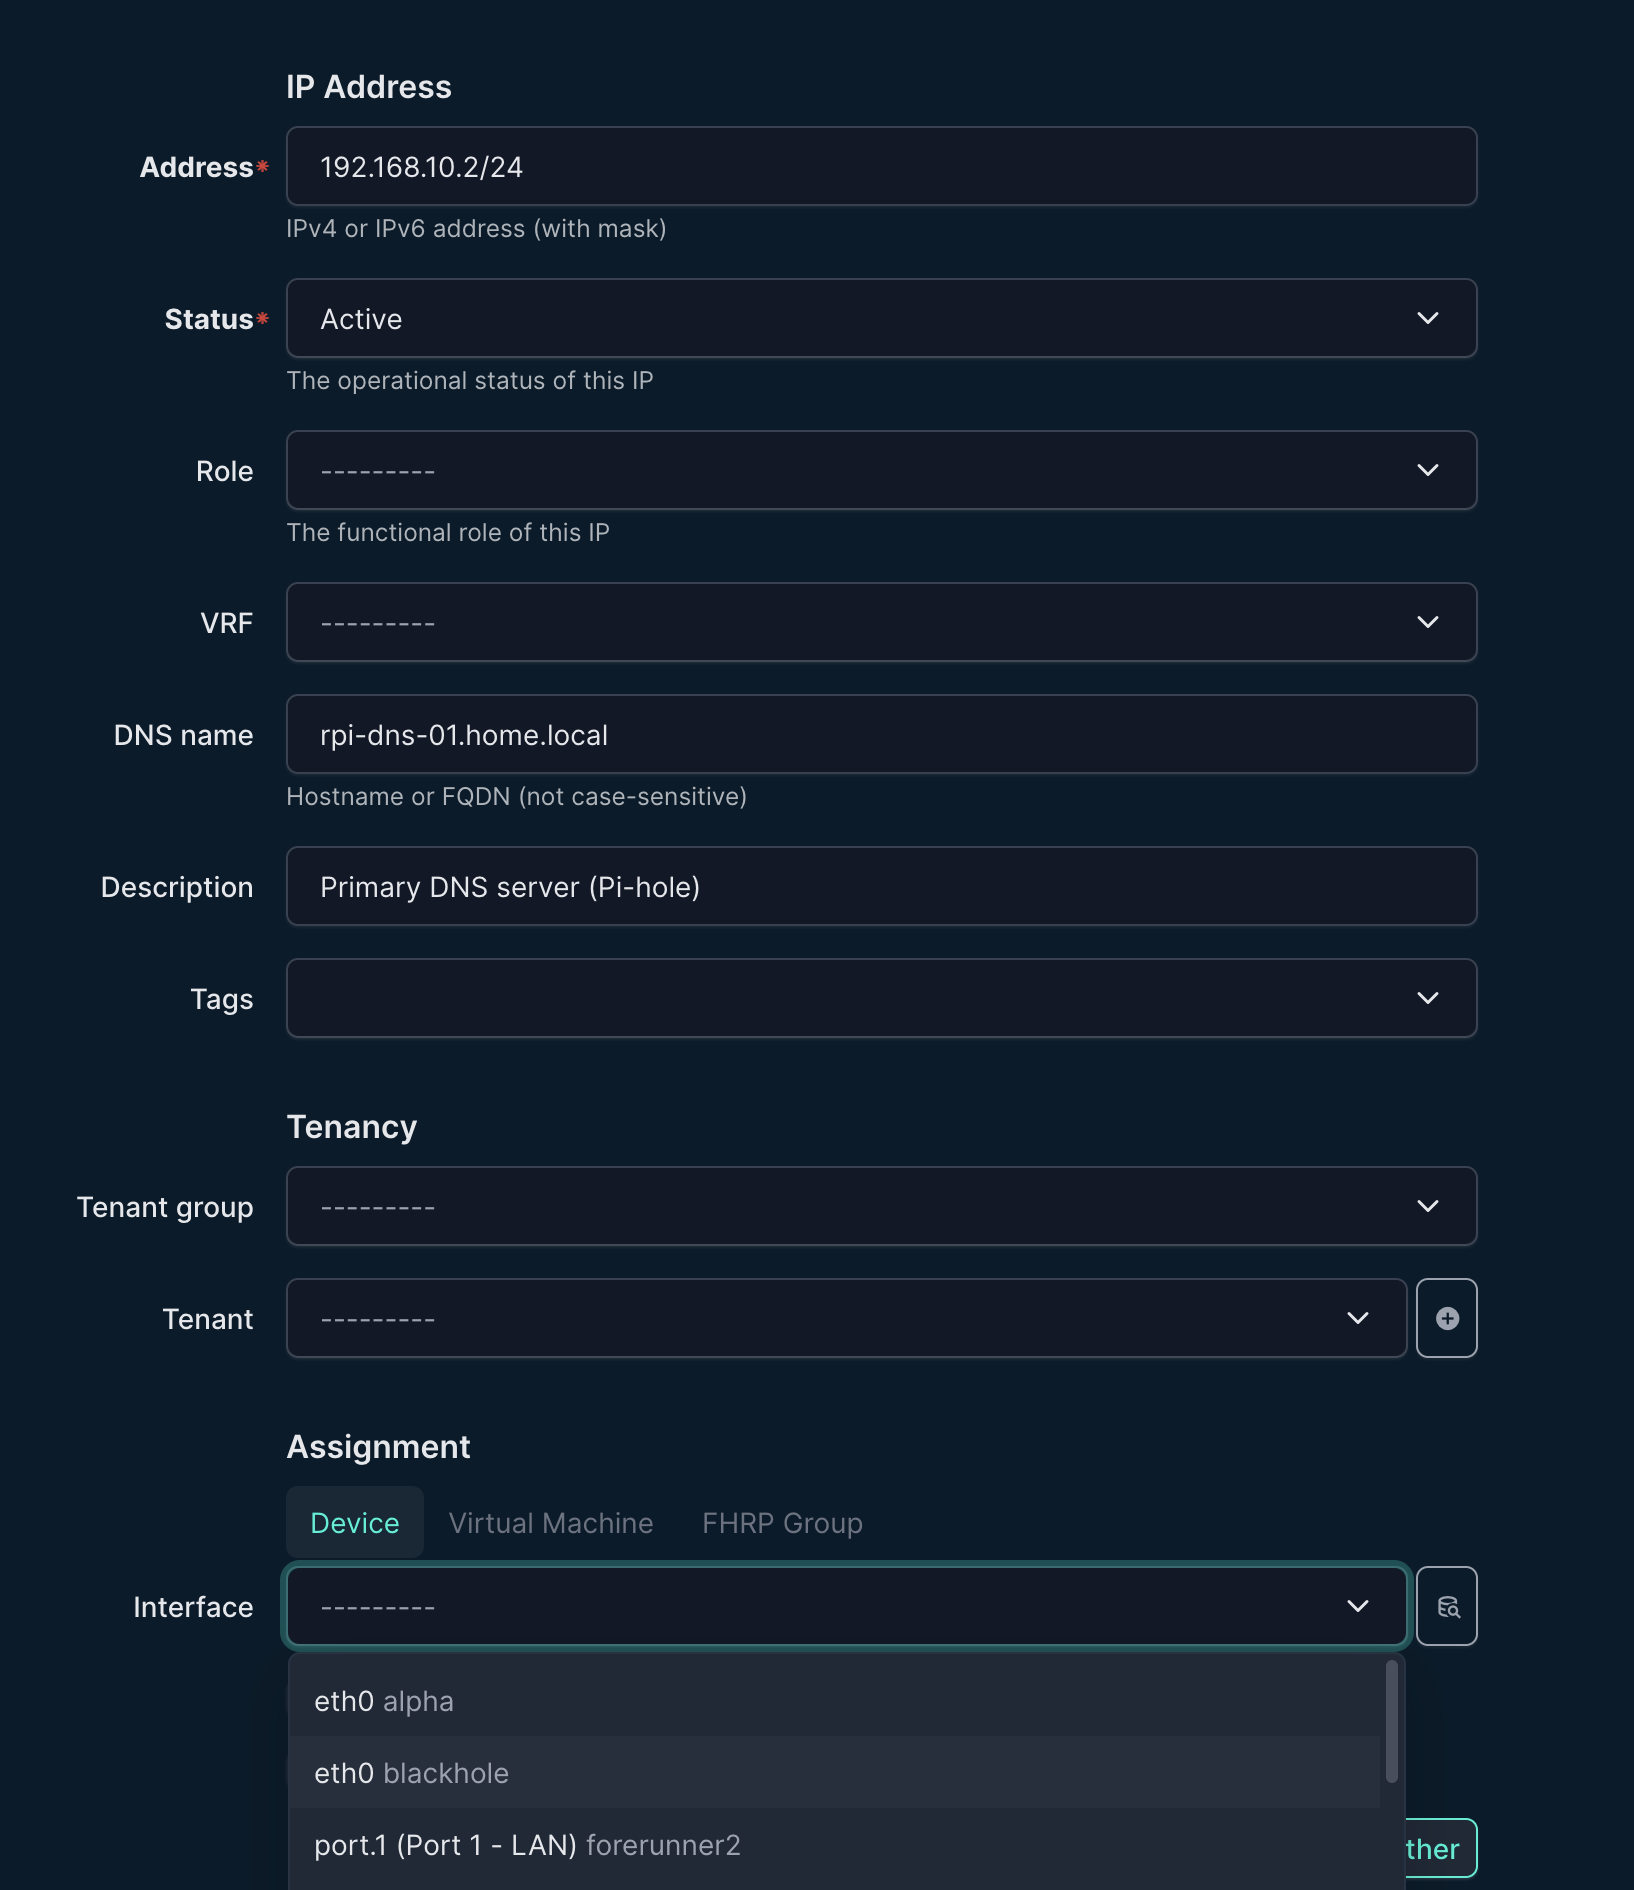
Now let’s assign IP addresses to your devices. Go to IPAM > IP Addresses and click Add.
For your primary DNS Raspberry Pi:
- IP Address: 192.168.10.2/24
- Status: Active
- DNS Name: rpi-dns-01.home.local (optional)
- Description: Primary DNS server (Pi-hole)
- Assignment > Device > Interface: Select your rpi-dns-01 device + interface
If you do not want to assign interfaces to each device you can just track IPs using the IPAM.
Repeat this for all your static IP assignments. For example:
- Secondary DNS server: 192.168.10.3
- Primary NAS: 192.168.10.10
- Backup NAS: 192.168.10.11
- Router management: 192.168.10.1
For devices with DHCP, you can still add them to NetBox. Just mark them as DHCP in the description. This helps you track what’s using dynamic addressing versus static.
Viewing Your IP Utilization
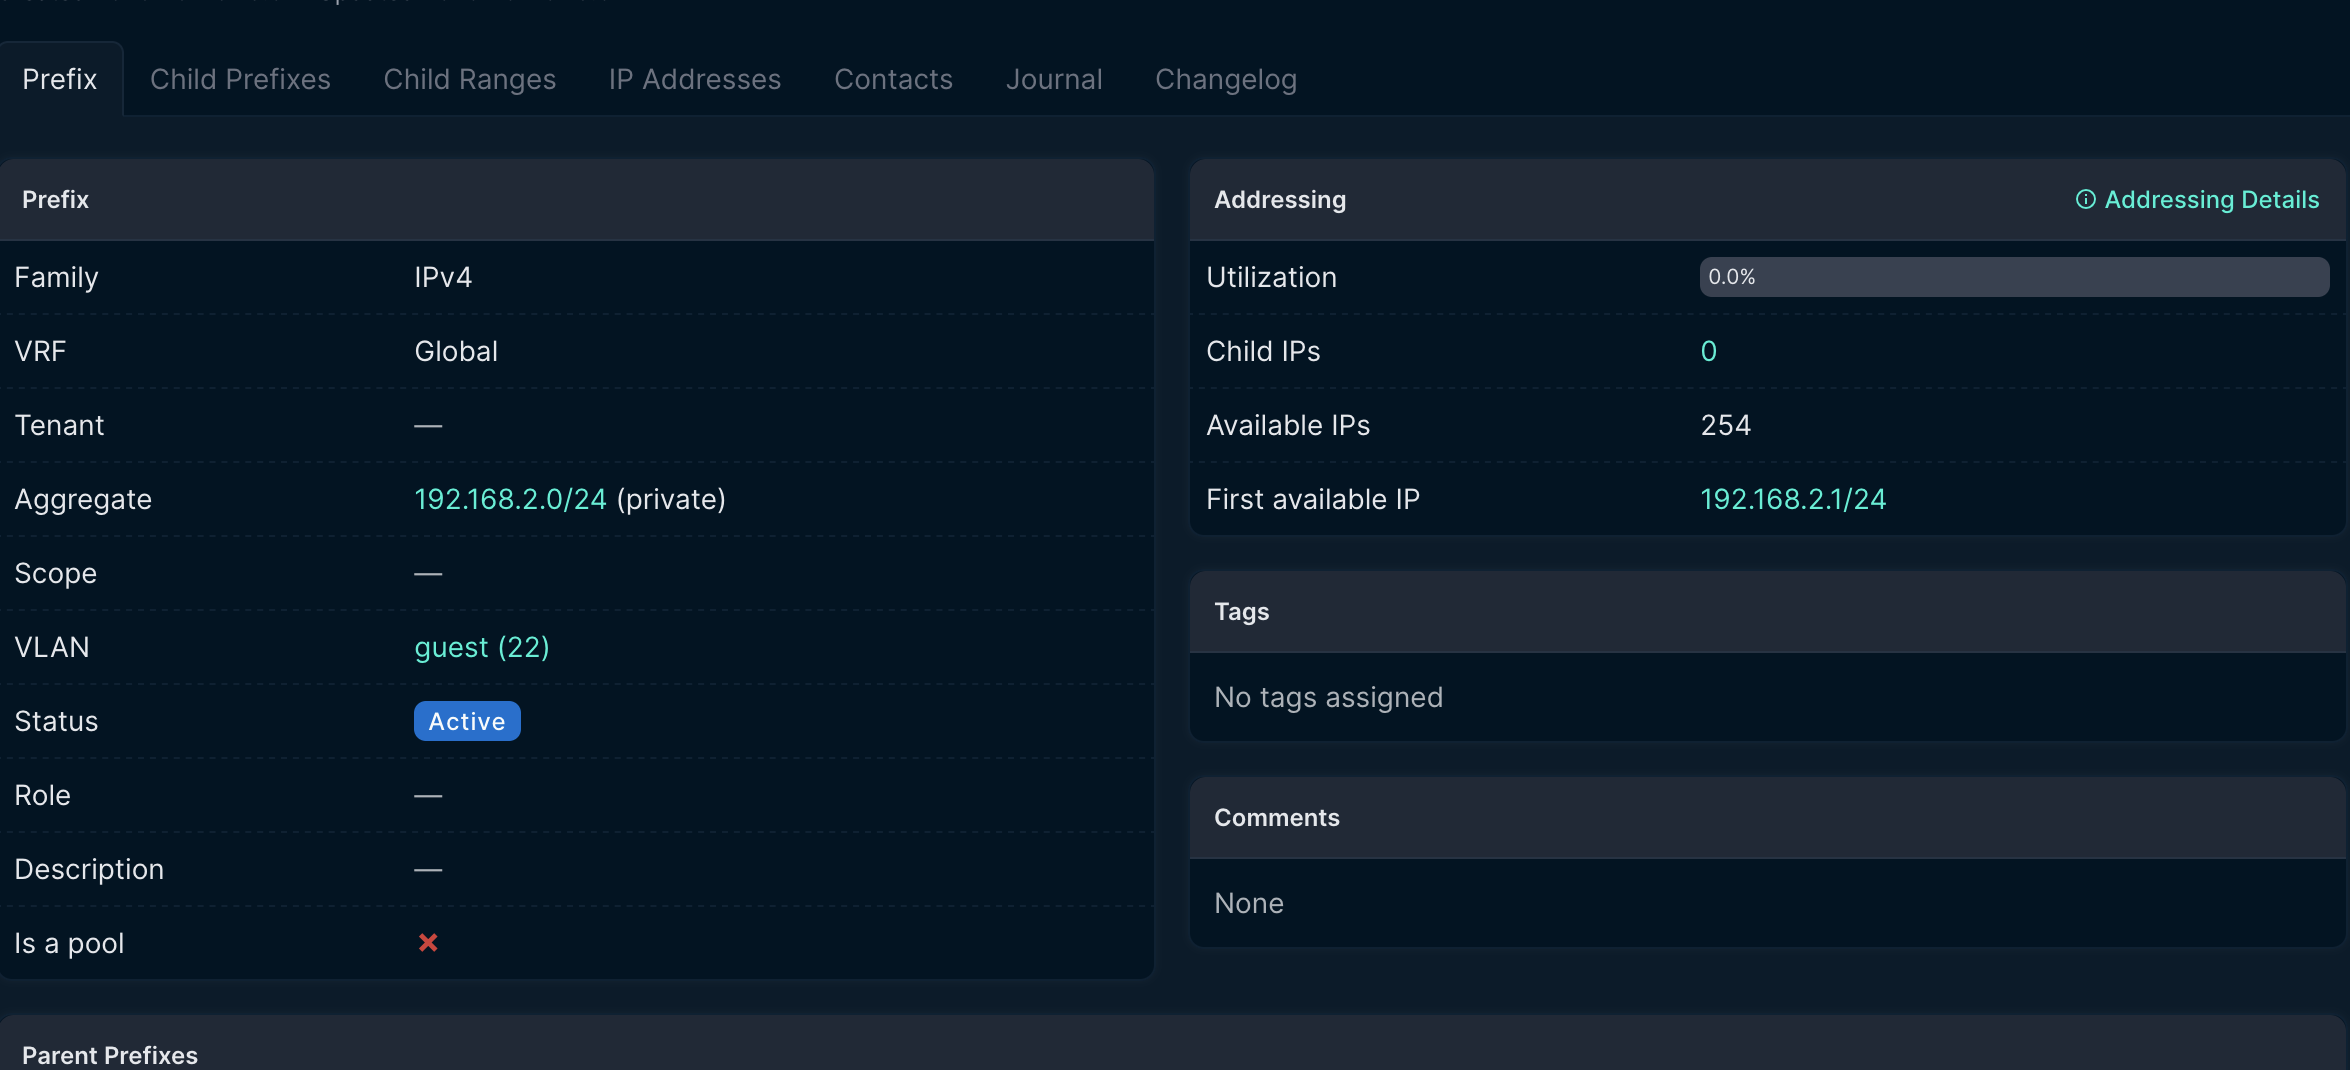
Once you’ve added your IPs, go back to IPAM > Prefixes and click on any prefix. NetBox will show you:
- How many IPs are used versus available
- A visual utilization bar
- All assigned addresses within that subnet
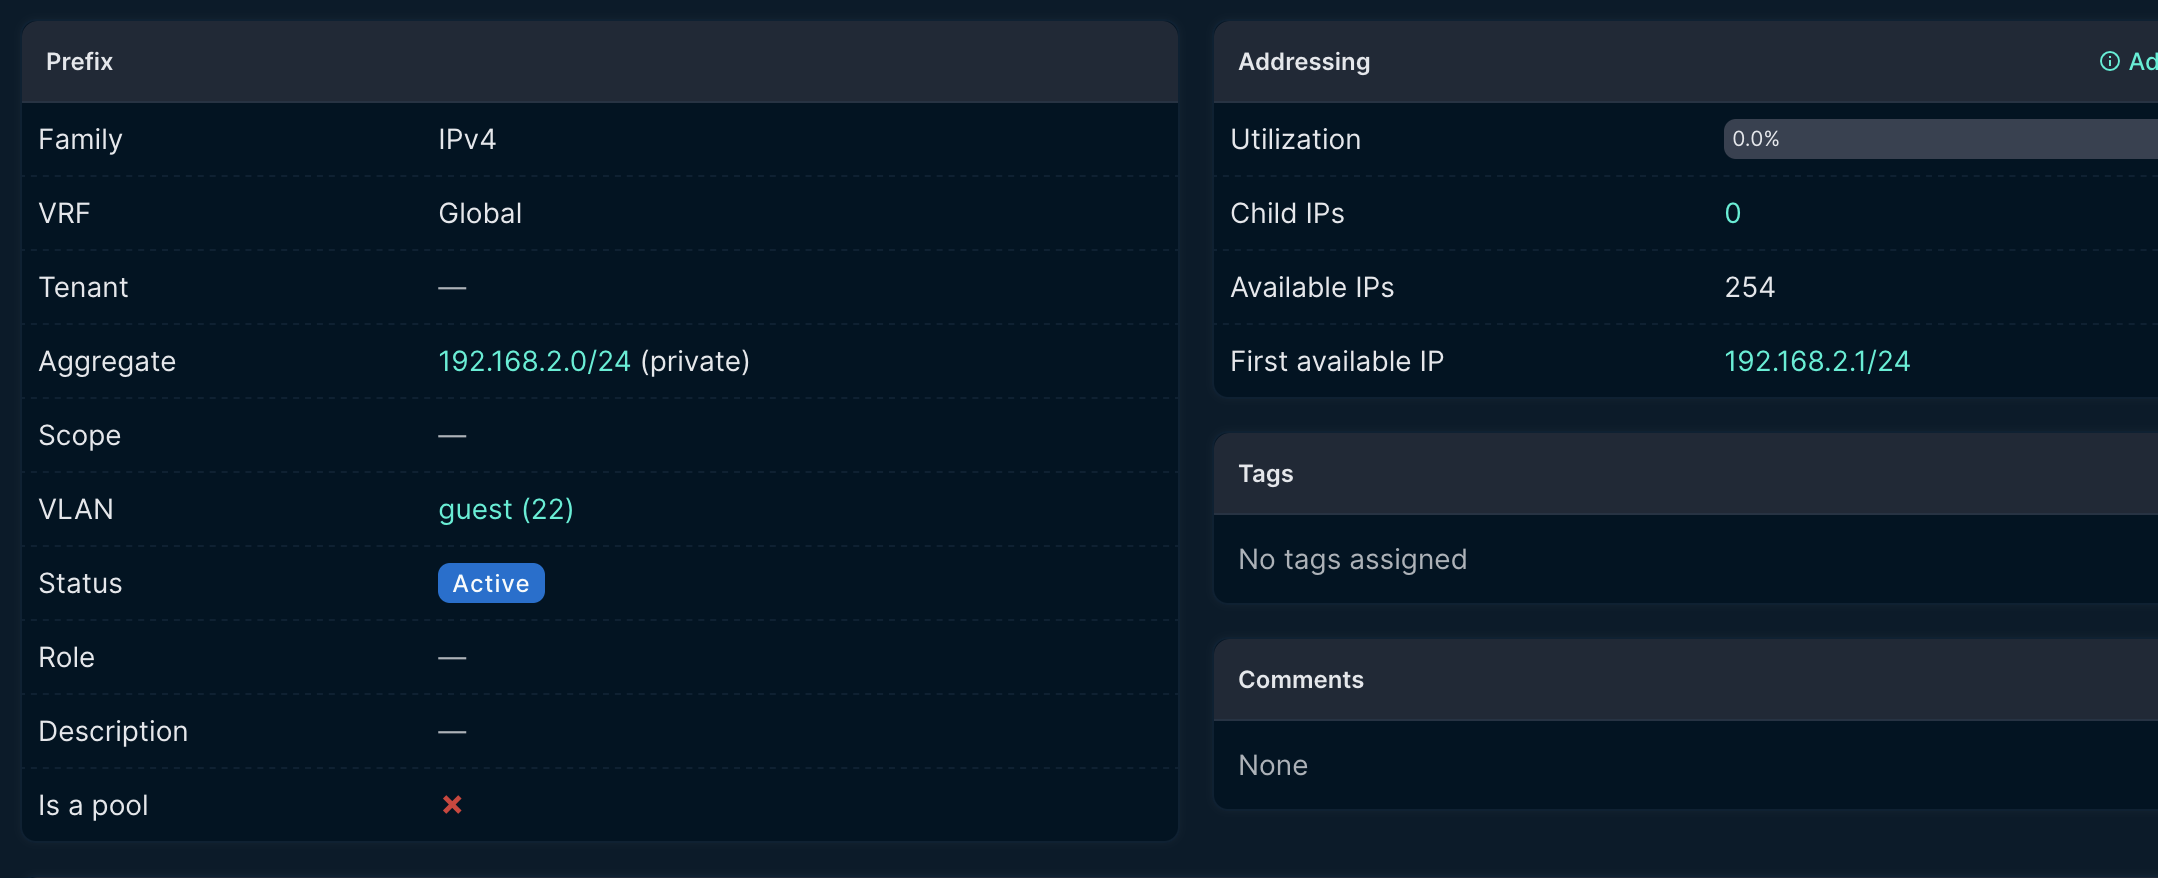
This is incredibly useful for seeing at a glance that your main VLAN is 47% utilized and you have plenty of room to grow.
Putting It All Together: Your Living Network Documentation
After following these steps, you now have a comprehensive, centralized documentation system for your home network. Hopefully you’ve accomplished:
Complete device inventory: Every router, switch, access point, server, and networked device is documented with details, roles, and notes.
IP address management: You can see at a glance which IPs are assigned, which subnet each device lives in, and how much address space you have left.
VLAN documentation: Your network segmentation is clearly documented. This makes it obvious which devices are isolated for security.
Physical connectivity map: You know exactly which cable connects to which port. This makes troubleshooting and upgrades much simpler.
Beyond the Basics
Now that you have NetBox set up, here are some ways to level up your network documentation:
Add more context: Use NetBox’s custom fields feature to track things like warranty expiration dates, purchase dates, or service contracts.
Document your configs: Use NetBox’s built-in configuration context to store JSON data about device configurations. This makes it queryable and version-controlled.
Set up automated updates: NetBox has a REST API that can be used to automatically update device information from your UniFi controller or other sources. I could have saved a lot of time exploring this further.
Add power tracking: If you have a UPS, document which devices connect to which power outlets.
Create tenant organizations: If you share your network with roommates or family, you can use tenants to track who owns which devices.
Explore plugins: The NetBox community has created dozens of plugins for everything from network diagrams to device lifecycle management.
The Bottom Line
Setting up NetBox might seem like a lot of work upfront. Honestly, it is. You’ll spend a few hours documenting everything. But that investment pays dividends the first time you:
- Need to troubleshoot a connectivity issue and can instantly see your entire network layout
- Want to add a new device and need to find an available static IP
- Have to explain your network setup to someone else (or remind yourself six months later)
- Plan an upgrade and need to know which devices depend on which infrastructure
For me, NetBox transformed my home network from a collection of devices I mostly remembered into a professionally documented system. It’s the difference between hoping you remember where things are and knowing exactly where everything is.
Your home network deserves better than scattered notes and tribal knowledge. Give NetBox a try. Your future self will thank you.
New disclaimer I am adding: I used an LLM to help create this post but afterwards I spent more than an hour editing it to the final form.