Configuring a status page in the cloud with Statping
Monitor your websites and other servers with an open-source application called Statping. This software has an easy to use web interface to monitor web applications and services.
This service is meant to monitor your applications. In order to accurately monitor the status of my services, this application needs to be running somewhere that is not my network. I will be using Amazon Web Services to host my status page.
Prerequisites
In order to proceed you need access to Amazon Web Services and a system with Ansible installed. Check out my previous post for help installing Ansible.

https://portal.aws.amazon.com/billing/signup#/start
Creating a Linux VM with the AWS console
-
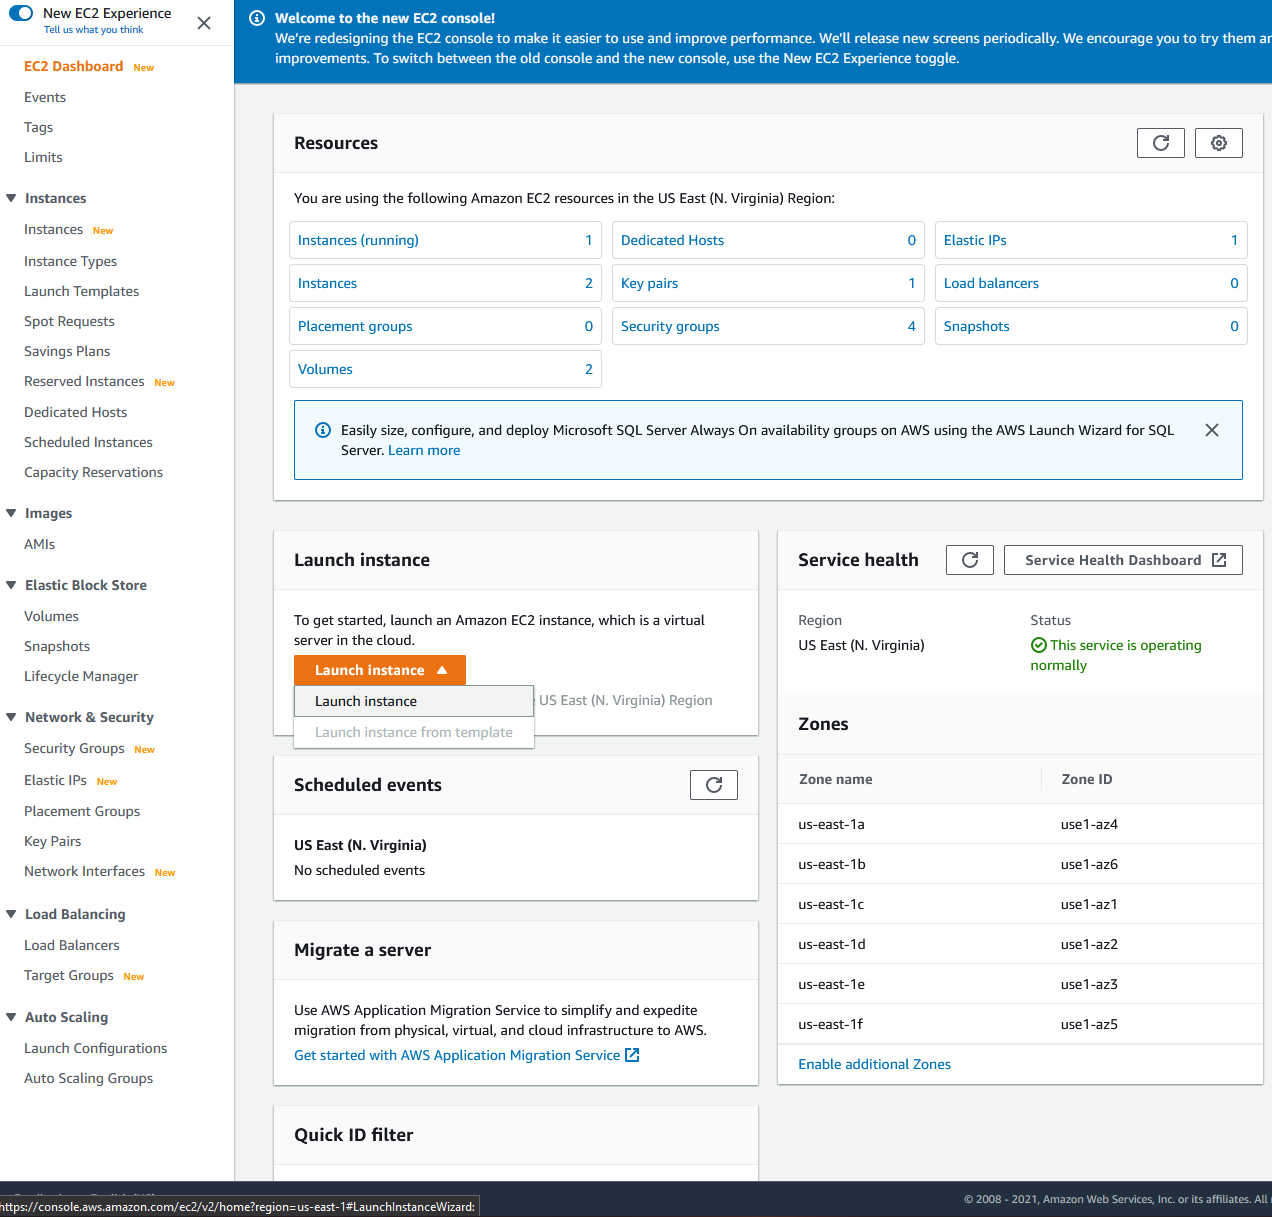
Log into the AWS console at https://console.aws.amazon.com/ and navigate to Services > Compute > EC2
-
Next, select “Launch Instance” to open the instance to create a new virtual machine.
-
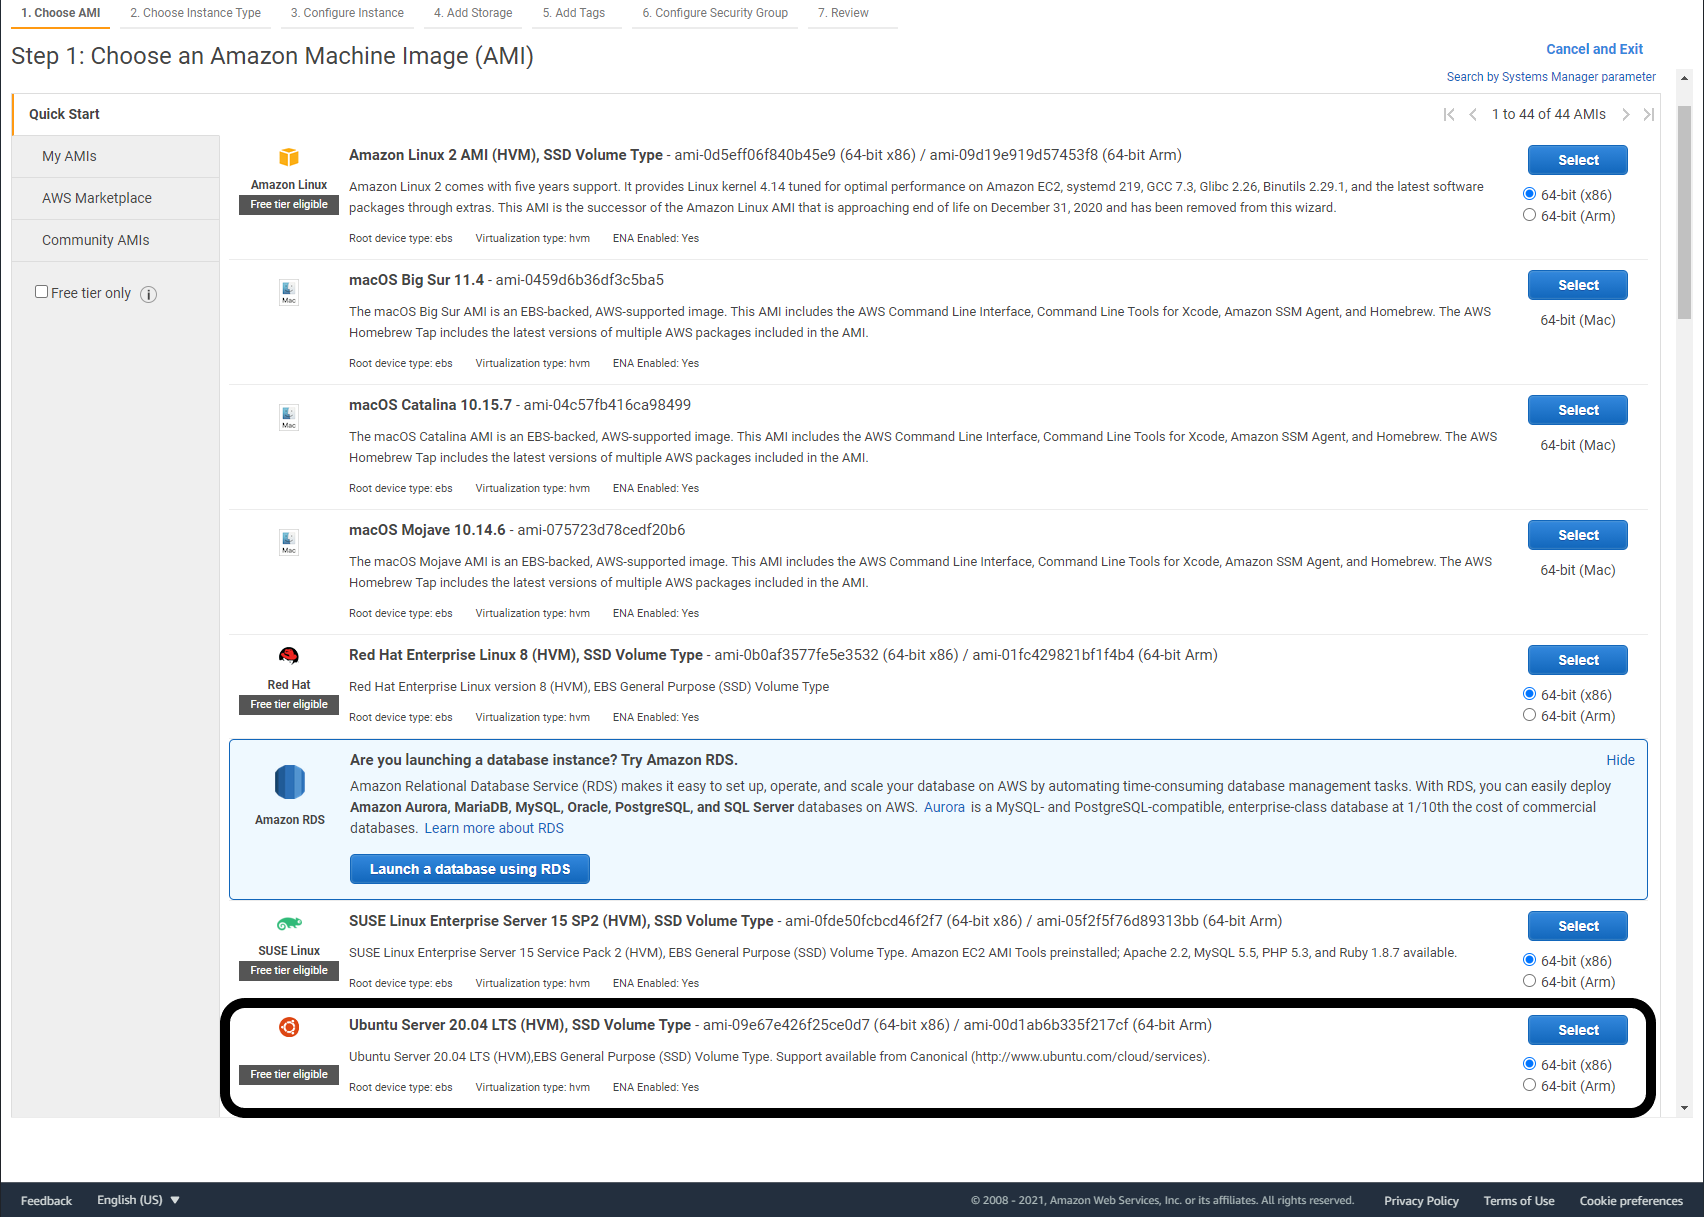
Select “Ubuntu Server 20.04 LTS (HVM), SSD Volume Type”
-
Select this image and Choose Instance Type “t2.micro”
-
Select “Review and Launch”
-
Now I recommend using the following settings for the Security Group:
| Type | Protocol | Port Range | Source |
|---|---|---|---|
| SSH | TCP | 22 | MY IP |
| HTTP | TCP | 80 | Anywhere |
| HTTPS | TCP | 443 | Anywhere |
- Select “Launch”
- Select an existing SSH key pair or create a new key pair to SSH into this system.
- Now In the AWS console EC2 dashboard, find your new instance under Resources > Instances (running)
- Copy the Public IPv4 address and ssh into the instance to ensure you have access:
# Replace ssh_key.pem with your ssh key and public.ipv4.address with the IP address of your instance
ssh -i ssh_key.pem ubuntu@public.ipv4.address- If you are able to log in, run system updates and then reboot the instance.
sudo apt update
sudo apt dist-upgrade -y
sudo reboot now
Configuring elastic IP and DNS record
In order to receive a certificate from let’s encrypt, your AWS instance needs an elastic IP address that has an associated DNS A record that is publicly resolvable.
Configuring Statping with Ansible
The configuration of statping is performed with an Ansible role. Make sure you have the public IPv4 address or DNS name to connect to your AWS instance. You will also need the private SSH key to access your instance. Then, clone the role:
git clone https://github.com/acaylor/statping_role.git ~/.ansible/roles/statping_roleOnce this role is saved on your system, install the required roles and collections:
ansible-galaxy install -r ~/.ansible/roles/statping_role/meta/requirements.ymlOnce all the requirements are installed, create a playbook to execute the role:
---
- hosts: all
  become: yes
  vars:
    statping_db: 'password'
    statping_host: 'hostname.example.com'
    admin_email: 'email@example.com'
    pip_install_packages:
      - name: docker
  roles:
    - statping_role
Docker Compose
This role will copy a docker-compose template to the target system. This template will include an nginx container, a let’s encrypt container, a statping container, and a postgresql database container.
This file is saved as a jinja template so that ansible variables can be injected into the target system. These variables are defined between brackets ex. "{{ variable }}"
version: '2.3'

services:
  nginx:
    container_name: nginx
    image: jwilder/nginx-proxy
    ports:
      - 0.0.0.0:80:80
      - 0.0.0.0:443:443
    labels:
      - 'com.github.jrcs.letsencrypt_nginx_proxy_companion.nginx_proxy'
    networks:
      - internet
    restart: always
    volumes:
      - /var/run/docker.sock:/tmp/docker.sock:ro
      - ./statup/nginx/certs:/etc/nginx/certs:ro
      - ./statup/nginx/vhost:/etc/nginx/vhost.d
      - ./statup/nginx/html:/usr/share/nginx/html:ro
      - ./statup/nginx/dhparam:/etc/nginx/dhparam
    environment:
      DEFAULT_HOST: '{{ statping_host }}'

  letsencrypt:
    container_name: letsencrypt
    image: jrcs/letsencrypt-nginx-proxy-companion
    networks:
      - internet
    restart: always
    volumes:
      - /var/run/docker.sock:/var/run/docker.sock:ro
      - ./statup/nginx/certs:/etc/nginx/certs
      - ./statup/nginx/vhost:/etc/nginx/vhost.d
      - ./statup/nginx/html:/usr/share/nginx/html
      - ./statup/nginx/dhparam:/etc/nginx/dhparam

  statup:
    container_name: statup
    image: adamboutcher/statping-ng:latest
    restart: always
    networks:
      - internet
      - database
    depends_on:
      - postgres
    volumes:
      - ./statup/app:/app
    environment:
      VIRTUAL_HOST: '{{ statping_host }}'
      VIRTUAL_PORT: 8080
      LETSENCRYPT_HOST: '{{ statping_host }}'
      LETSENCRYPT_EMAIL: '{{ admin_email }}'
      DB_CONN: postgres
      DB_HOST: postgres
      DB_USER: statup
      DB_PASS: '{{ statping_db }}'
      DB_DATABASE: statup
      NAME: SSL Example
      DESCRIPTION: This Status Status Page should be running "{{ statping_host }}" with SSL.

  postgres:
    container_name: postgres
    image: postgres:10
    restart: always
    networks:
      - database
    volumes:
      - ./statup/postgres:/var/lib/postgresql/data
    environment:
      POSTGRES_PASSWORD: '{{ statping_db }}'
      POSTGRES_USER: statup
      POSTGRES_DB: statup

networks:
  internet:
    driver: bridge
  database:
    driver: bridge
Execute the playbook:
ansible-playbook playbook.yml -i 'public.ipv4.address,' -u ubuntu --key-file path/to/your/key.pemOnce the playbook has run, wait a few minutes and then you should be able to open the web page in your browser by entering the public hostname that matches the DNS record you created.
https://<public_hostname>.example.com
Statping comes with some example services to monitor but you can add your own.
More information:
For more information, see the statping wiki.