Adguard Home self-hosted DNS
AdGuard Home is a network-wide software for blocking ads and tracking. When used as your network DNS server, you can also manage custom DNS records in your local network. Once configured as your DNS server, all devices on your network will have ads and trackers blocked.
DNS is a distributed naming system for translating domain names (like example.com) into IP addresses (such as 192.168.1.1) that computers understand.
DNS resolves human-readable domain names to machine-readable IP addresses, enabling users to access websites, send emails, and connect to other networked resources using memorable domain names rather than numeric IP addresses. Together, DHCP and DNS form the backbone of modern networking infrastructure.
Set up AdGuard container
In order to run the AdGuard server, I will be using a docker container. In order to keep this post concise, please check out my previous post on docker if you are not familiar with the technology.
Requirements
In order to proceed, you must have a suitable Linux System with docker installed. See above for a post that will help you meet these requirements.
container template
The container will need a location to store persistent data such as configuration and query logs. In my example, we will create a work and conf directory along with the docker compose template. Enter the following to create those directories:
mkdir work
mkdir conf
In order to preserve the configuration of the AdGuard server that is running in a docker container, we can use a docker-compose template. Save the following as a docker-compose.yml file in a location that you will remember and that is not readable by any user.
version: '3'
services:
  adguard:
    container_name: adguard
    image: adguard/adguardhome:latest
    ports:
      - '53:53/tcp'
      - '53:53/udp'
      - '3000:3000/tcp'
    volumes:
      - './work:/opt/adguardhome/work'
      - './conf:/opt/adguardhome/conf'
    restart: unless-stopped
Once this template has been saved, the AdGuard server can be started with the following command:
docker compose up -dNow you can open the browser and navigate to http://docker.host:3000/ to control your AdGuard Home service. Replace docker.host with the hostname or IP address of the system where you are running the AdGuard container.
When you first visit that address there will be a configuration wizard where you can customize your install without using the config file. That is how you set up a username and password to protect access to your instance.
After the container starts up, it will create a yaml config file in the conf directory we created earlier.
cat conf/AdGuardHome.yamlThere are other network ports that you can leverage with this container:
-
53:53/tcp and 53:53/udp: plain DNS.
-
67:67/udp , 68:68/tcp , 68:68/udp: add if you intend to use AdGuard Home as a DHCP server.
-
80:80/tcp , 443:443/tcp , 443:443/udp , 3000:3000/tcp: add if you are going to use AdGuard Home’s admin panel as well as run AdGuard Home as an HTTPS/DNS-over-HTTPS server.
-
853:853/tcp: add if you are going to run AdGuard Home as a DNS-over-TLS server.
-
853:853/udp: add if you are going to run AdGuard Home as a DNS-over-QUIC server.
-
5443:5443/tcp and 5443:5443/udp: add if you are going to run AdGuard Home as a DNSCrypt server.
In my template I am only using the plain DNS ports and a port for the Adguard admin interface.
Upgrading to new versions
Run these commands in the directory with the docker-compose.yml template:
docker compose pull
docker compose up -d
Configuring your devices
The official documentation for AdGuard has configuration instructions: https://adguard-dns.io/kb/adguard-home/getting-started/#configure-devices
Everyone likely has a different router/gateway on their network but generally the admin interface allows you to define DNS server(s) in the DHCP configuration which will configure all devices on your network to use AdGuard server as the DNS server.
NOTE: resolved
If you try to run AdGuardHome on a system where the resolved daemon is started, docker will fail to bind on port 53, because resolved daemon is listening on 127.0.0.53:53. Here’s how you can disable DNSStubListener on your machine:
Deactivate DNSStubListener and update the DNS server address. Create a new file, /etc/systemd/resolved.conf.d/adguardhome.conf (creating the /etc/systemd/resolved.conf.d directory if needed) and add the following content to it:
[Resolve]
DNS=127.0.0.1
DNSStubListener=no
Specifying 127.0.0.1 as the DNS server address is necessary because otherwise the nameserver will be 127.0.0.53 which doesn’t work without DNSStubListener.
Activate a new resolv.conf file:
mv /etc/resolv.conf /etc/resolv.conf.backup
ln -s /run/systemd/resolve/resolv.conf /etc/resolv.conf
Stop DNSStubListener:
systemctl reload-or-restart systemd-resolvedNote for Ubuntu
If you are running Ubuntu Linux or another Linux distribution that uses netplan to configure the network interfaces, you will want to make sure your DNS Server is configured via DHCP or you may need to verify that a different server address is not included in the default netplan configuration. On my systems, usually the file is found here:
cat /etc/netplan/50-cloud-init.yamlIn this file you can modify the nameservers to change your DNS servers
nameservers:
  addresses:
    - 1.1.1.1
    - 8.8.8.8
Replace the addresses with the IP address of the server with your AdGuard container.
DNS rewrites
Here is one of the main features that I use for AdGuard Home which is creating custom DNS records with the DNS rewrites feature. Allows to easily configure custom DNS response for a specific domain name.
From the Admin interface you can navigate to “Filters” > “DNS rewrites”
Now you can create custom DNS records. In my homelab I can define virtual hosts here to use in a proxy server or just to assign hostnames to servers running on the homelab network.
Manage multiple servers with AdGuard-sync
Adguardhome-sync is a tool to synchronize AdGuardHome config to replica instances. Once you have set up a single AdGuard Home instance you can run instances on other services and use this app to keep them up to date with the same configuration.
The container image that will be used here is created by the LinuxServer.io team who keep up with regular security updates and publish images that are not affected by the rate limits of the public Docker Hub.
This app can be configured with a yaml file. Make a config directory that the new container can use:
mkdir configAfter creating the directory, create a adguardhome-sync.yaml file to configure the application. Make sure you replace the url values with your instances.
# cron expression to run in daemon mode. (default; "" = runs only once)
cron: '0 */2 * * *'

# runs the synchronisation on startup
runOnStart: true

# If enabled, the synchronisation task will not fail on single errors, but will log the errors and continue
continueOnError: false

origin:
  # url of the origin instance
  url: http://your.adguard.url:3000
  # apiPath: define an api path if other than "/control"
  # insecureSkipVerify: true # disable tls check
  username: admin
  password: password
  # cookie: Origin-Cookie-Name=CCCOOOKKKIIIEEE

# replicas instances
replicas:
  # url of the replica instance
  - url: http://adguard:3000
    autoSetup: true # If set to true this app will attempt to configure a new adguard instance
    username: admin # with this username
    password: password # and password
    # cookie: Replica1-Cookie-Name=CCCOOOKKKIIIEEE
  # Configure the sync API server, disabled if api port is 0
api:
  # Port, default 8080
  port: 8081
  # if username and password are defined, basic auth is applied to the sync API
  #username: username
  #password: password
  # enable api dark mode
  darkMode: true

  # enable metrics on path '/metrics' (api port must be != 0)
  metrics:
    enabled: true
    scrapeInterval: 30s
    queryLogLimit: 10000

  # enable tls for the api server
  # tls:
  #   # the directory of the provided tls certs
  #   certDir: /path/to/certs
  #   # the name of the cert file (default: tls.crt)
  #   certName: foo.crt
  #   # the name of the key file (default: tls.key)
  #   keyName: bar.key

# Configure sync features; by default all features are enabled.
features:
  generalSettings: true
  queryLogConfig: true
  statsConfig: true
  clientSettings: true
  services: true
  filters: true
  dhcp:
    serverConfig: true
    staticLeases: true
  dns:
    serverConfig: true
    accessLists: true
    rewrites: true
Save the following below as a docker-compose.yml file in a location that you will remember and that is not readable by any user.
services:
  adguardhome-sync:
    image: lscr.io/linuxserver/adguardhome-sync:latest
    container_name: adguardhome-sync
    environment:
      - PUID=1000
      - PGID=1000
      - TZ=Etc/UTC # Replace with your timezone
      - CONFIGFILE=/config/adguardhome-sync.yaml #optional
    ports:
      - '8081:8081/tcp' # optional port forward for the admin interface
    volumes:
      - ./config:/config
    restart: unless-stopped
Once this template has been saved, the sync server can be started with the following command:
docker compose up -dCheck the logs to see if the instances synced and correct any errors:
docker compose logsYou should see output similar to INFO sync sync/sync.go:303 Sync done
This container will keep one or more replica AdGuard instances synced. I have this set up and rarely ever check on it.
Scrape AdGuard metrics with prometheus
In my homelab I use Prometheus to collect metrics from systems and applications. If you are not familiar with Prometheus, check out a previous post where I set it up with Grafana to visualize metrics.
AdGuard has query logs and metrics but does not have a prometheus /metrics API endpoint at this time. In the section above, there are some Prometheus metrics exposed by the AdGuard-sync application which is a good fall-back for me but someone in the community has created a specific app to export metrics from AdGuard Home and I have it set up for all of my replica instances.
Save the following below as a docker-compose.yml file in a location that you will remember and that is not readable by any user.
services:
  adguardhome-exporter:
    image: ghcr.io/henrywhitaker3/adguard-exporter:latest
    container_name: adguardhome-exporter
    ports:
      - '9618:9618/tcp'
    environment:
      - ADGUARD_SERVERS=https://adguard.1,http://adguard.2:3000
      - ADGUARD_USERNAMES=admin,admin # These can be different
      - ADGUARD_PASSWORDS=password1,password2 # Same here, order by ADGUARD_SERVERS order
    restart: unless-stopped
Once this template has been saved, the sync server can be started with the following command:
docker compose up -dIf everything is working, you should be able to see metrics by visiting the hostname or IP address and port where you are running the exporter container.
Adding to prometheus config
On the prometheus server node(s), update /etc/prometheus/prometheus.yml (or your prometheus config file)
- job_name: 'adguard-metrics'
  static_configs:
    - targets: ['adguard-host:9618']
Replace adguard-host with the hostname or IP where you are running the adguard-exporter container with port 9618.
Any updates to scraping config will require prometheus to be restarted. If using a container, it would be similar to:
docker restart prometheusGrafana dashboard
The creator of this exporter has published a Grafana dashboard. I use the following query to create a graph to look at the DNS request latency of the AdGuard instance and all upstream DNS servers. Give them a star for creating this app!
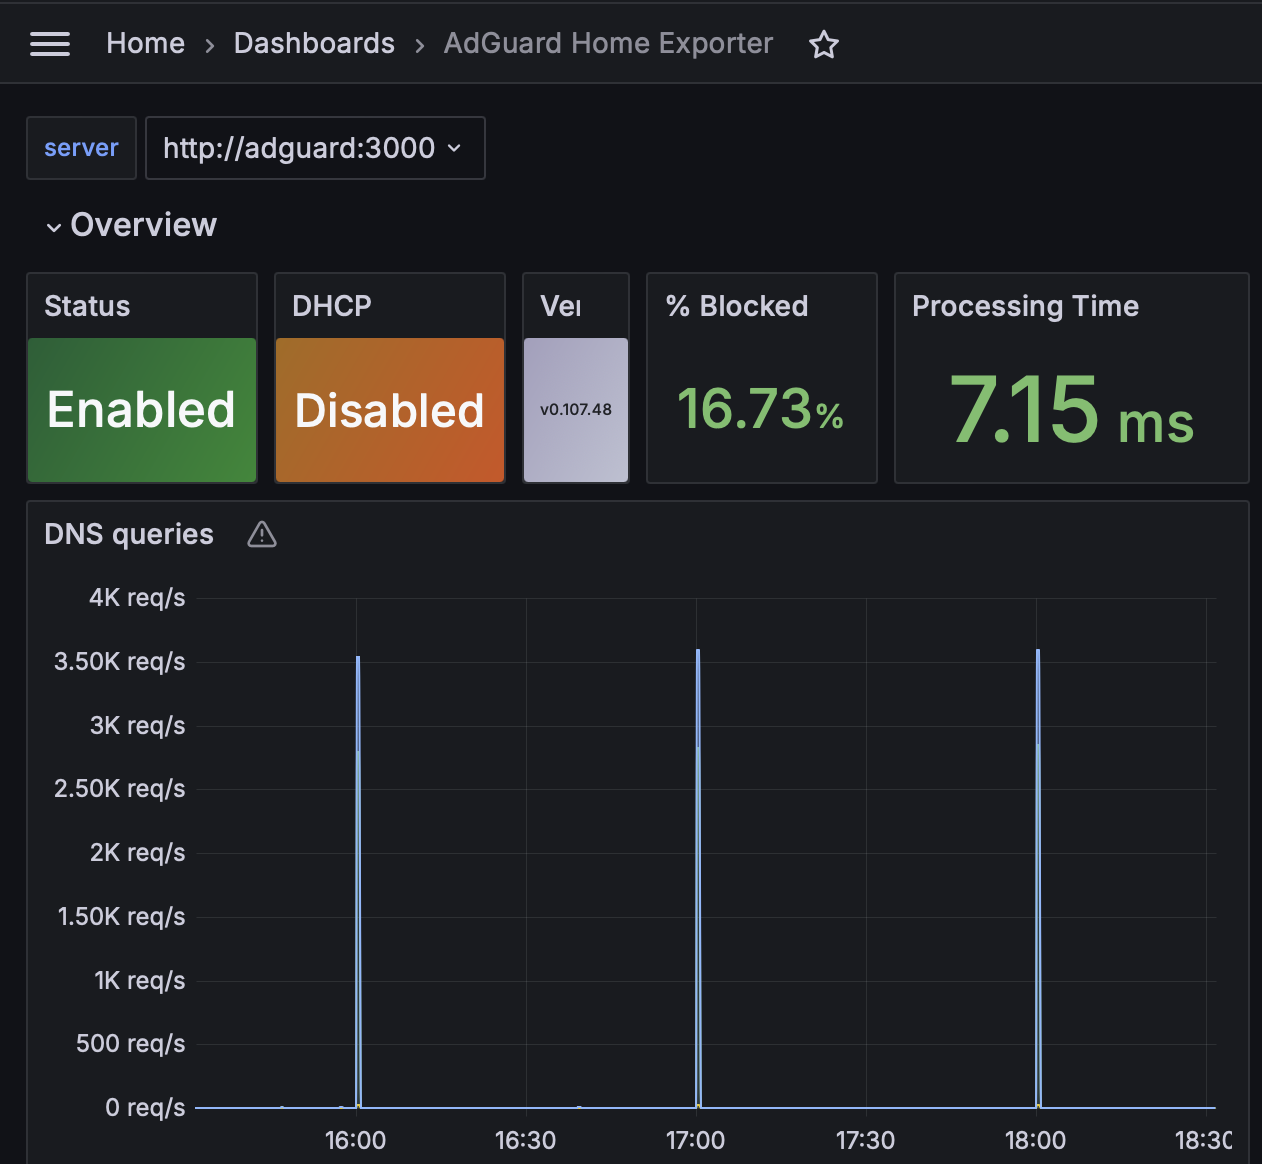
sum by (upstream) (rate(adguard_processing_time_milliseconds_sum[5m])) / sum by (upstream) (rate(adguard_processing_time_milliseconds_count[5m]))