Kubernetes
Kubernetes, also known as k8s, is an open-source system for automating deployment, scaling, and managment of containerized applications. The name Kubernetes originates from Greek, meaning helmsman or pilot. K8s as an abbreviation results from counting the eight letters between the “K” and the “s”. Kubernetes builds on 15 years of development powering the largest search engine Google with contributions from the open-source community. Kubernetes is focused on scalability from running to to a billion containers. K8s is open source and can be run on your own computer or in public cloud infrastructure.
If you are not familiar with containerized applications, check out a previous post on getting started with containers.
Kubernetes features
- Automated deployments and rollbacks
- Persistent storage orchestration
- Automatic binary packing
- Self-Healing
- Service discovery and load balancing
- Secret and configuration management
- Batch executions
- Automated horizontal scaling
- Extensible API
Kubernetes components
When you deploy k8s, you have a cluster of computers known as nodes that will run containerized applications. Each k8s cluster needs at least one node to function.
The nodes host the containerized applications known as Pods. The k8s control plane manages the nodes and Pods in a k8s cluster. In production environments, the control plane usually runs on multiple nodes to provide High Availability if one or more nodes were to fail.
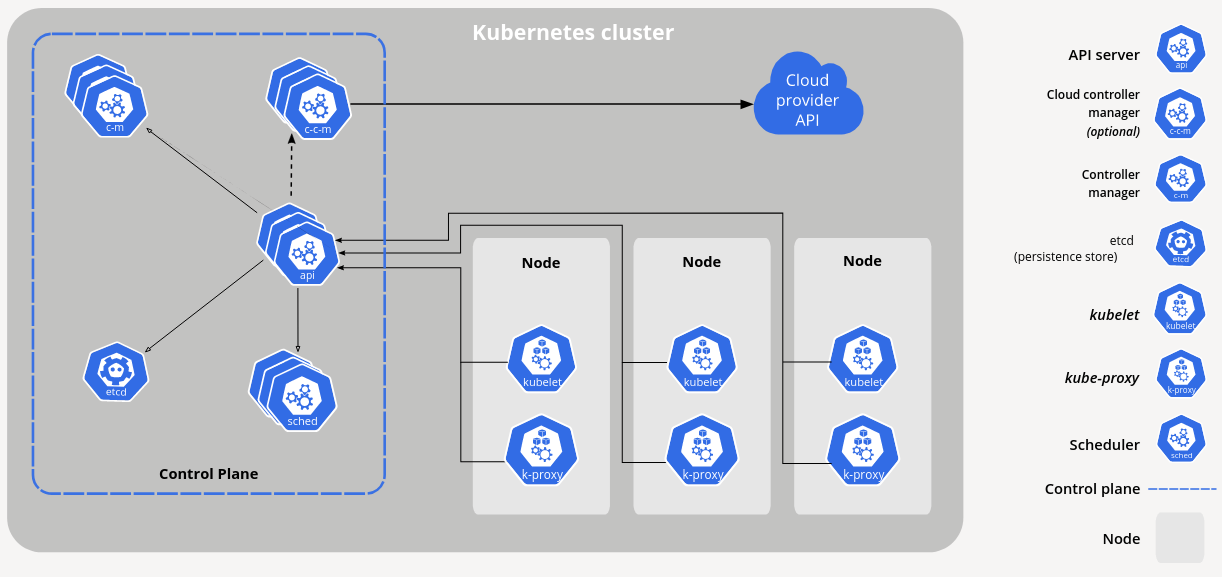
Control plane components
The control plane makes decisions about the cluster and responds to cluster events.
- kube-apiserver: api server for the control plane
- etcd: highly-available database for storing cluster state
- kube-scheduler: watches for newly created Pods and selects a node for them to run on
- kube-controller-manager: runs control plane processes
- cloud-controller-manager: implements logic pertaining to specific cloud providers such as AWS or Azure.
The control plane is the API server which is an HTTP API that allows end users to configure and deploy containerized applications. The API allows you to query and manipulate the state of the cluster. API objects include Namespaces, ConfigMaps, Deployments, Services, Secrets, Pods, and many more as of this post.
Most operations can be performed with a command-line interface with a golang binary called kubectl
Kubernetes stores the state of API objects in the etcd database. In a production environment, multiple nodes should provide etcd service to maintain High Availability for the Kubernetes API server.
Node components
Node components run on every node, running Pods for the cluster.
- kubelet: an agent on each node that takes instructions from the control plane
- kube-proxy: a network proxy that runs on each node implementing the Pod/container network
- container runtime: the software that runs containers such as docker, containerd, cri-o or other open source Container Runtime
Installing kubectl
Installing the kubectl utility on your system means that you can interface with any kubernetes cluster. Minikube is an easy way to get started but as the word cluster suggests, kubernetes is designed to pool resources of multiple computers. The kubectl utility is mostly human friendly commands that are passed to the kubernetes API over port 6443/tcp.
Install kubectl on Linux
Some distributions have package repositories available but you can simply download the appropriate release of kubectl and add it to the executable $PATH of a *nix system and get going.
curl -LO "https://dl.k8s.io/release/$(curl -L -s https://dl.k8s.io/release/stable.txt)/bin/linux/amd64/kubectl"This will download the latest stable release but if you need to use a specific older version:
curl -LO https://dl.k8s.io/release/v1.18.0/bin/linux/amd64/kubectlAdd to PATH
In order to execute kubectl commands:
sudo cp kubectl /usr/local/bin/kubectl
sudo chmod 755 /usr/local/bin/kubectl
Now as a non-root user, check the program is working:
kubectl version --clientInstall kubectl on macOS
If you are on macOS, I recommend using the Homebrew package manager.
brew install kubectlNow as a non-root user, check the program is working:
kubectl version --clientInstall kubectl on Windows
I will be installing kubectl with Chocolatey. Check out my post on setting up Windows for info on how to get started with Chocolatey.
choco install kubernetes-clikubectl version --clientMinikube
In order to try out kubernetes, there is a tool called Minikube that will install a virtual kubernetes enviornment onto your computer. This will require support for virtualization or it can be run inside of Docker containers. In order to use the Docker mode, check out the post introducing containers with docker. Once Docker is running we can proceed by downloading the minikube software.
Installing minikube
minikube Windows
I will be installing minikube with Chocolatey.
choco install minikube
As you can see, with chocolatey the installation is trivial on Windows.
minikube macOS
On macOS, I use homebrew to install and update software. I can install minikube with one command:
brew install minikube --cask
minikube Linux
There are different distributions of Linux. All distributions can directly download the minikube binary:
curl -LO https://storage.googleapis.com/minikube/releases/latest/minikube-linux-amd64
sudo install minikube-linux-amd64 /usr/local/bin/minikube
This install program copies files into destination locations you choose. In this case we are moving the minikube binary somewhere where it can be executed by typing minikube in a shell.
There are also packages for distros that use .deb or .rpm packages:
Deb package
curl -LO https://storage.googleapis.com/minikube/releases/latest/minikube_latest_amd64.deb
sudo dpkg -i minikube_latest_amd64.deb
RPM package
curl -LO https://storage.googleapis.com/minikube/releases/latest/minikube-latest.x86_64.rpm
sudo rpm -Uvh minikube-latest.x86_64.rpm
Configure minikube driver
minikube config set driver dockerStart a minikube cluster
minikube start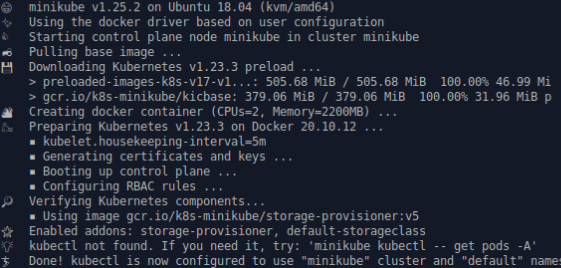
Once minikube starts, open a new terminal.
minikube dashboardThis will open the kubernetes dashboard in a web browswer window.

Deploy an application to minikube cluster
Kubernetes deploys container applications into Pods.
A Pod is a group of one or more Containers, tied together for the purposes of administration and networking. A Kubernetes Deployment checks on the health of your Pod and restarts the Pod’s Container if it terminates. Deployments are the recommended way to manage the creation and scaling of Pods. This example deployment is a simple web server that will return information in a browser window or command line output.
minikube kubectl -- create deployment hello-node --image=k8s.gcr.io/echoserver:1.4By default, the Pod is only accessible by its internal IP address within the Kubernetes cluster. To make the hello-node Container accessible from outside the Kubernetes virtual network, you have to expose the Pod as a Kubernetes Service.
minikube kubectl -- expose deployment hello-node --type=ClusterIP --port=8080The —type=ClusterIP flag indicates that you want to expose your Service to an endpoint inside the kubernetes network.
The application code inside the image k8s.gcr.io/echoserver only listens on TCP port 8080. If you used kubectl expose to expose a different port, clients could not connect to that other port.
The service can also be exposed with the kubectl program which is how you can forward kubernetes services to a port on your local computer for any kubernetes cluster, not just minikube.
Use kubectl to forward a service to a local port
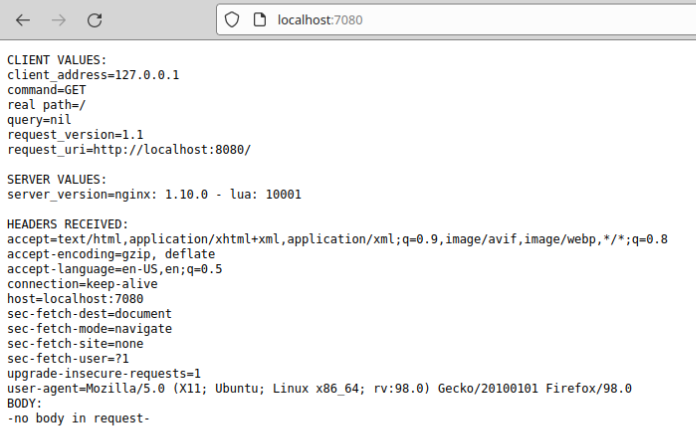
kubectl port-forward service/hello-node 7080:8080That will forward connections to the kubernetes service on port 7080 of your computer.
Visit http://localhost:7080 On your computer to view the app
Clean up
To remove the minikube cluster from your computer:
minikube stop

minikube delete --all