Terraform for homelab
Note: This post was updated 2025-10-15
Terraform is a tool for orchestrating infrastructure as code with human-readable configuration files. It can be used to create objects in the cloud and in the homelab. Similar to ansible, terraform abstracts various other APIs used to provision virtual machines, containers, or an entire public cloud ecosystem.
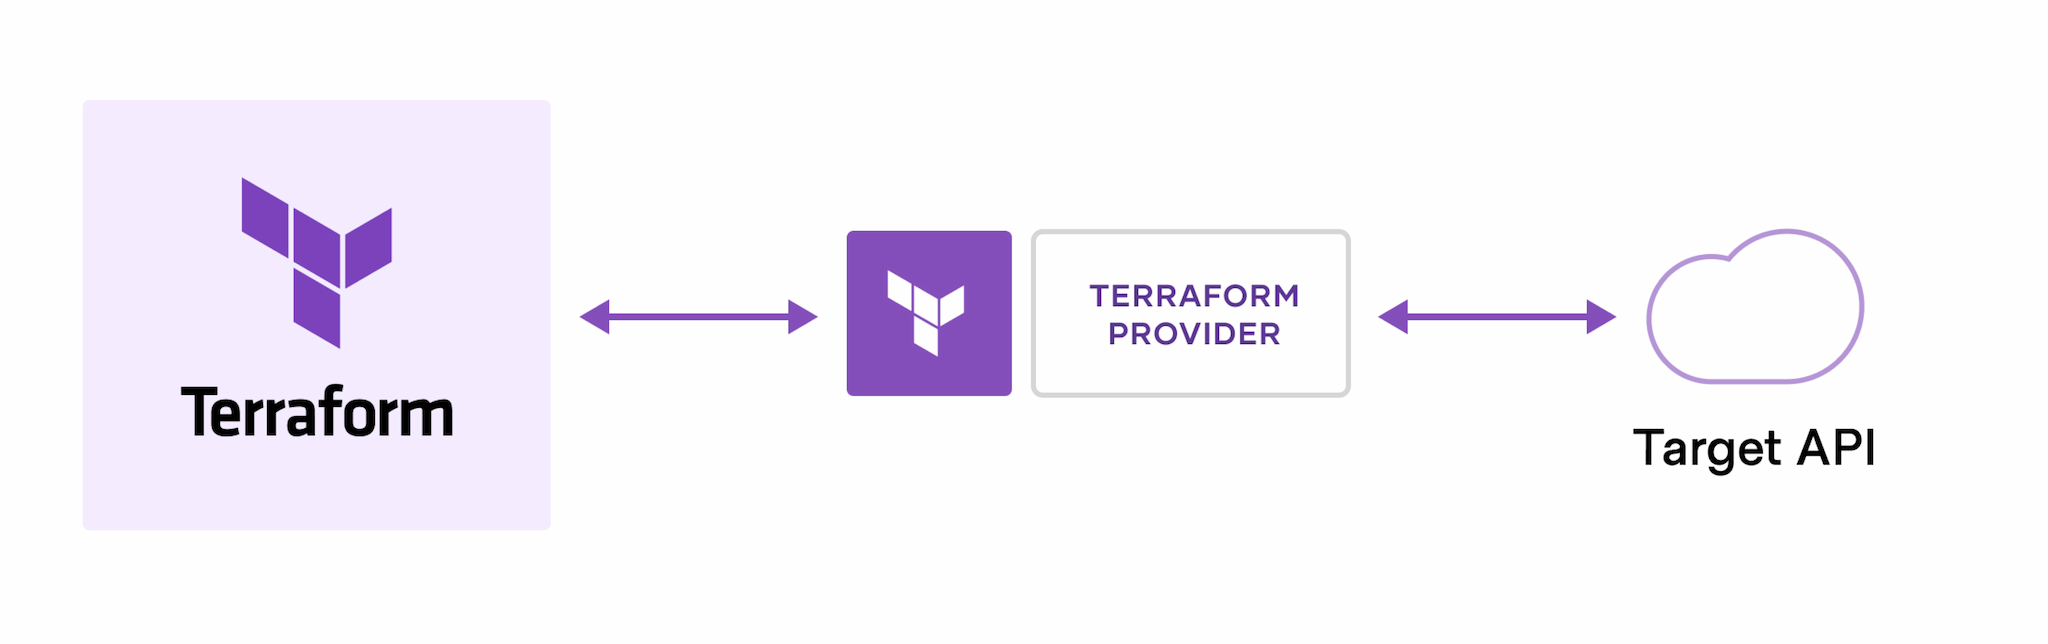
Terraform has an active community that contributes “providers” that interface with various resources and services. For example I will be switching my entire lab to using terraform. There are existing providers for the platforms that I use: Amazon Web Services, Docker, Kubernetes, github, proxmox, and likely more that I have yet to find.
The work-flow for terraform at the most basic level is three stages:
- Define resources in a configuration file.
- Use terraform program to create a
planwhich shows what actions terraform will perform. Terraform will either create, update, or destroy resources. - Use terraform program to
applyyour plan to the target API. The best part about this is for example you are creating a virtual machine in the cloud, but terraform will make sure to create network configurations before creating the virtual machine. Providers can include dependency logic for resources.
Terraform is now very popular in the software industry and is something that I get paid to write. In this post I will go over all the providers that I use in my homelab. This was a real game changer for managing my homelab. No more installation wizards!!!
Installation
The good news is that terraform is cross-platform and can run as a single binary executable file. You can download the compiled binary and directly run it on linux, macos, and windows systems. There are also package repositories for installing terraform on each of these platforms.
Manual install
On any platform, you can download the terraform binary and run it in a terminal.
https://www.terraform.io/downloads
macOS
On macOS, I use homebrew to install and update software. Terraform was removed due to licensing changes.
This post was updated 2025-10-15
You can install the tool tfenv to manage terraform versions on your machine. For example to install and use a certain version:
tfenv install 1.13.3
tfenv use 1.13.3
Check for the latest version before installing.
Windows
On windows, I suggest the chocolatey package manager. Check out a post on setting up windows if you are not familiar with chocolatey.
Install with chocolatey:
choco install terraform
Linux
The publishers of terraform have package repositories for the following distributions: Debian/Ubuntu, CentOS/RHEL, and Fedora. Check out the download link above for up to date commands to add terraform repo to your distro.
Here is an example to install the hashicorp repo on fedora:
sudo dnf install -y dnf-plugins-core
sudo dnf config-manager --add-repo https://rpm.releases.hashicorp.com/fedora/hashicorp.repo
sudo dnf -y install terraform
Also note that this repo includes other hashicorp tools such as packer.
Examples
Here are some examples of how I am using terraform demonstrating how to get started.
Verify that terraform works by running this in a terminal:
terraform --versionDocker
Terraform can be used to manage docker containers. If you are not familiar with containers, check out a previous post for the basics and how to get started. My previous posts include lots of applications that are deployed as containers. Those typically have been managed with docker-compose templates in yml format.
Terraform provides another way to manage containers. The reason to use terraform instead of docker-compose could be to unify your infrastructure as code. Rather than have a mess of shell scripts, .yml files, or relying on a gui, terraform can deploy containers and provide a source of truth for the state of your infrastructure.
For this first example, we can create a single terraform template file to start a simple web server container. In the file we must reference the provider that defines docker related resources.
terraform {
  required_providers {
    # This is the provider mentioned and recognizes docker resources
    docker = {
      source = "kreuzwerker/docker"
      version = "~> 2.13.0"
    }
  }
}

# Don't need to modify the provider settings
provider "docker" {}

# This is the container image from the public docker hub
resource "docker_image" "nginx" {
  name         = "nginx:latest"
  keep_locally = false
}

# This is the container that we want to run
# note that it references the image defined above, this is a taste of how powerful terraform becomes as you scale out.
resource "docker_container" "nginx" {
  image = docker_image.nginx.latest
  name  = "nginx-tf"
  ports {
    internal = 80
    external = 8000
  }
}
That is a very basic example that is equivalent of running:
docker run -d -p 8000:80 nginxOnce the file is created, the terraform init command is needed to download the configured docker provider.
terraform initYou should see ‘Terraform has been successfully initialized’ in the output.
Terraform can also format your resource files to clean up white space and indentation:
terraform fmtTerraform can validate the syntax of the files as well:
terraform validate
Success! The configuration is valid
And finally we tell terraform to apply the configuration. This command will create resources or verify that they are already running as configured.
terraform applyBefore terraform makes changes, the user is prompted with a summary of what changes terraform will make or it will inform the user that everything is up to date.
Terraform used the selected providers to generate the following execution
plan. Resource actions are indicated with the following symbols:
  + create

Terraform will perform the following actions:

  # docker_container.nginx will be created
  + resource "docker_container" "nginx" {
      + attach           = false
      + bridge           = (known after apply)
      + command          = (known after apply)
      + container_logs   = (known after apply)
      + entrypoint       = (known after apply)
      + env              = (known after apply)
      + exit_code        = (known after apply)
      + gateway          = (known after apply)
      + hostname         = (known after apply)
      + id               = (known after apply)
      + image            = (known after apply)
      + init             = (known after apply)
      + ip_address       = (known after apply)
      + ip_prefix_length = (known after apply)
      + ipc_mode         = (known after apply)
      + log_driver       = "json-file"
      + logs             = false
      + must_run         = true
      + name             = "nginx-tf"
      + network_data     = (known after apply)
      + read_only        = false
      + remove_volumes   = true
      + restart          = "no"
      + rm               = false
      + security_opts    = (known after apply)
      + shm_size         = (known after apply)
      + start            = true
      + stdin_open       = false
      + tty              = false

      + healthcheck {
          + interval     = (known after apply)
          + retries      = (known after apply)
          + start_period = (known after apply)
          + test         = (known after apply)
          + timeout      = (known after apply)
        }

      + labels {
          + label = (known after apply)
          + value = (known after apply)
        }

      + ports {
          + external = 8000
          + internal = 80
          + ip       = "0.0.0.0"
          + protocol = "tcp"
        }
    }

  # docker_image.nginx will be created
  + resource "docker_image" "nginx" {
      + id           = (known after apply)
      + keep_locally = false
      + latest       = (known after apply)
      + name         = "nginx:latest"
      + output       = (known after apply)
      + repo_digest  = (known after apply)
    }

Plan: 2 to add, 0 to change, 0 to destroy.

Do you want to perform these actions?
  Terraform will perform the actions described above.
  Only 'yes' will be accepted to approve.
The output should show ‘Apply complete!’
Verify the container is running with a docker command:
docker ps

CONTAINER ID   IMAGE          COMMAND                  CREATED          STATUS          PORTS                  NAMES
2d2df903f238   de2543b9436b   "/docker-entrypoint.…"   48 seconds ago   Up 47 seconds   0.0.0.0:8000->80/tcp   nginx-tf
After you apply the terraform configuration, a new file is generated in the working directory called terraform.tfstate this is a text file that includes metadata about the resources that you have created. This file is used by terraform to determine if new changes are needed. This file can be inspected in a text editor or by running:
terraform showProxmox
This post was updated 2025-10-15
Now for what excited me most, the proxmox provider. The proxmox provider can be used to create and manage virtual machines and lxc containers on proxmox systems. If you have a cluster of proxmox nodes, terraform can deploy to any of the nodes. If you are not familiar with proxmox and virtual machines, check out a previous post on how to set it up.
Unlike the docker provider, the proxmox provider needs credentials to access the proxmox API. I recommend using an API token and avoid putting passwords in terraform templates.
In order to better protect credentials, terraform variables can be used to keep credentials out of template files.
The provider that I use is: https://registry.terraform.io/providers/Telmate/proxmox/latest/docs
Create service account for terraform
The configuration of the permissions has changed over the past several years. Check the proxmox provider docs to see if the process has changed.
Log into the proxmox host terminal or GUI and then:
- Create a new
rolefor terraform - Create a new
userfor terraform - Bind the new user to the new role
- Create an API key and associate it with the new user
pveum role add TerraformProv -privs "Datastore.AllocateSpace Datastore.AllocateTemplate Datastore.Audit Pool.Allocate Sys.Audit Sys.Console Sys.Modify VM.Allocate VM.Audit VM.Clone VM.Config.CDROM VM.Config.Cloudinit VM.Config.CPU VM.Config.Disk VM.Config.HWType VM.Config.Memory VM.Config.Network VM.Config.Options VM.Migrate VM.PowerMgmt SDN.Use"
pveum user add terraform-prov@pve --password <password>
pveum aclmod / -user terraform-prov@pve -role TerraformProv
pveum user token add terraform-prov@pve tftoken
pveum user token modify 'terraform-prov@pve' 'tftoken' --privsep 0
The secret value of the token should be output and you need to save this value in an environment variable or the example Terraform below.
Check the token is still valid with this command: pveum user token list 'terraform-prov@pve'
Using the provider
Once a role has been created you can reference during Terraform execution or in a tfvars file. For example in a separate file:
vars.tfvars
proxmox_api_token_var = 'terraform-prov@pve!mytoken'
proxmox_api_token_secret_var = "secret"
Environment variables can also be used instead of storing the credentials in a file:
# use single quotes for the API token ID because of the exclamation mark
export PM_API_TOKEN_ID='terraform-prov@pve!mytoken'
export PM_API_TOKEN_SECRET="afcd8f45-acc1-4d0f-bb12-a70b0777ec11"
Configure the provider in your Terraform code with this block:
terraform {
  required_providers {
    proxmox = {
     source = "telmate/proxmox"
      version = "3.0.2-rc04"
    }
  }
}
provider "proxmox" {
  # URL of proxmox API where terraform commands should be executed. Append /api2/json to the hostname of your proxmox web client
  pm_api_url = var.proxmox_api_var
  # API token id
  pm_api_token_id = var.proxmox_api_token_var
  # This is the secret value of the api token
  pm_api_token_secret = var.proxmox_api_token_secret_var
}
I am using variables which you do not have to do, the values can be placed directly in the .tf files but I prefer keeping those values out of my git repo. Instead create both a variables.tf file and a vars.tfvars file.
variables.tf
variable "proxmox_api_var" {
  type    = string
  default = "api"
}
variable "proxmox_api_token_var" {
  type    = string
  default = "token"
}
variable "proxmox_api_token_secret_var" {
  type    = string
  default = "secret"
}
vars.tfvars
Example vars file but you need to use your own values from previous setup steps.
proxmox_api_var              = "https://proxmox.example.com/api2/json"
proxmox_api_token_var        = "terraform-prov@pve!tftoken"
proxmox_api_token_secret_var = "foo-bar-baz"
Create a new virtual machine with cloud-init
Proxmox supports cloud-init which makes cloning virtual machines easier. Cloud-init reads configuration data when the virtual machine boots for the first time. Proxmox can pass in enough data to get a working system without you having to step through an installation wizard. It also enables you to deploy many virtual machines at the same time.
Proxmox out of the box can configure the following options with cloud-init:
- User
- Password
- ssh keys
- DNS
- Static IP or DHCP
When using cloud init, the virtual machine will have a hostname that matches the name given to proxmox as well.
Ubuntu publishes new releases over time. Here is my latest post to set up an Ubuntu VM template in Proxmox that is compatible with cloud-init.
Deploy a virtual machine with terraform
The Proxmox provider has a resource to create and manage VMs: proxmox_vm_qemu.
To follow along with me, create a new .tf file with this resource and the provider config to create a new virtual machine in Proxmox:
vm.tf
resource "proxmox_vm_qemu" "example" {
  name        = "example"
  target_node = "your-proxmox-hostname-here"
  onboot      = true
  clone       = "noble-template"
  agent       = 1
  os_type     = "cloud-init"
  qemu_os     = "l26"
  cores       = 2
  sockets     = 1
  cpu_type    = "host"
  memory      = 8192
  boot        = "order=scsi0"
  scsihw      = "virtio-scsi-pci"
  disks {
    ide {
      ide3 {
        cloudinit {
          storage = "local-lvm"
        }
      }
    }
    scsi {
      scsi0 {
        disk {
          size    = 100
          storage = "local-lvm"
        }
      }
    }
  }
  network {
    id     = 0
    model  = "virtio"
    bridge = "vmbr0"
  }
  lifecycle {
    ignore_changes = [
      network,
    ]
  }
  ipconfig0 = "ip=10.0.0.2/24,gw=10.0.0.1"
  sshkeys   = <<EOF
    ${var.ssh_key}
    EOF
  serial {
    id   = 0
    type = "socket"
  }
  vga {
    type = "serial0"
  }
}
Note: you can update the
ipconfig0to either use Terraform vars for the IPs or replace them with valid values for your environment. You can also use DHCP but for servers I prefer static IPs. My example is also assuming you followed my previous post linked above to create a “noble-template” cloud-init VM template that we can use here.
A couple notes here from my example, you need to have a valid ssh public key in the Terraform var ssh_key. Add this to variables.tf You also need to ensure the value of target-node matches the name of your Proxmox host.
Once the Terraform files are ready, there are a few commands like above with the Docker example to apply our code:
terraform initYou should see output like this:
Initializing the backend...
Initializing provider plugins...
- Finding telmate/proxmox versions matching "3.0.2-rc04"...
- Installing telmate/proxmox v3.0.2-rc04...
- Installed telmate/proxmox v3.0.2-rc04 (self-signed, key ID A9EBBE091B35AFCE)
Partner and community providers are signed by their developers.
If you'd like to know more about provider signing, you can read about it here:
https://developer.hashicorp.com/terraform/cli/plugins/signing
Terraform has created a lock file .terraform.lock.hcl to record the provider
selections it made above. Include this file in your version control repository
so that Terraform can guarantee to make the same selections by default when
you run "terraform init" in the future.

Terraform has been successfully initialized!
This command will create resources or verify that they are already running as configured.
terraform applyEnter “yes” when prompted to apply the terraform plan. You should see output similar to this:
proxmox_vm_qemu.example: Creating...
proxmox_vm_qemu.example: Still creating... [00m10s elapsed]
proxmox_vm_qemu.example: Still creating... [00m20s elapsed]
proxmox_vm_qemu.example: Still creating... [00m30s elapsed]
proxmox_vm_qemu.example: Still creating... [00m40s elapsed]
proxmox_vm_qemu.example: Still creating... [00m50s elapsed]
proxmox_vm_qemu.example: Creation complete after 53s [id=proxmox/qemu/101]

Apply complete! Resources: 1 added, 0 changed, 0 destroyed.
Next steps
Additional configuration options are included with the providers, check out the documentation:
Terraform has made it easier for me to create vms to test new software and also makes it easy to clean up after testing is complete.
Clean up
Any resources deployed with terraform can be removed with the command:
terraform destroy