Homelab, 2024 stage 3 Servers
The next phase of my homelab is setting up Servers or rather computers where I can store data and run software applications. Once a network is configured, many computers can be connected together and exchange data between themselves and other networks like the Internet.
Server systems
I will be using computer hardware that is mostly from used consumer systems. This is not ideal for a “server” system that runs 24/7 however the power consumption of consumer computers is typically much lower than enterprise grade servers.
The unreliability of consumer hardware can be compensated with by redundancy and system backup procedures.
Critical servers
I define critical servers as those that host DNS servers. DNS can be provided by the gateway/router but there is some awesome open-source software out there that provides better security around DNS along with network-wide blocking of malware and advertisements. It can also block all of the telemetry your devices are attempting to send back to their manufacturers (“smart” devices usually transmit usage statistics back to the manufacturer).
“Critical” servers will run 24/7 so I opt for the lowest power usage devices that I own which in my case is 2 Raspberry Pi devices.
- Raspberry Pi 3 will provide DNS primarily as well as a NGINX web server/proxy to redirect HTTP traffic.
- Raspberry Pi 4 will run identical services to ensure DNS will be available if the other Pi is offline. This Pi will also run a Wireguard VPN server since it has more memory.
If you are not familiar with the Raspberry Pi, check out a previous post that walks through how to set one up. There is also a post talking about how to use NGINX as a proxy.
Network storage server
After DNS is configured, I need a server to store data ranging from documents, media files, to large backup archive files. This system is also critical and will provide shared storage for all of the other servers.
At this time I have 5 8 TB hard drives to serve as my primary data storage. These drives will be configured in a redundant array (RAID6) which allows the drives to act as a single pool of storage while allowing for 2 drives to completely fail without losing data. Here is a summary of the performance and fault tolerance of this configuration:
- Raw capacity: 40TB
- Usable capacity: 24TB
- Fault tolerance: 2 disks
- Read speed multiplier: 3x
- Write speed multiplier: 1x
As you can see, we are sacrificing 16 TB of capacity in order to provide fault tolerance and a 3x boost to read speeds. The read speed is nice but I am more concerned with fault tolerance.
Backup storage
Redundant disks is not sufficient for backing up important data so I will be running an additional storage server that is dedicated to backups. The primary storage server will be configured with a cron job to compress and transfer data archives to the backup server every night. These archives will include personal data and at least 2 full backup images for each server along with snapshot backups from the past 14 days. I used to have a shorter backup retention period but at least twice in the past decade I have run into bad RAM that corrupts backups and sometimes I don’t check my systems every week if everything has been running normally.
In addition to automated backups, once a month I backup the backups to a 14 TB external storage that I keep disconnected and in a fire proof safe. I also plan to start backing up my personal data to the cloud in encrypted archives.
That would satisfy what I have heard as the 3-2-1 rule for backups.
3 copies of your data on 2 different storage mediums and 1 of those copies should be off-site (cloud for me).
I understand reservations with uploading personal data into the cloud but at this time there are still encryption algorithms that have not been “cracked” meaning that if you encrypt your backups with a secure passphrase, no one will be able to decrypt the data even if they do infiltrate the cloud service.
I used to run smaller disks in my backup storage server but I do not want to manage the mental overhead of wondering when I am going to run out of backup storage space. The plan is to run the same storage configuration as the primary storage server.
VM hosts
In addition to storage, the other servers I will set up are for running virtual machines (VMs). If you are not familiar with VMs, check out a previous post for an introduction to the topic. In essence they provide a way for me to quickly provision new servers on the same hardware and back up data from those servers easily. All additional servers will run Proxmox as the Operating System.
Proxmox
Proxmox is an open-source virtualization management platform that combines the capabilities of both virtualization and containerization technologies. It allows users to create and manage virtual machines (VMs), containers, and virtualized networks from a single interface and API. Proxmox utilizes KVM (Kernel-based Virtual Machine) for virtualization and LXC (Linux Containers) for lightweight containerization, providing flexibility and scalability to meet various computing needs. If you are not familiar with Proxmox, check out a previous post to get started and try it out.
Proxmox cluster
Creating a cluster of servers using Proxmox involves pooling together multiple physical servers to work as a unified infrastructure. This clustering approach enhances resource utilization, ensures high availability, and simplifies management tasks such as workload distribution and failover.
To create a Proxmox cluster, you first need to install Proxmox VE on each physical server that you intend to include in the cluster. Once installed, you configure networking settings to ensure that all servers can communicate with each other reliably. This typically involves assigning static IP addresses and configuring DNS settings to ensure proper name resolution.
Next, you configure “storage” to enable seamless data access across all servers in the cluster. Proxmox supports various storage options, including local storage on a disk (hard drive or SSD), NFS (Network File System), iSCSI (Internet Small Computer System Interface), and Ceph storage. Shared storage is crucial for facilitating live migrations of VMs and ensuring data redundancy. Shared storage is not required to create a cluster but makes configuring High Availability possible for running virtual machines.
After setting up networking and storage, you can proceed to create the cluster itself. In Proxmox, clustering is achieved by adding additional servers as “Nodes” to the cluster. This can be done through the Proxmox web interface by specifying the IP address or hostname of each server and providing authentication credentials.
Once the cluster is formed, you can start distributing virtual machines and containers across nodes. Proxmox offers features such as live migration and high availability, allowing VMs to be seamlessly moved between nodes without downtime in case of server failures or maintenance activities.
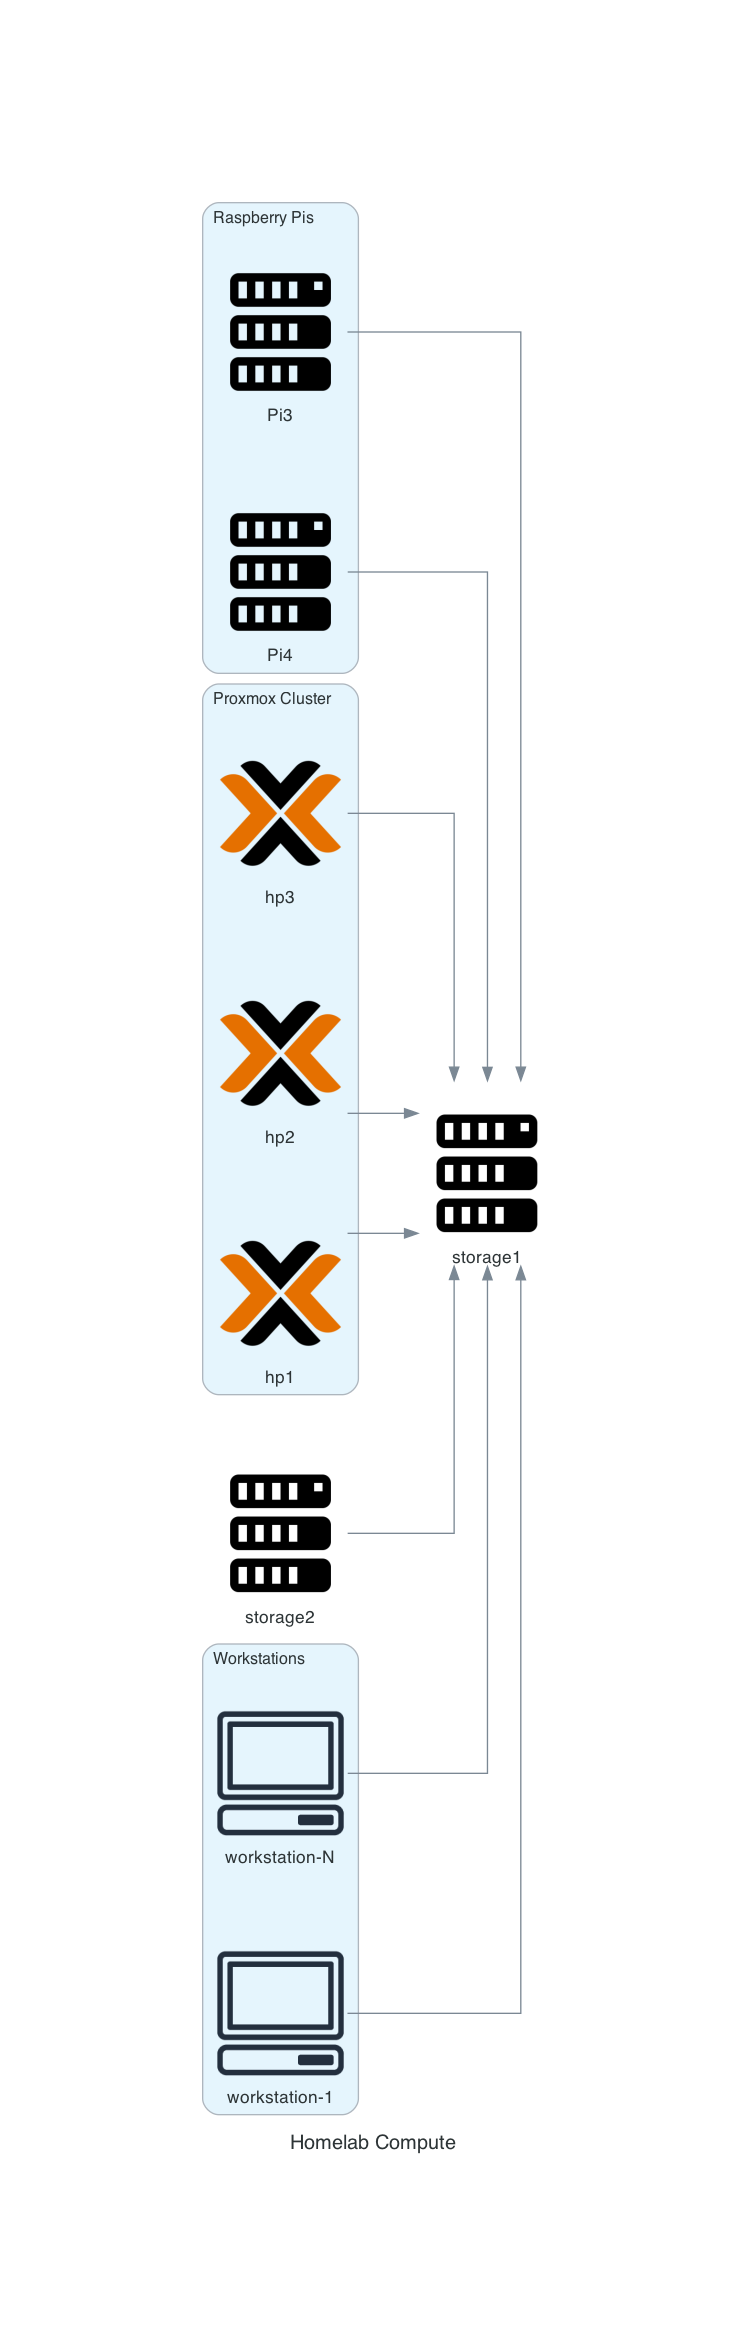
Diagram
This diagram shows the planned computers for the homelab.