WireGuard on an Ubuntu 26.04 VM

In 2021 I set up a homelab VPN with WireGuard using the LinuxServer Docker image. Most recently that container ran on alpha, a Raspberry Pi. When I retired the Pi, I moved WireGuard to a dedicated Ubuntu 26.04 VM and ran it natively, with no Docker.
WireGuard is built into the Linux kernel, and Ubuntu packages the tools to manage it. A native install has fewer moving parts than the container: one config file, one systemd unit, and a couple of firewall rules. I like simple.
This post walks through the setup. If you are wondering why you would use a Wireguard VPN, once you have something running on your network at home you may want to access that when you are not at home. A VPN let’s you tunnel back into your network from any other network like Celluar or someone else’s Wi-fi. The addresses and names below are examples, not my real network:
| Example value | Meaning |
|---|---|
192.168.10.0/24 |
The LAN the VPN gives access to |
192.168.10.6 |
The WireGuard VM |
192.168.10.53, .54 |
DNS servers on the LAN (AdGuard, in my case) |
10.8.0.0/24 |
The tunnel network; the server is 10.8.0.1 |
vpn.example.com:51820 |
The public name and UDP port clients connect to |
New setup

- The client looks up
vpn.example.comand sends encrypted UDP to port51820, which the router forwards to the VM. - The kernel’s WireGuard interface,
wg0, decrypts the packets. The server’s tunnel address is10.8.0.1. - DNS queries to
10.8.0.1go tosystemd-resolvedon the VM, which forwards them to the LAN DNS servers. - Other traffic is routed onto the LAN with its source NATed to
192.168.10.6.
The diagram source is wireguard-ubuntu-vm.d2.
New VM
WireGuard needs very little hardware. My VM has 1 vCPU, 1 GB of RAM, and an 8 GB disk, and stays nearly idle. I cloned it from my Ubuntu 26.04 Proxmox template with a static IP.
To follow along you also need:
- A port forward on your router: UDP
51820to the VM. - A public DNS name for your home IP, so clients don’t break when it changes. I use an A record in Route 53.
Install and enable forwarding
sudo apt update
sudo apt install wireguard-tools
The VM routes traffic between the tunnel and the LAN, so turn on IPv4 forwarding and make it persistent across reboots:
echo 'net.ipv4.ip_forward = 1' | sudo tee /etc/sysctl.d/99-wireguard.conf
sudo sysctl --system
Server keys and config
To set up a server you need to generate keys for the server and for each client(device) you want to connect.
Generate the server’s key pair. umask 077 keeps the private key readable only by root:
sudo -i
umask 077
wg genkey | tee /etc/wireguard/server.key | wg pubkey > /etc/wireguard/server.pub
cat /etc/wireguard/server.pub
Then create /etc/wireguard/wg0.conf:
[Interface]
Address = 10.8.0.1/24
ListenPort = 51820
PrivateKey = <contents of server.key>
PostUp = iptables -A FORWARD -i %i -o eth0 -j ACCEPT; iptables -A FORWARD -i eth0 -o %i -j ACCEPT; iptables -t nat -A POSTROUTING -s 10.8.0.0/24 -o eth0 -j MASQUERADE
PostDown = iptables -D FORWARD -i %i -o eth0 -j ACCEPT; iptables -D FORWARD -i eth0 -o %i -j ACCEPT; iptables -t nat -D POSTROUTING -s 10.8.0.0/24 -o eth0 -j MASQUERADE%iexpands to the interface name,wg0.- Replace
eth0with your VM’s LAN interface (ip -br ashows it). MASQUERADErewrites traffic from VPN clients to the VM’s own LAN address. LAN services see VPN clients as the WireGuard VM, so nothing on the LAN needs a route back to10.8.0.0/24.PostDownremoves exactly the rulesPostUpadded, so restarting the tunnel doesn’t stack duplicates.
The file holds a private key, so lock it down: chmod 600 /etc/wireguard/wg0.conf.
Use iptables, not nft
My first PostUp hook used nft, and the tunnel wouldn’t start. Ubuntu 26.04’s AppArmor profile for wg-quick includes a wg-quick//nft sub-profile that blocks nft from accessing /etc/wireguard. iptables avoids that profile and uses iptables-nft underneath anyway, so the rules still land in nftables. If a hook fails for you, check journalctl -k | grep -i apparmor.
DNS for VPN clients
I want VPN clients to use my LAN DNS, so they get my ad blocking and can resolve local names. You could point clients straight at the LAN DNS servers, but I let the VM answer on its tunnel address. systemd-resolved is already running on Ubuntu and can listen on an extra address.
Create /etc/systemd/resolved.conf.d/wireguard.conf:
[Resolve]
DNS=192.168.10.53 192.168.10.54
DNSStubListenerExtra=10.8.0.1
Then sudo systemctl restart systemd-resolved. Clients use DNS = 10.8.0.1, and resolved forwards their queries to the LAN servers.
10.8.0.1exists only whilewg0is up. On my VM,resolvedpicked up the listener after a reboot without any extra ordering, but checkss -ulnp | grep 10.8.0.1:53if clients can’t resolve.- On a cloud-init VM, netplan can re-add the cloud-init DNS servers as per-interface resolvers. I clear them with a networkd drop-in file at
/etc/systemd/network/10-netplan-eth0.network.d/dns-override.confcontaining[Network]andDNS=, soresolveduses onlyresolved.conf.d.
Start the server
sudo systemctl enable --now wg-quick@wg0
sudo wg show
ss -ulnp | grep -E '51820|10\.8\.0\.1:53'
wg show should list the interface with its public key and listening port. There are no peers until you connect something.
Add a peer
Each client gets its own key pair, a preshared key for an extra layer of symmetric encryption, and a /32 in the tunnel network. I generate the client’s keys on the server in a temporary directory, copy the config to the device, and then delete the private key from the server.
sudo -i
umask 077; d=$(mktemp -d); cd "$d"
wg genkey | tee client.key | wg pubkey > client.pub
wg genpsk > client.psk

cat >> /etc/wireguard/wg0.conf <<EOF

[Peer]
# laptop
PublicKey = $(cat client.pub)
PresharedKey = $(cat client.psk)
AllowedIPs = 10.8.0.2/32
EOF
The # laptop comment is just there as a comment, since wg show lists peers only by public key. My monitoring script uses it as the peer’s label.
Apply the change by restarting the unit (which drops connected peers for a few seconds if you are adding multiple), or reload in place with wg syncconf (which I haven’t tested under Ubuntu 26.04’s AppArmor profile yet):
systemctl restart wg-quick@wg0
# or, to reload without dropping peers:
wg syncconf wg0 <(wg-quick strip wg0)
Now write the client’s config:
cat > client.conf <<EOF
[Interface]
PrivateKey = $(cat client.key)
Address = 10.8.0.2/32
DNS = 10.8.0.1

[Peer]
PublicKey = $(cat /etc/wireguard/server.pub)
PresharedKey = $(cat client.psk)
Endpoint = vpn.example.com:51820
AllowedIPs = 0.0.0.0/0
EOF
AllowedIPs = 0.0.0.0/0is a full tunnel: all of the client’s traffic goes through your home connection. For LAN access only, list just the tunnel and LAN networks, e.g.AllowedIPs = 10.8.0.0/24, 192.168.10.0/24.- Add
PersistentKeepalive = 25if the client needs to stay reachable while idle, or sits behind a strict NAT.
To get the config onto a phone, show it as a QR code and scan it in the WireGuard app:
apt install qrencode
qrencode -t ansiutf8 < client.conf
For a Linux laptop, copy client.conf to /etc/wireguard/ and run wg-quick up client.
On other OS’s use the wireguard app and import the client.conf file.
Finally, delete the temporary directory (wg0.conf already has the client’s public and preshared keys, and the server doesn’t need the private key):
cd /; shred -u "$d"/*; rmdir "$d"To remove a peer later, delete its
[Peer]block and apply the config again. A removed key can’t connect, even if the device still has its config.
Check that it works
From a connected client:
ping 10.8.0.1                       # tunnel is up
dig @10.8.0.1 example.com           # DNS through the VM
curl -sI http://192.168.10.1        # something on the LAN
On the server, wg show should show a recent latest handshake and growing transfer totals for the peer.
Troubleshooting
| Symptom | What to check |
|---|---|
| No handshake | The router’s UDP port forward, the public DNS name, and ss -ulnp | grep 51820 on the VM |
| Handshake, but no LAN access | sysctl net.ipv4.ip_forward must be 1, and iptables -S FORWARD and iptables -t nat -S must show the PostUp rules |
| Handshake, but no DNS | ss -ulnp | grep 10.8.0.1:53 and resolvectl status on the VM |
wg-quick@wg0 fails to start |
journalctl -u wg-quick@wg0, and AppArmor denials in journalctl -k |
Monitoring and backups
The VM runs Grafana Alloy for host metrics and logs, plus a small script that exports per-peer handshake times and traffic totals from wg show wg0 dump (covered in Monitoring Proxmox hosts with Grafana Alloy). Here is a Grafana dashboard built from those metrics, covering 12 hours:
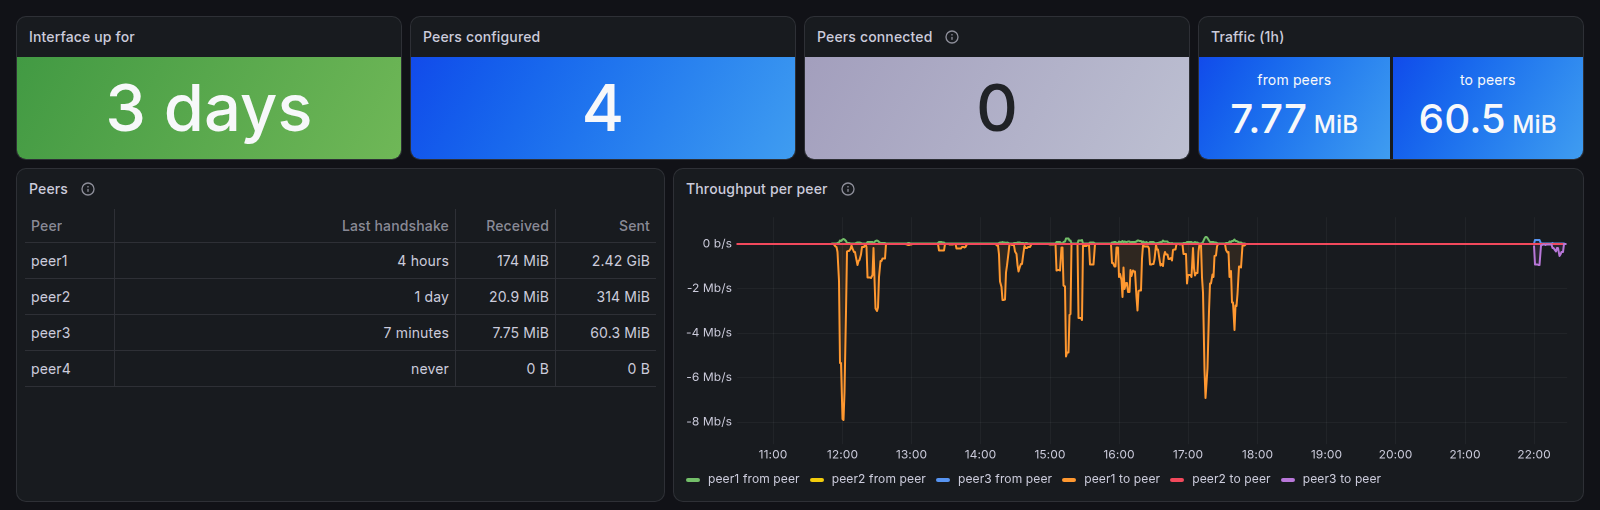
“Peers connected” counts peers with a handshake in the last three minutes. WireGuard has no connection state: peers handshake again only while there is traffic to send, and none of my clients use PersistentKeepalive, so an idle device drops out of that count even while its tunnel is switched on.
Back up /etc/wireguard. It holds the server’s private key, and if you lose it, every client config needs the new server public key. I reused my old server key when I moved off the Docker container, so none of my clients had to change anything.